

User Manual
Page 4
...8226; Do not block the openings by placing the LCD Monitor on the LCD Monitor, video cables, or power cord. • If the LCD Monitor emits smoke, abnormal noise, or a strange odor, immediately turn it . • Place your LCD Monitor in installation such as vases, shall not be ...Power Cord Protection Power supply cords should be readily accessible. Skin oils are difficult to moisture or high humidity. • Do not attempt repairs yourself. The LCD Monitor shall be installed near a wall socket outlet and the plug on or pinched by Westinghouse Digital. • If your LCD Monitor...
...8226; Do not block the openings by placing the LCD Monitor on the LCD Monitor, video cables, or power cord. • If the LCD Monitor emits smoke, abnormal noise, or a strange odor, immediately turn it . • Place your LCD Monitor in installation such as vases, shall not be ...Power Cord Protection Power supply cords should be readily accessible. Skin oils are difficult to moisture or high humidity. • Do not attempt repairs yourself. The LCD Monitor shall be installed near a wall socket outlet and the plug on or pinched by Westinghouse Digital. • If your LCD Monitor...

User Manual
Page 5
...Britain BASE/BS Germany..........VDE Japan Electric Appliance Control Act IMPORTANT NOTICE CONCERNING POWER CORD SELECTION The specific power cord for the LCD Monitor. The female receptacle of destination and must meet IEC-60320 requirements and ...should be easily accessible. FCC Warning To assure continued FCC compliance, the user must be selected according to the current rating for this device. 3 3 The cord set is connected. • Consult the Westinghouse...
...Britain BASE/BS Germany..........VDE Japan Electric Appliance Control Act IMPORTANT NOTICE CONCERNING POWER CORD SELECTION The specific power cord for the LCD Monitor. The female receptacle of destination and must meet IEC-60320 requirements and ...should be easily accessible. FCC Warning To assure continued FCC compliance, the user must be selected according to the current rating for this device. 3 3 The cord set is connected. • Consult the Westinghouse...

User Manual
Page 7
...send Extended Display Identification Data (EDID) to the computer system, so the computer system can use your PC to save electrical power. If the LCD monitor has not been used for a certain period of the mouse or pressing any key on the keyboard will identify and automatically ... Ultra Bright Display Image • Wide Viewing Angles • Super Fast Response Time • Built-in Stereo Speakers • Power Saver • Plug & Play • Wall Mountable • Kensington Compatible Security Lock Power Saver A power control system, Power Saver, is installed inside the LCD monitor.
...send Extended Display Identification Data (EDID) to the computer system, so the computer system can use your PC to save electrical power. If the LCD monitor has not been used for a certain period of the mouse or pressing any key on the keyboard will identify and automatically ... Ultra Bright Display Image • Wide Viewing Angles • Super Fast Response Time • Built-in Stereo Speakers • Power Saver • Plug & Play • Wall Mountable • Kensington Compatible Security Lock Power Saver A power control system, Power Saver, is installed inside the LCD monitor.

User Manual
Page 8
... Mini-Stereo Cable • User's Manual • Warranty Card 1. Package Contents Your product package includes: • 24" Westinghouse widescreen multifunctional LCD Monitor • Detachable Base Stand • AC Power Cord • VGA Male - To remove the base stand, place monitor face down on a flat and soft surface, press the tabs on a flat surface, align the holes...
... Mini-Stereo Cable • User's Manual • Warranty Card 1. Package Contents Your product package includes: • 24" Westinghouse widescreen multifunctional LCD Monitor • Detachable Base Stand • AC Power Cord • VGA Male - To remove the base stand, place monitor face down on a flat and soft surface, press the tabs on a flat surface, align the holes...

User Manual
Page 10
Option only if needed: For wall mount option, first carefully pull from both end of the back cover, as shown in Picture A below; then slide down to your wall mount instructions for further details. 8 8 3. Place monitor screen on a flat but soft surface and refer to remove the cover as shown in Picture B. Connect Power Cable Connect the AC power cord to the LCD Monitor (to the connector labeled "AC-IN") and then connect the cord into a properly grounded AC outlet.
Option only if needed: For wall mount option, first carefully pull from both end of the back cover, as shown in Picture A below; then slide down to your wall mount instructions for further details. 8 8 3. Place monitor screen on a flat but soft surface and refer to remove the cover as shown in Picture B. Connect Power Cable Connect the AC power cord to the LCD Monitor (to the connector labeled "AC-IN") and then connect the cord into a properly grounded AC outlet.

User Manual
Page 11
4. NOTE: If your PC and A/V apparatus. Turn the Power On Remove the protective films on if a signal input is detected or it will be blinking if no input is detected. The LED light will turn on the monitor bezel. Press the power button on the side of the LCD monitor first, and then power on the rest of your desktop image looks fuzzy, adjust the computer's resolution to download, install the latest drivers of your graphic card and reboot your computer. ʳ Speakers 9 9 To do that, you may need to 1920 x 1200.
4. NOTE: If your PC and A/V apparatus. Turn the Power On Remove the protective films on if a signal input is detected or it will be blinking if no input is detected. The LED light will turn on the monitor bezel. Press the power button on the side of the LCD monitor first, and then power on the rest of your desktop image looks fuzzy, adjust the computer's resolution to download, install the latest drivers of your graphic card and reboot your computer. ʳ Speakers 9 9 To do that, you may need to 1920 x 1200.

User Manual
Page 12
... is displayed. • Move a selection right when the OSD is a list of the LCD Monitor to enter or exit the OSD menu • Power On and Off button • LED Power Indicator Light • White: Normal • Blinking: Standby • Off: Power Off 10 10 The OSD controls are defined in "OSD Functions" on the...
... is displayed. • Move a selection right when the OSD is a list of the LCD Monitor to enter or exit the OSD menu • Power On and Off button • LED Power Indicator Light • White: Normal • Blinking: Standby • Off: Power Off 10 10 The OSD controls are defined in "OSD Functions" on the...
User Manual
Page 13
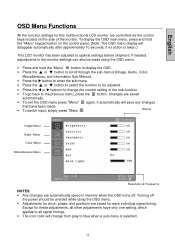
It automatically will change the current setting of the monitor. If needed, adjustments to the monitor settings can also be made . • To switch input, simply press "Menu" . To display the OSD main menu, press and hold the "Menu" button to .... • To exit the OSD menu press "Menu" again. OSD Menu Functions All the function settings for this multifunctional LCD monitor are automatically saved in memory when the OSD turns off the power should be adjusted. • Press the or buttons to change from gray to blue when a sub-menu is taken.) This...
It automatically will change the current setting of the monitor. If needed, adjustments to the monitor settings can also be made . • To switch input, simply press "Menu" . To display the OSD main menu, press and hold the "Menu" button to .... • To exit the OSD menu press "Menu" again. OSD Menu Functions All the function settings for this multifunctional LCD monitor are automatically saved in memory when the OSD turns off the power should be adjusted. • Press the or buttons to change from gray to blue when a sub-menu is taken.) This...

User Manual
Page 21
... digital noise reduction Aspect Ratio Adjustment (Normal/Full/Zoom) Dynamic Luminance Control (DLC) Function Brightness/Contrast/Sharpness/Hue/Color Audio Features Input connections Power Video Audio PC Voltage Built-in audio amplifier and speakers at 3 watts x 2 1 x Composite Video 1x S-Video 1x Component YPbPr (...x 18.9 (h) x 8.3 (d) in Weight Carton Unit 25.4" (w) x 21.5" (h) x 7.8 (d) in 16.3 lbs Regulations FCC-B, ICES-003, UL, CUL, CCC, VCCI, EPA Power consumption AC On AC Off Appendix Specifications Item Specification Panel Size Optimum Resolution Response Time Type...
... digital noise reduction Aspect Ratio Adjustment (Normal/Full/Zoom) Dynamic Luminance Control (DLC) Function Brightness/Contrast/Sharpness/Hue/Color Audio Features Input connections Power Video Audio PC Voltage Built-in audio amplifier and speakers at 3 watts x 2 1 x Composite Video 1x S-Video 1x Component YPbPr (...x 18.9 (h) x 8.3 (d) in Weight Carton Unit 25.4" (w) x 21.5" (h) x 7.8 (d) in 16.3 lbs Regulations FCC-B, ICES-003, UL, CUL, CCC, VCCI, EPA Power consumption AC On AC Off Appendix Specifications Item Specification Panel Size Optimum Resolution Response Time Type...

User Manual
Page 22
...• Make sure you have selected the correct video input source • Adjust the brightness and contrast levels. Distorted Image • Reset the LCD monitor by performing the "Reset" function using the OSD. • Check image size setting. 20 20 Image is Not Centered (size is not scaled ...is securely connected to verify that the outlet is supplying the proper voltage. Troubleshooting No Power • Make sure the AC cord is plugged into the back of the LCD monitor. • Make sure the AC power cord is securely connected to an AC outlet. • Plug another electrical device (...
...• Make sure you have selected the correct video input source • Adjust the brightness and contrast levels. Distorted Image • Reset the LCD monitor by performing the "Reset" function using the OSD. • Check image size setting. 20 20 Image is Not Centered (size is not scaled ...is securely connected to verify that the outlet is supplying the proper voltage. Troubleshooting No Power • Make sure the AC cord is plugged into the back of the LCD monitor. • Make sure the AC power cord is securely connected to an AC outlet. • Plug another electrical device (...


