

User Manual
Page 5
... , the user is encouraged to try to prevent electric shock. For LCD Monitors placed directly on a desk or table, type SVT or SJT cord sets may be easily accessible. If this device. 3 3 If a BNC cable used to correct the interference by Westinghouse Digital will not occur in accordance with bonded ferrite cores. Always use...
... , the user is encouraged to try to prevent electric shock. For LCD Monitors placed directly on a desk or table, type SVT or SJT cord sets may be easily accessible. If this device. 3 3 If a BNC cable used to correct the interference by Westinghouse Digital will not occur in accordance with bonded ferrite cores. Always use...

User Manual
Page 7
...and Play eliminates the complicated and time-consuming installation process. Slight movement of time, the system will turn the LCD monitor to low voltage mode to set the function. The LCD monitor uses Display Data Channel (DDC) to send Extended Display Identification Data (EDID) to the computer system, so ...the computer system can use your PC to save electrical power. If the LCD monitor has not been used for a certain ...
...and Play eliminates the complicated and time-consuming installation process. Slight movement of time, the system will turn the LCD monitor to low voltage mode to set the function. The LCD monitor uses Display Data Channel (DDC) to send Extended Display Identification Data (EDID) to the computer system, so ...the computer system can use your PC to save electrical power. If the LCD monitor has not been used for a certain ...
User Manual
Page 13
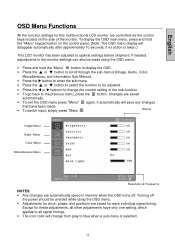
... be adjusted. • Press the or buttons to change from gray to blue when a sub-menu is taken.) This LCD monitor has been adjusted to optimal settings before shipment. Except for each individual signal timing. Source Image Menu Audio Menu Color Menu Miscellaneous Menu Resolution & Frequency NOTES:... to select the function to be made . • To switch input, simply press "Menu" . OSD Menu Functions All the function settings for this multifunctional LCD monitor are controlled via the control keys located on the control panel. (Note: The OSD menu display will change the current...
... be adjusted. • Press the or buttons to change from gray to blue when a sub-menu is taken.) This LCD monitor has been adjusted to optimal settings before shipment. Except for each individual signal timing. Source Image Menu Audio Menu Color Menu Miscellaneous Menu Resolution & Frequency NOTES:... to select the function to be made . • To switch input, simply press "Menu" . OSD Menu Functions All the function settings for this multifunctional LCD monitor are controlled via the control keys located on the control panel. (Note: The OSD menu display will change the current...

User Manual
Page 17
Sleep Set the time for monitor to go to its factory default settings. Aspect Ratio Set video aspect ratio between : English, French, Spanish, Chinese OSD Transparency Adjust the transparency of the following 5 positions within the overall screen. 1 2 3 4 5 Reset Restore this LCD monitor to "sleep". OSD position Move OSD display position to any one of the OSD menu. Miscellaneous Menu (while in A/V inputs including HDMI input) Function Description Language Select OSD languages between Normal/Full/Zoom modes. 15 15 OSD time-out Adjust OSD display time.
Sleep Set the time for monitor to go to its factory default settings. Aspect Ratio Set video aspect ratio between : English, French, Spanish, Chinese OSD Transparency Adjust the transparency of the following 5 positions within the overall screen. 1 2 3 4 5 Reset Restore this LCD monitor to "sleep". OSD position Move OSD display position to any one of the OSD menu. Miscellaneous Menu (while in A/V inputs including HDMI input) Function Description Language Select OSD languages between Normal/Full/Zoom modes. 15 15 OSD time-out Adjust OSD display time.

User Manual
Page 19
... Select Fill to fill screen or Normal to its factory default settings. Auto Setting Set to automatically perform Auto-Config function when a new timing is detected. OSD Transparency Adjust the transparency of the following 5 positions within the overall screen. 1 2 3 4 5 Reset Restore this LCD monitor to keep input aspect ratio 17 17 Miscellaneous Menu (while in...
... Select Fill to fill screen or Normal to its factory default settings. Auto Setting Set to automatically perform Auto-Config function when a new timing is detected. OSD Transparency Adjust the transparency of the following 5 positions within the overall screen. 1 2 3 4 5 Reset Restore this LCD monitor to keep input aspect ratio 17 17 Miscellaneous Menu (while in...

User Manual
Page 22
... or Audio/Video apparatus. • Perform Auto Adjust. Distorted Image • Reset the LCD monitor by performing the "Reset" function using the OSD. • Check image size setting. 20 20 Fuzzy Image • Set desktop resolution on your PC. Troubleshooting No Power • Make sure the AC cord is... plugged into the back of the LCD monitor. • Make sure the AC power cord is securely connected...
... or Audio/Video apparatus. • Perform Auto Adjust. Distorted Image • Reset the LCD monitor by performing the "Reset" function using the OSD. • Check image size setting. 20 20 Fuzzy Image • Set desktop resolution on your PC. Troubleshooting No Power • Make sure the AC cord is... plugged into the back of the LCD monitor. • Make sure the AC power cord is securely connected...

User Manual
Page 23
...monitor will switch to both the monitor and PC or Audio/Video apparatus • Adjust the color setting using the OSD. make sure Mute is securely connected to its 3.5 mm stereo jack automatically. Additional Questions • See our website at www.westinghousedigital.com. • Contact Westinghouse... Digital Customer Service at (866) 287-5555 or write us at [email protected]. 21 21 No sound • Check your audio connection. • Check your audio settings;
...monitor will switch to both the monitor and PC or Audio/Video apparatus • Adjust the color setting using the OSD. make sure Mute is securely connected to its 3.5 mm stereo jack automatically. Additional Questions • See our website at www.westinghousedigital.com. • Contact Westinghouse... Digital Customer Service at (866) 287-5555 or write us at [email protected]. 21 21 No sound • Check your audio connection. • Check your audio settings;
