
User Manual
Page 7
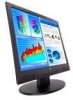
Male Stereo Audio Cable • User's Manual • Warranty Card 5 Male Cable • 3.5 mm Male - English INSTALLATION Congratulations on your purchase of a Westinghouse 19" LCD Monitor. Sleek and practical, this lightweight and wall-mountable LCD monitor delivers a crisp and clear display optimized for 1280 x 1024 display resolution. Package Contents Your product package includes: • 19" Westinghouse LCD Monitor • Detachable Base Stand • AC Power Cord • VGA (HD15) Male -
Male Stereo Audio Cable • User's Manual • Warranty Card 5 Male Cable • 3.5 mm Male - English INSTALLATION Congratulations on your purchase of a Westinghouse 19" LCD Monitor. Sleek and practical, this lightweight and wall-mountable LCD monitor delivers a crisp and clear display optimized for 1280 x 1024 display resolution. Package Contents Your product package includes: • 19" Westinghouse LCD Monitor • Detachable Base Stand • AC Power Cord • VGA (HD15) Male -

User Manual
Page 13
Menu Misc Menu Info Menu Resolution & Frequency NOTES: • The OSD turns off several seconds after approximately 10 seconds, if no action is selected. Except for each individual signal timing. Source ... the front panel. To display the OSD main menu, press the "Menu" keypad button on the bottom part of the OSD sub-menus for the LCD monitor are saved for these adjustments, all signal timings. • The icon color will disappear automatically after you stop pressing the buttons while performing an adjustment...
Menu Misc Menu Info Menu Resolution & Frequency NOTES: • The OSD turns off several seconds after approximately 10 seconds, if no action is selected. Except for each individual signal timing. Source ... the front panel. To display the OSD main menu, press the "Menu" keypad button on the bottom part of the OSD sub-menus for the LCD monitor are saved for these adjustments, all signal timings. • The icon color will disappear automatically after you stop pressing the buttons while performing an adjustment...

User Manual
Page 14
Clock Adjust the LCD monitor clock. (Optional) Phase Adjust the LCD monitor phase. (Optional) H. Sharpness Adjust the picture sharpness of the image. Position Move the image up or down on the screen. (Optional) V. Contrast Adjust the contrast of low resolution pictures. Position Move the image left or right on the screen. (Optional) 12 Image Menu English Function Description Brightness Adjust the brightness of the screen.
Clock Adjust the LCD monitor clock. (Optional) Phase Adjust the LCD monitor phase. (Optional) H. Sharpness Adjust the picture sharpness of the image. Position Move the image up or down on the screen. (Optional) V. Contrast Adjust the contrast of low resolution pictures. Position Move the image left or right on the screen. (Optional) 12 Image Menu English Function Description Brightness Adjust the brightness of the screen.

User Manual
Page 21
... Optimum Resolution Response Time Contrast Ratio Maximum Brightness Viewing Angles Wall/Arm Mount Physical Input Signal Video Speaker Output Audio Power Voltage Operating Conditions Temperature Humidity Altitude Storage Conditions Temperature Humidity Altitude Dimensions Unit Carton Weight Unit Regulations Power consumption DC On DC Off Lamp Life Specification 19" Color TFT Active Matrix LCD...
... Optimum Resolution Response Time Contrast Ratio Maximum Brightness Viewing Angles Wall/Arm Mount Physical Input Signal Video Speaker Output Audio Power Voltage Operating Conditions Temperature Humidity Altitude Storage Conditions Temperature Humidity Altitude Dimensions Unit Carton Weight Unit Regulations Power consumption DC On DC Off Lamp Life Specification 19" Color TFT Active Matrix LCD...
User Manual
Page 22
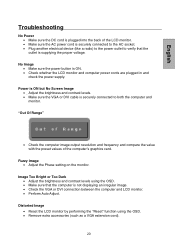
...; Adjust the Phase setting on the monitor. Distorted Image • Reset the LCD monitor by performing the "Reset" function using the OSD. • Make sure that the computer is securely connected to verify that the outlet is ON. • Check whether the LCD monitor and computer power cords are plugged in... and check the power supply. "Out Of Range" • Check the computer image output resolution and frequency and compare the value with the preset values of the LCD monitor. • Make sure the AC power cord is securely connected to the AC socket. • Plug another...
...; Adjust the Phase setting on the monitor. Distorted Image • Reset the LCD monitor by performing the "Reset" function using the OSD. • Make sure that the computer is securely connected to verify that the outlet is ON. • Check whether the LCD monitor and computer power cords are plugged in... and check the power supply. "Out Of Range" • Check the computer image output resolution and frequency and compare the value with the preset values of the LCD monitor. • Make sure the AC power cord is securely connected to the AC socket. • Plug another...