
User Manual
Page 3
CONNECT YOUR COMPUTER AND OTHER DEVICES 6 3. ATTACHING THE BASE STAND TO THE LCD MONITOR 6 2. TURN THE POWER ON ...6 CONTROL PANEL BUTTONS 7 OSD MENU FUNCTIONS...8 QUICK ADJUSTMENTS...9 DISPLAY MODES ...10 TROUBLESHOOTING ...11 NO POWER ...11 NO... INCORRECT 12 NO SOUND...12 HOW TO CONNECT A DVI-D INPUT TO THE MONITOR 12 ADDITIONAL QUESTIONS...12 1 CONNECT POWER CABLE 6 4. CONTENTS IMPORTANT PRODUCT SAFETY INSTRUCTIONS 2 SAFETY GUIDELINES ...3 FCC COMPLIANCE STATEMENT 3 CLEANING THE LCD MONITOR 4 FEATURES...5 POWER SAVER ...5 PLUG & PLAY ...5 INSTALLATION ...6 PACKAGE CONTENTS ...
CONNECT YOUR COMPUTER AND OTHER DEVICES 6 3. ATTACHING THE BASE STAND TO THE LCD MONITOR 6 2. TURN THE POWER ON ...6 CONTROL PANEL BUTTONS 7 OSD MENU FUNCTIONS...8 QUICK ADJUSTMENTS...9 DISPLAY MODES ...10 TROUBLESHOOTING ...11 NO POWER ...11 NO... INCORRECT 12 NO SOUND...12 HOW TO CONNECT A DVI-D INPUT TO THE MONITOR 12 ADDITIONAL QUESTIONS...12 1 CONNECT POWER CABLE 6 4. CONTENTS IMPORTANT PRODUCT SAFETY INSTRUCTIONS 2 SAFETY GUIDELINES ...3 FCC COMPLIANCE STATEMENT 3 CLEANING THE LCD MONITOR 4 FEATURES...5 POWER SAVER ...5 PLUG & PLAY ...5 INSTALLATION ...6 PACKAGE CONTENTS ...
User Manual
Page 8
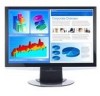
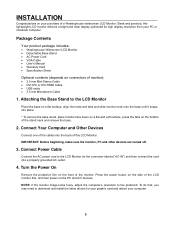
...labeled "AC-IN") and then connect the cord into a properly grounded AC outlet. 4. Package Contents Your product package includes: • Westinghouse Widescreen LCD Monitor • Detachable Base Stand • AC Power Cord • VGA Cable • User's Manual • Warranty Card • ...DVI-HDMI Cable • USB cable • 3.5 mm Microphone Cable 1. Press the power button on the side of a Westinghouse widescreen LCD Monitor. INSTALLATION Congratulations on your purchase of the LCD monitor first, and then power on the PC and A/V devices. Attaching the Base Stand to download...
...labeled "AC-IN") and then connect the cord into a properly grounded AC outlet. 4. Package Contents Your product package includes: • Westinghouse Widescreen LCD Monitor • Detachable Base Stand • AC Power Cord • VGA Cable • User's Manual • Warranty Card • ...DVI-HDMI Cable • USB cable • 3.5 mm Microphone Cable 1. Press the power button on the side of a Westinghouse widescreen LCD Monitor. INSTALLATION Congratulations on your purchase of the LCD monitor first, and then power on the PC and A/V devices. Attaching the Base Stand to download...

User Manual
Page 9
...• Move a selection right when the OSD is a list of the LCD Monitor to switch between different video inputs or enter/exit the OSD menu. • Power On and Off button. 7 Control Panel Buttons Use the control buttons in "OSD Functions" on page 8. 1. ▲ 2. ▼ 3. ...The OSD controls are defined in the front of the control button functions. Below is displayed. • Press or hold this button to display the On Screen ...
...• Move a selection right when the OSD is a list of the LCD Monitor to switch between different video inputs or enter/exit the OSD menu. • Power On and Off button. 7 Control Panel Buttons Use the control buttons in "OSD Functions" on page 8. 1. ▲ 2. ▼ 3. ...The OSD controls are defined in the front of the control button functions. Below is displayed. • Press or hold this button to display the On Screen ...

User Manual
Page 10
.... • The icon color will disappear automatically after approximately 10 seconds, if no action is taken.) This LCD monitor has been adjusted to optimal settings before shipment. To display the OSD main menu, press the keypad button on or off the power should be adjusted. • Press the W orXbuttons to change from gray...
.... • The icon color will disappear automatically after approximately 10 seconds, if no action is taken.) This LCD monitor has been adjusted to optimal settings before shipment. To display the OSD main menu, press the keypad button on or off the power should be adjusted. • Press the W orXbuttons to change from gray...

User Manual
Page 11
Quick Adjustments You can skip the Menu pages and display an adjustment scale directly by using the following button operations: • Brightness: Press the X Brightness button when the Menu is not displayed. • Contrast: Press the W Contrast button when the Menu is not displayed. • Auto Setting: Press the ▼ button when the Menu is not displayed. • Volume Control: Press the ▲ button when the Menu is not displayed to adjust volume. • Modes: Hold the ▲ button when the Menu is not displayed to switch between display modes. 9
Quick Adjustments You can skip the Menu pages and display an adjustment scale directly by using the following button operations: • Brightness: Press the X Brightness button when the Menu is not displayed. • Contrast: Press the W Contrast button when the Menu is not displayed. • Auto Setting: Press the ▼ button when the Menu is not displayed. • Volume Control: Press the ▲ button when the Menu is not displayed to adjust volume. • Modes: Hold the ▲ button when the Menu is not displayed to switch between display modes. 9

