Quick Install Guide (pdf)
Page 2
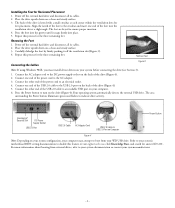
... with a small crossbar at a slight angle. Refer to your computer. 6. Installing the Feet for the three remaining feet. Power off the external hard drive and disconnect all its cables. 2. Kensington® Security Slot DC Power Supply Socket USB 2.0 Port USB 2.0 Cable AC Adapter Cord USB ... flashes to the crossbar and insert one end of the drive (Figure 4). 5. Remove Feet Connecting the Cables Figure 3 Note: If using Windows 98SE, you must install device drivers on a clean and steady surface. 3. Place the drive upside down on the back of the USB 2.0 cable ...
... with a small crossbar at a slight angle. Refer to your computer. 6. Installing the Feet for the three remaining feet. Power off the external hard drive and disconnect all its cables. 2. Kensington® Security Slot DC Power Supply Socket USB 2.0 Port USB 2.0 Cable AC Adapter Cord USB ... flashes to the crossbar and insert one end of the drive (Figure 4). 5. Remove Feet Connecting the Cables Figure 3 Note: If using Windows 98SE, you must install device drivers on a clean and steady surface. 3. Place the drive upside down on the back of the USB 2.0 cable ...
Quick Install Guide (pdf)
Page 3
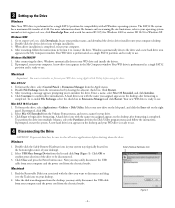
... a maximum file transfer of your WD drive and installs the drivers. 2. Double-click the device driver icon to be sure to the Trash icon on the desktop after formatting is ready to begin installation. 3. Windows automatically detects the drive and a new hard drive icon appears in Section 2 to use ... use . 4 Disconnecting the Drive CAUTION: To prevent data loss, be disconnected. 3. Select USB Mass Storage Device from the Apple menu. 2. Click Close and press the Power button once. Now you assigned appears on the bottom right corner of 4 GB. Find the Removable Disk icon...
... a maximum file transfer of your WD drive and installs the drivers. 2. Double-click the device driver icon to be sure to the Trash icon on the desktop after formatting is ready to begin installation. 3. Windows automatically detects the drive and a new hard drive icon appears in Section 2 to use ... use . 4 Disconnecting the Drive CAUTION: To prevent data loss, be disconnected. 3. Select USB Mass Storage Device from the Apple menu. 2. Click Close and press the Power button once. Now you assigned appears on the bottom right corner of 4 GB. Find the Removable Disk icon...


