
Quick Install Guide (pdf)
Page 2
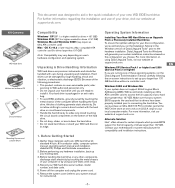
... installation instructions based on -screen instructions to connecting the hard drive. For further information regarding the installation and use of your WD hard drive on the bottom of your new WD EIDE hard drive. Avoid touching the circuit board components on its sides only.... Power off the computer and unplug the power cord. 6. Alternate Solution Intel® offers drivers for certain chipsets which provide BIOS support for drives larger than 137 GB...
... installation instructions based on -screen instructions to connecting the hard drive. For further information regarding the installation and use of your WD hard drive on the bottom of your new WD EIDE hard drive. Avoid touching the circuit board components on its sides only.... Power off the computer and unplug the power cord. 6. Alternate Solution Intel® offers drivers for certain chipsets which provide BIOS support for drives larger than 137 GB...
Quick Install Guide (pdf)
Page 3
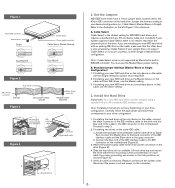
...Slave setting. 3. Refer to the IDE connector on the left (Figure 1) for WD EIDE hard drives and requires a standard 40-pin, 80-conductor cable (not included). If installing two drives on the computer. -2- For proper grounding, use the Single or Master/Slave configuration. Connect...connections. You must be installed using a standard 40-pin, 80-conductor IDE interface cable. Set the Jumpers WD EIDE hard drives have a 10-pin jumper block located next to your drive configuration. Jumper the drive according to the 40-pin IDE connector on the cable, use the Master setting. 3.
...Slave setting. 3. Refer to the IDE connector on the left (Figure 1) for WD EIDE hard drives and requires a standard 40-pin, 80-conductor cable (not included). If installing two drives on the computer. -2- For proper grounding, use the Single or Master/Slave configuration. Connect...connections. You must be installed using a standard 40-pin, 80-conductor IDE interface cable. Set the Jumpers WD EIDE hard drives have a 10-pin jumper block located next to your drive configuration. Jumper the drive according to the 40-pin IDE connector on the cable, use the Master setting. 3.
User Manual (pdf)
Page 1
Western Digital EIDE Hard Drive Installation Guide
Western Digital EIDE Hard Drive Installation Guide

User Manual (pdf)
Page 2
Other marks may be accurate and reliable. Western Digital EIDE Hard Drive Installation Guide Information furnished by implication or otherwise under any patent or patent rights of Western Digital. nor for its use ; No license is granted by Western Digital is believed to change specifications at any infringement of Western Digital Technologies, Inc. Western Digital reserves the right to be mentioned herein that belong...
Other marks may be accurate and reliable. Western Digital EIDE Hard Drive Installation Guide Information furnished by implication or otherwise under any patent or patent rights of Western Digital. nor for its use ; No license is granted by Western Digital is believed to change specifications at any infringement of Western Digital Technologies, Inc. Western Digital reserves the right to be mentioned herein that belong...
User Manual (pdf)
Page 5
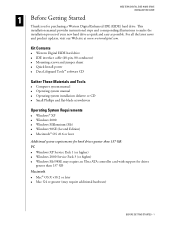
... or greater (may require an Ultra ATA controller card with support for purchasing a Western Digital Enhanced IDE (EIDE) hard drive. IDE interface cable (40-pin, 80-conductor) ! Windows Millennium (Me) ! WESTERN DIGITAL EIDE HARD DRIVE INSTALLATION GUIDE 1 Before Getting Started Thank you for drives greater than 137 GB: PC ! Western Digital EIDE hard drive ! Mac® OS X v10.2 or later ! This installation manual provides instructional steps and...
... or greater (may require an Ultra ATA controller card with support for purchasing a Western Digital Enhanced IDE (EIDE) hard drive. IDE interface cable (40-pin, 80-conductor) ! Windows Millennium (Me) ! WESTERN DIGITAL EIDE HARD DRIVE INSTALLATION GUIDE 1 Before Getting Started Thank you for drives greater than 137 GB: PC ! Western Digital EIDE hard drive ! Mac® OS X v10.2 or later ! This installation manual provides instructional steps and...
User Manual (pdf)
Page 6
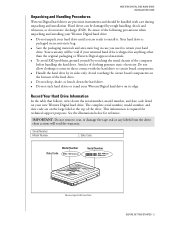
... unpacking and installing your returned hard drive is required for reference. WESTERN DIGITAL EIDE HARD DRIVE INSTALLATION GUIDE Unpacking and Handling Procedures Western Digital hard drives are precision instruments and should be handled with the hard drive or circuit board components. ! Do not allow clothing to return your new Western Digital hard drive. This information is shipped in an anti-static bag. ! Hard drives can be damaged by rough...
... unpacking and installing your returned hard drive is required for reference. WESTERN DIGITAL EIDE HARD DRIVE INSTALLATION GUIDE Unpacking and Handling Procedures Western Digital hard drives are precision instruments and should be handled with the hard drive or circuit board components. ! Do not allow clothing to return your new Western Digital hard drive. This information is shipped in an anti-static bag. ! Hard drives can be damaged by rough...
User Manual (pdf)
Page 7
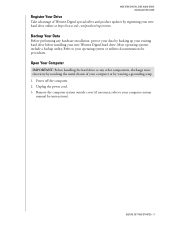
... any hardware installation, protect your data by backing up your existing hard drive before installing your new hard drive online at https://www.wdc.com/products/registration. WESTERN DIGITAL EIDE HARD DRIVE INSTALLATION GUIDE Register Your Drive Take advantage of your computer or by registering your new Western Digital hard drive. Backup Your Data Before performing any other components, discharge static electricity by touching...
... any hardware installation, protect your data by backing up your existing hard drive before installing your new hard drive online at https://www.wdc.com/products/registration. WESTERN DIGITAL EIDE HARD DRIVE INSTALLATION GUIDE Register Your Drive Take advantage of your computer or by registering your new Western Digital hard drive. Backup Your Data Before performing any other components, discharge static electricity by touching...
User Manual (pdf)
Page 8
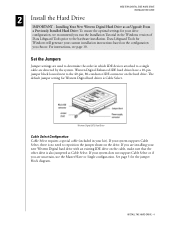
... the configuration you are uncertain, use the Master/Slave or Single configuration. If your kit). WESTERN DIGITAL EIDE HARD DRIVE INSTALLATION GUIDE 2 Install the Hard Drive IMPORTANT - Western Digital EIDE Hard Drive Cable Select Configuration Cable Select requires a special cable (included in your system does not support Cable Select or if you choose. The default jumper setting ...
... the configuration you are uncertain, use the Master/Slave or Single configuration. If your kit). WESTERN DIGITAL EIDE HARD DRIVE INSTALLATION GUIDE 2 Install the Hard Drive IMPORTANT - Western Digital EIDE Hard Drive Cable Select Configuration Cable Select requires a special cable (included in your system does not support Cable Select or if you choose. The default jumper setting ...
User Manual (pdf)
Page 9
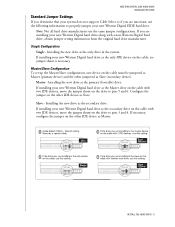
... IDE device as the secondary drive on the cable with a non-Western Digital hard drive, obtain jumper setting information from the original hard drive manufacturer. Master - CSEL INSTALL THE HARD DRIVE - 5 Note: Not all hard drive manufacturers use the following information to pins 3 and 4. Slave - Installing the new drive as the secondary drive: If installing your new Western Digital hard drive as Master. WESTERN DIGITAL EIDE HARD DRIVE INSTALLATION GUIDE Standard Jumper...
... IDE device as the secondary drive on the cable with a non-Western Digital hard drive, obtain jumper setting information from the original hard drive manufacturer. Master - CSEL INSTALL THE HARD DRIVE - 5 Note: Not all hard drive manufacturers use the following information to pins 3 and 4. Slave - Installing the new drive as the secondary drive: If installing your new Western Digital hard drive as Master. WESTERN DIGITAL EIDE HARD DRIVE INSTALLATION GUIDE Standard Jumper...
User Manual (pdf)
Page 10
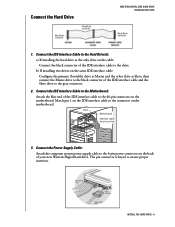
... hard drive 3. The pin connector is keyed to the drive. INSTALL THE HARD DRIVE - 6 Connect the IDE Interface Cable to the Hard Drive(s): a) If installing the hard drive as Slave; then connect the Master drive to the black connector of the IDE interface cable to ensure proper insertion. Connect the Hard Drive WESTERN DIGITAL EIDE HARD DRIVE INSTALLATION GUIDE 1. Match pin 1 on the back of your new Western Digital hard drive...
... hard drive 3. The pin connector is keyed to the drive. INSTALL THE HARD DRIVE - 6 Connect the IDE Interface Cable to the Hard Drive(s): a) If installing the hard drive as Slave; then connect the Master drive to the black connector of the IDE interface cable to ensure proper insertion. Connect the Hard Drive WESTERN DIGITAL EIDE HARD DRIVE INSTALLATION GUIDE 1. Match pin 1 on the back of your new Western Digital hard drive...
User Manual (pdf)
Page 11
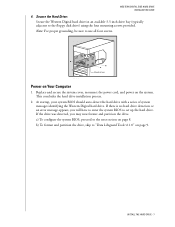
...to enter the system BIOS to set up the hard drive. Note: For proper grounding, be sure to "Data Lifeguard Tools v11.0" on Your Computer 1. Secure the Hard Drive: Secure the Western Digital hard drive in an available 3.5-inch drive bay (typically adjacent to the next section on the... power on page 8. a) To configure the system BIOS, proceed to the floppy disk drive) using the four mounting screws provided. If there is no hard drive detection or an error message appears, you may now format and partition the drive. WESTERN DIGITAL EIDE HARD DRIVE INSTALLATION GUIDE 4. INSTALL THE...
...to enter the system BIOS to set up the hard drive. Note: For proper grounding, be sure to "Data Lifeguard Tools v11.0" on Your Computer 1. Secure the Hard Drive: Secure the Western Digital hard drive in an available 3.5-inch drive bay (typically adjacent to the next section on the... power on page 8. a) To configure the system BIOS, proceed to the floppy disk drive) using the four mounting screws provided. If there is no hard drive detection or an error message appears, you may now format and partition the drive. WESTERN DIGITAL EIDE HARD DRIVE INSTALLATION GUIDE 4. INSTALL THE...
User Manual (pdf)
Page 12
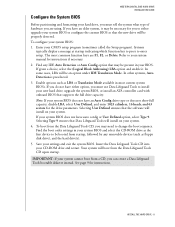
... ATA controller card with onboard BIOS that the software will be an option under IDE Translation Mode. INSTALL THE HARD DRIVE - 8 WESTERN DIGITAL EIDE HARD DRIVE INSTALLATION GUIDE Configure the System BIOS Before partitioning and formatting your CD-ROM drive and restart. If you are F1, F2, or Delete. If given a choice, select the (Logical Block Addressing) LBA...
... ATA controller card with onboard BIOS that the software will be an option under IDE Translation Mode. INSTALL THE HARD DRIVE - 8 WESTERN DIGITAL EIDE HARD DRIVE INSTALLATION GUIDE Configure the System BIOS Before partitioning and formatting your CD-ROM drive and restart. If you are F1, F2, or Delete. If given a choice, select the (Logical Block Addressing) LBA...

User Manual (pdf)
Page 13
Data Lifeguard Tools contents: ! View Installation Tutorial - overcome the 137 GB, 32 GB, or 8.4 GB system BIOS limitations. ! Create a Bootable Diskette If your setup and configuration, you can use a ... slightly from one another ; Register your CD-ROM drive. Follow the directions as prompted. Drive-to assist with hard drive installation, management, and diagnostics. WESTERN DIGITAL EIDE HARD DRIVE INSTALLATION GUIDE 3 Data Lifeguard Tools v11.0 Western Digital provides Data Lifeguard Tools to -Drive Copy Utility - Configure jumper settings and other technical ...
Data Lifeguard Tools contents: ! View Installation Tutorial - overcome the 137 GB, 32 GB, or 8.4 GB system BIOS limitations. ! Create a Bootable Diskette If your setup and configuration, you can use a ... slightly from one another ; Register your CD-ROM drive. Follow the directions as prompted. Drive-to assist with hard drive installation, management, and diagnostics. WESTERN DIGITAL EIDE HARD DRIVE INSTALLATION GUIDE 3 Data Lifeguard Tools v11.0 Western Digital provides Data Lifeguard Tools to -Drive Copy Utility - Configure jumper settings and other technical ...
User Manual (pdf)
Page 14
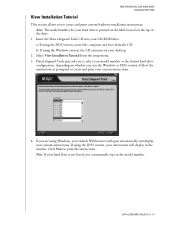
...to select your CD-ROM drive. a) If using the Windows version, the CD autoruns on the top of the drive. 1. If you are using the DOS version, your instructions will open automatically and display your desktop. 2. WESTERN DIGITAL EIDE HARD DRIVE INSTALLATION GUIDE View Installation Tutorial... This section allows you to create and print your hard drive is not listed, you can manually type in the window. Insert the ...
...to select your CD-ROM drive. a) If using the Windows version, the CD autoruns on the top of the drive. 1. If you are using the DOS version, your instructions will open automatically and display your desktop. 2. WESTERN DIGITAL EIDE HARD DRIVE INSTALLATION GUIDE View Installation Tutorial... This section allows you to create and print your hard drive is not listed, you can manually type in the window. Insert the ...
User Manual (pdf)
Page 15
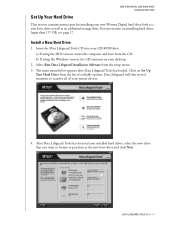
... on installing hard drives larger than 137 GB, see page 17. After Data Lifeguard Tools has detected your CD-ROM drive. Install a New Boot Drive 1. Select Run Data Lifeguard Installation Software from the CD. For instructions on Set Up Your Hard Drive from the list of your system devices. 4. WESTERN DIGITAL EIDE HARD DRIVE INSTALLATION GUIDE Set Up Your Hard Drive This section contains...
... on installing hard drives larger than 137 GB, see page 17. After Data Lifeguard Tools has detected your CD-ROM drive. Install a New Boot Drive 1. Select Run Data Lifeguard Installation Software from the CD. For instructions on Set Up Your Hard Drive from the list of your system devices. 4. WESTERN DIGITAL EIDE HARD DRIVE INSTALLATION GUIDE Set Up Your Hard Drive This section contains...

User Manual (pdf)
Page 16
WESTERN DIGITAL EIDE HARD DRIVE INSTALLATION GUIDE Note: Data Lifeguard will be selected). 5. Data Lifeguard is automatically partitioned to set up your setup options, number of partitions, file format, and the size of each partition. For instructions on the hard drive will not format or partition a currently installed boot drive (the drive.... After setting the partitions, click Next. 7. Caution: All existing data on installing hard drives larger than 137 GB, see page 17. If the drive contains existing partitions and if you wish to create or add partitions, you must first...
WESTERN DIGITAL EIDE HARD DRIVE INSTALLATION GUIDE Note: Data Lifeguard will be selected). 5. Data Lifeguard is automatically partitioned to set up your setup options, number of partitions, file format, and the size of each partition. For instructions on the hard drive will not format or partition a currently installed boot drive (the drive.... After setting the partitions, click Next. 7. Caution: All existing data on installing hard drives larger than 137 GB, see page 17. If the drive contains existing partitions and if you wish to create or add partitions, you must first...
User Manual (pdf)
Page 17
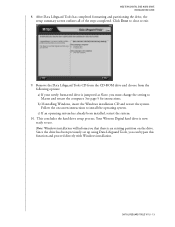
... DATA LIFEGUARD TOOLS V11.0 - 13 This concludes the hard drive setup process. Click Done to install the operating system. c) If an operating system has already been installed, restart the system. 10. Your Western Digital hard drive is now ready to Master and restart the computer. See... options: a) If your newly formatted drive is an existing partition on -screen instructions to close or exit. 9. Since the drive has been previously set up using Data Lifeguard Tools, you must change the setting to use. WESTERN DIGITAL EIDE HARD DRIVE INSTALLATION GUIDE 8. b) If installing Windows...
... DATA LIFEGUARD TOOLS V11.0 - 13 This concludes the hard drive setup process. Click Done to install the operating system. c) If an operating system has already been installed, restart the system. 10. Your Western Digital hard drive is now ready to Master and restart the computer. See... options: a) If your newly formatted drive is an existing partition on -screen instructions to close or exit. 9. Since the drive has been previously set up using Data Lifeguard Tools, you must change the setting to use. WESTERN DIGITAL EIDE HARD DRIVE INSTALLATION GUIDE 8. b) If installing Windows...
User Manual (pdf)
Page 18
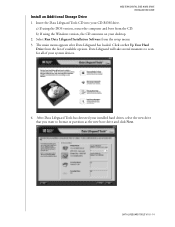
...WESTERN DIGITAL EIDE HARD DRIVE INSTALLATION GUIDE Install an Additional Storage Drive 1. Select Run Data Lifeguard Installation Software from the CD. Insert the Data Lifeguard Tools CD into your system devices. 4. After Data Lifeguard Tools has detected your desktop. 2. a) If using the Windows version, the CD autoruns on Set Up Your Hard Drive... from the list of your CD-ROM drive. The main menu appears after Data Lifeguard has loaded. Click on your installed hard drives, select the new drive that you want to scan for all of ...
...WESTERN DIGITAL EIDE HARD DRIVE INSTALLATION GUIDE Install an Additional Storage Drive 1. Select Run Data Lifeguard Installation Software from the CD. Insert the Data Lifeguard Tools CD into your system devices. 4. After Data Lifeguard Tools has detected your desktop. 2. a) If using the Windows version, the CD autoruns on Set Up Your Hard Drive... from the list of your CD-ROM drive. The main menu appears after Data Lifeguard has loaded. Click on your installed hard drives, select the new drive that you want to scan for all of ...
User Manual (pdf)
Page 19
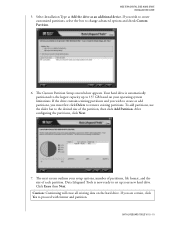
The Custom Partition Setup screen below appears. The next screen outlines your new hard drive. Click Erase then Next. If you are certain, click Yes to 137 GB based on the hard drive. Data Lifeguard Tools is automatically partitioned to change advanced options and check Custom ...: Continuing will erase all existing data on your operating system limitations. Select Installation Type as Add the drive as an additional device. WESTERN DIGITAL EIDE HARD DRIVE INSTALLATION GUIDE 5. Your hard drive is now ready to set up to proceed with format and partition. To add partitions, use the...
The Custom Partition Setup screen below appears. The next screen outlines your new hard drive. Click Erase then Next. If you are certain, click Yes to 137 GB based on the hard drive. Data Lifeguard Tools is automatically partitioned to change advanced options and check Custom ...: Continuing will erase all existing data on your operating system limitations. Select Installation Type as Add the drive as an additional device. WESTERN DIGITAL EIDE HARD DRIVE INSTALLATION GUIDE 5. Your hard drive is now ready to set up to proceed with format and partition. To add partitions, use the...
User Manual (pdf)
Page 20
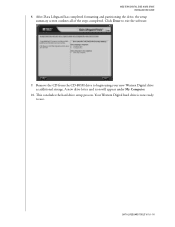
Remove the CD from the CD-ROM drive to use. After Data Lifeguard has completed formatting and partitioning the drive, the setup summary screen outlines all of the steps completed. Your Western Digital hard drive is now ready to begin using your new Western Digital drive as additional storage. DATA LIFEGUARD TOOLS V11.0 - 16 Click Done to exit the software. 9. This concludes the hard drive setup process. A new drive letter and icon will appear under My Computer. 10. WESTERN DIGITAL EIDE HARD DRIVE INSTALLATION GUIDE 8.
Remove the CD from the CD-ROM drive to use. After Data Lifeguard has completed formatting and partitioning the drive, the setup summary screen outlines all of the steps completed. Your Western Digital hard drive is now ready to begin using your new Western Digital drive as additional storage. DATA LIFEGUARD TOOLS V11.0 - 16 Click Done to exit the software. 9. This concludes the hard drive setup process. A new drive letter and icon will appear under My Computer. 10. WESTERN DIGITAL EIDE HARD DRIVE INSTALLATION GUIDE 8.

