
Quick Install Guide (pdf)
Page 1
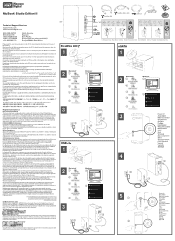
... in any environment, including residential areas. En "samsvarserklæring" i henhold til gjeldende direktiver har blitt skrevet og finnes arkivert hos Western Digital Europe. regulation 3. VCCI Notice (Japan only) LED FireWire 800 1 Macintosh® 21 2 3 4 5 3 2 USB 1...Western Digital Europa. CD. CD CD CD CD Regulatory Compliance FCC Class B Information This device has been tested and found to comply with Canadian ICES-003 Class B. This device complies with the limits of a Class B digital device, pursuant to Part 15 of the FCC Rules. My Book® Studio Edition...
... in any environment, including residential areas. En "samsvarserklæring" i henhold til gjeldende direktiver har blitt skrevet og finnes arkivert hos Western Digital Europe. regulation 3. VCCI Notice (Japan only) LED FireWire 800 1 Macintosh® 21 2 3 4 5 3 2 USB 1...Western Digital Europa. CD. CD CD CD CD Regulatory Compliance FCC Class B Information This device has been tested and found to comply with Canadian ICES-003 Class B. This device complies with the limits of a Class B digital device, pursuant to Part 15 of the FCC Rules. My Book® Studio Edition...

User Manual
Page 4
...11 9393 (MNTL)/ 1 800 200 5789 (Reliance) 011 26384700 (Pilot Line) 00800 ASK4 WDEU Indonesia +803 852 9439 (00800 27549338) Japan 00 531 650442 Korea 02 703 6550 +31 880062100 Malaysia +800 6008 6008/1 800 88 1908/+65 62430496 +31 880062100 Philippines 1 800 1441 0159 ... Recovery Information. • Knowledge Base - E-mail support is free for support, have your first telephone contact with WD technical support. MY BOOK STUDIO EDITION II USER MANUAL 1 WD Service and Support Should you informed of new features and services, remember to register your product online at https://...
...11 9393 (MNTL)/ 1 800 200 5789 (Reliance) 011 26384700 (Pilot Line) 00800 ASK4 WDEU Indonesia +803 852 9439 (00800 27549338) Japan 00 531 650442 Korea 02 703 6550 +31 880062100 Malaysia +800 6008 6008/1 800 88 1908/+65 62430496 +31 880062100 Philippines 1 800 1441 0159 ... Recovery Information. • Knowledge Base - E-mail support is free for support, have your first telephone contact with WD technical support. MY BOOK STUDIO EDITION II USER MANUAL 1 WD Service and Support Should you informed of new features and services, remember to register your product online at https://...
User Manual
Page 5
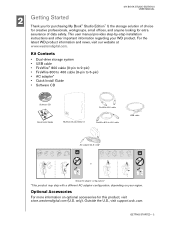
...by-step installation instructions and other important information regarding your region. GETTING STARTED - 2 MY BOOK STUDIO EDITION II USER MANUAL 2 Getting Started Thank you for purchasing My Book® Studio Edition™ II, the storage solution of choice for creative professionals, workgroups, small offices, and...pin to 6-pin) • AC adapter* • Quick Install Guide • Software CD Software CD Quick Install Guide My Book Studio Edition II FireWire 800 cable FireWire 800 to 400 cable USB cable AC adapter (U.S.-only)* or Global AC adapter configurations* *This product ...
...by-step installation instructions and other important information regarding your region. GETTING STARTED - 2 MY BOOK STUDIO EDITION II USER MANUAL 2 Getting Started Thank you for purchasing My Book® Studio Edition™ II, the storage solution of choice for creative professionals, workgroups, small offices, and...pin to 6-pin) • AC adapter* • Quick Install Guide • Software CD Software CD Quick Install Guide My Book Studio Edition II FireWire 800 cable FireWire 800 to 400 cable USB cable AC adapter (U.S.-only)* or Global AC adapter configurations* *This product ...

User Manual
Page 6
MY BOOK STUDIO EDITION II USER MANUAL Compatibility Macintosh • Any of the following: - eSATA port or eSATA adapter card* • Mac® OS X 10.4.10+ • Mac OS X 1.0.5.2+ ...
MY BOOK STUDIO EDITION II USER MANUAL Compatibility Macintosh • Any of the following: - eSATA port or eSATA adapter card* • Mac® OS X 10.4.10+ • Mac OS X 1.0.5.2+ ...
User Manual
Page 7
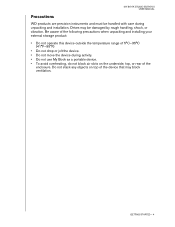
... GETTING STARTED - 4 Do not stack any objects on top of the device that may be handled with care during activity. • Do not use My Book as a portable device. • To avoid overheating, do not block air slots on the underside, top, or rear of 5°C-35°C (41&#... precautions when unpacking and installing your external storage product: • Do not operate this device outside the temperature range of the enclosure. MY BOOK STUDIO EDITION II USER MANUAL Precautions WD products are precision instruments and must be damaged by rough handling, shock, or vibration.
... GETTING STARTED - 4 Do not stack any objects on top of the device that may be handled with care during activity. • Do not use My Book as a portable device. • To avoid overheating, do not block air slots on the underside, top, or rear of 5°C-35°C (41&#... precautions when unpacking and installing your external storage product: • Do not operate this device outside the temperature range of the enclosure. MY BOOK STUDIO EDITION II USER MANUAL Precautions WD products are precision instruments and must be damaged by rough handling, shock, or vibration.
User Manual
Page 8
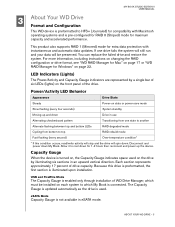
... occurs, read/write activity will stop and the drive will be installed on the front panel of WD Drive Manager, which My Book is connected. Each section represents approximately 17 percent of six LEDs (lights) on each system to which must be preserved. This product...an upward vertical direction. Capacity Gauge When the device is turned on page 22. eSATA Mode Capacity Gauge is illuminated upon installation. MY BOOK STUDIO EDITION II USER MANUAL 3 About Your WD Drive Format and Configuration This WD device is preformatted to HFS+ (Journaled) for compatibility with ...
... occurs, read/write activity will stop and the drive will be installed on the front panel of WD Drive Manager, which My Book is connected. Each section represents approximately 17 percent of six LEDs (lights) on each system to which must be preserved. This product...an upward vertical direction. Capacity Gauge When the device is turned on page 22. eSATA Mode Capacity Gauge is illuminated upon installation. MY BOOK STUDIO EDITION II USER MANUAL 3 About Your WD Drive Format and Configuration This WD device is preformatted to HFS+ (Journaled) for compatibility with ...
User Manual
Page 9
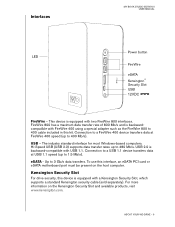
... device is backwardcompatible with a Kensington Security Slot, which supports a standard Kensington security cable (sold separately). To use this kit. ABOUT YOUR WD DRIVE - 6 Interfaces MY BOOK STUDIO EDITION II USER MANUAL Power button LED FireWire eSATA Kensington® Security Slot USB FireWire - Connection to a FireWire 400 device transfers data at USB 1.1 speed (up...
... device is backwardcompatible with a Kensington Security Slot, which supports a standard Kensington security cable (sold separately). To use this kit. ABOUT YOUR WD DRIVE - 6 Interfaces MY BOOK STUDIO EDITION II USER MANUAL Power button LED FireWire eSATA Kensington® Security Slot USB FireWire - Connection to a FireWire 400 device transfers data at USB 1.1 speed (up...

User Manual
Page 10
ABOUT YOUR WD DRIVE - 7 It features automatic backup to multiple destinations and synchronization of working files to keep them current. A user guide and online help are included with this device. Copy Application Software allows you to back up the software included with this application. WD Anywhere Backup™ (Mac and Windows) is shipped with the following bonus software. MY BOOK STUDIO EDITION II USER MANUAL Software In addition to WD Drive Manager, this WD product is an intuitive and robust backup and recovery application that provides around-the-clock data protection.
ABOUT YOUR WD DRIVE - 7 It features automatic backup to multiple destinations and synchronization of working files to keep them current. A user guide and online help are included with this device. Copy Application Software allows you to back up the software included with this application. WD Anywhere Backup™ (Mac and Windows) is shipped with the following bonus software. MY BOOK STUDIO EDITION II USER MANUAL Software In addition to WD Drive Manager, this WD product is an intuitive and robust backup and recovery application that provides around-the-clock data protection.

User Manual
Page 11
MY BOOK STUDIO EDITION II USER MANUAL 4 Setting Up Macintosh FireWire or USB® Important: Follow the steps below to load. 2. SETTING UP - 8 Double-click the CD-ROM drive ...
MY BOOK STUDIO EDITION II USER MANUAL 4 Setting Up Macintosh FireWire or USB® Important: Follow the steps below to load. 2. SETTING UP - 8 Double-click the CD-ROM drive ...
User Manual
Page 12
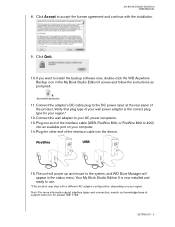
... 10. Plug one end of the interface cable into an available port on your AC power receptacle. 13. The unit will appear in the My Book Studio Edition II screen and follow the instructions as prompted. 11. Plug the other end of the interface cable (USB, FireWire 800, or FireWire 800 to your...'s DC cable plug to accept the license agreement and continue with a different AC adapter configuration, depending on your region.* 12. FireWire USB 15. MY BOOK STUDIO EDITION II USER MANUAL 8. Click Accept to the DC power input at support.wdc.com for your computer. 14. Your My...
... 10. Plug one end of the interface cable into an available port on your AC power receptacle. 13. The unit will appear in the My Book Studio Edition II screen and follow the instructions as prompted. 11. Plug the other end of the interface cable (USB, FireWire 800, or FireWire 800 to your...'s DC cable plug to accept the license agreement and continue with a different AC adapter configuration, depending on your region.* 12. FireWire USB 15. MY BOOK STUDIO EDITION II USER MANUAL 8. Click Accept to the DC power input at support.wdc.com for your computer. 14. Your My...
User Manual
Page 13
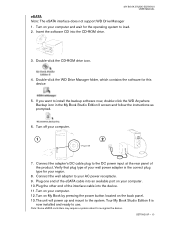
... UP - 10 The unit will power up and mount to install the backup software now, double-click the WD Anywhere Backup icon in the My Book Studio Edition II screen and follow the instructions as prompted. 6. Connect the adapter's DC cable plug to your computer. 1 2 Power Off 7. Plug one end of...to recognize the device. Turn on the back panel. 13. Insert the software CD into an available port on your region. 8. Your My Book Studio Edition II is the correct plug type for your computer and wait for this device 5. Verify that plug type of the eSATA cable into the CD...
... UP - 10 The unit will power up and mount to install the backup software now, double-click the WD Anywhere Backup icon in the My Book Studio Edition II screen and follow the instructions as prompted. 6. Connect the adapter's DC cable plug to your computer. 1 2 Power Off 7. Plug one end of...to recognize the device. Turn on the back panel. 13. Insert the software CD into an available port on your region. 8. Your My Book Studio Edition II is the correct plug type for your computer and wait for this device 5. Verify that plug type of the eSATA cable into the CD...
User Manual
Page 14
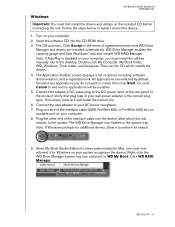
... run the CD which the unit mounts to the system. Since My Book Studio Edition II comes preformatted for Mac, you do not want to the DC power...desktop. If incorrect, remove it to exit and no applications will be installed. 5. Double-click My Computer, My Book folder, WD_Windows_Tools folder, and Setup.exe. Verify that plug type of the interface cable into the CD-ROM drive. ... available port on your computer, you must install the utilities manually. MY BOOK STUDIO EDITION II USER MANUAL Windows Important: You must first install the drivers and utilities on your computer. 2.
... run the CD which the unit mounts to the system. Since My Book Studio Edition II comes preformatted for Mac, you do not want to the DC power...desktop. If incorrect, remove it to exit and no applications will be installed. 5. Double-click My Computer, My Book folder, WD_Windows_Tools folder, and Setup.exe. Verify that plug type of the interface cable into the CD-ROM drive. ... available port on your computer, you must install the utilities manually. MY BOOK STUDIO EDITION II USER MANUAL Windows Important: You must first install the drivers and utilities on your computer. 2.
User Manual
Page 15
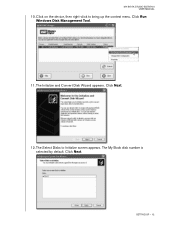
The My Book disk number is selected by default. Click Next. Click Next. 12. SETTING UP - 12 Click Run Windows Disk Management Tool. 11. The Select Disks to bring up the context menu. MY BOOK STUDIO EDITION II USER MANUAL 10. The Initialize and Convert Disk Wizard appears. Click on the device, then right-click to Initialize screen appears.
The My Book disk number is selected by default. Click Next. Click Next. 12. SETTING UP - 12 Click Run Windows Disk Management Tool. 11. The Select Disks to bring up the context menu. MY BOOK STUDIO EDITION II USER MANUAL 10. The Initialize and Convert Disk Wizard appears. Click on the device, then right-click to Initialize screen appears.

User Manual
Page 16
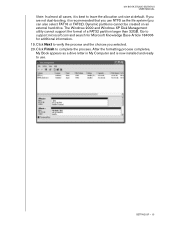
... to the next step. Select New Partition or New Simple Volume from the menu of available options. The Initialize and Convert Disk Wizard completes. MY BOOK STUDIO EDITION II USER MANUAL 13. Windows Vista: please proceed to continue and select Primary partition.
... to the next step. Select New Partition or New Simple Volume from the menu of available options. The Initialize and Convert Disk Wizard completes. MY BOOK STUDIO EDITION II USER MANUAL 13. Windows Vista: please proceed to continue and select Primary partition.

User Manual
Page 17
On this screen, you can select the file system, allocation unit size, and volume label you wish to save time in the Volume label field and select Perform a quick format to create on the drive. SETTING UP - 14 It is recommended that you wish to the partition and click Next. 18. The Format Partition screen appears. MY BOOK STUDIO EDITION II USER MANUAL 16. Select a drive letter to assign to create and click Next. 17. Select the size of the partition you enter "My Book" in the formatting process.
On this screen, you can select the file system, allocation unit size, and volume label you wish to save time in the Volume label field and select Perform a quick format to create on the drive. SETTING UP - 14 It is recommended that you wish to the partition and click Next. 18. The Format Partition screen appears. MY BOOK STUDIO EDITION II USER MANUAL 16. Select a drive letter to assign to create and click Next. 17. Select the size of the partition you enter "My Book" in the formatting process.
User Manual
Page 18
MY BOOK STUDIO EDITION II USER MANUAL Note: In almost all cases, it is now installed and ready to leave the allocation unit size at default. After the formatting process completes, My Book appears as a drive letter in My Computer and is recommended that you use . Go to verify the process and the choices you...
MY BOOK STUDIO EDITION II USER MANUAL Note: In almost all cases, it is now installed and ready to leave the allocation unit size at default. After the formatting process completes, My Book appears as a drive letter in My Computer and is recommended that you use . Go to verify the process and the choices you...

User Manual
Page 19
... - 16 Mac Condition Icon To view WD Drive Manager Status in Mac, click the WD Drive Manager status menu icon and point to WD My Book RAID. MY BOOK STUDIO EDITION II USER MANUAL 5 WD Drive Manager Status WD Drive Manager Status provides a quick view of the general status of the device.
... - 16 Mac Condition Icon To view WD Drive Manager Status in Mac, click the WD Drive Manager status menu icon and point to WD My Book RAID. MY BOOK STUDIO EDITION II USER MANUAL 5 WD Drive Manager Status WD Drive Manager Status provides a quick view of the general status of the device.

User Manual
Page 20
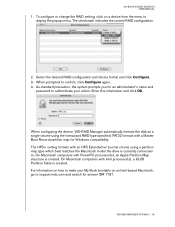
My Book Studio Edition II is preformatted for HFS+ (Journaled) and is a tool designed to help you proceed, make sure to back up all files stored in My Book onto another storage device. WD RAID MANAGER FOR MAC - 17 Click Launch WD RAID Manager. This product also supports RAID 1 (Mirrored) mode... RAID Important: Before you easily manage your RAID system, including changing the RAID configuration and formatting the device. MY BOOK STUDIO EDITION II USER MANUAL 6 WD RAID Manager for Mac WD RAID Manager is preconfigured for RAID 0 (Striped) mode for maximum capacity and accelerated ...
My Book Studio Edition II is preformatted for HFS+ (Journaled) and is a tool designed to help you proceed, make sure to back up all files stored in My Book onto another storage device. WD RAID MANAGER FOR MAC - 17 Click Launch WD RAID Manager. This product also supports RAID 1 (Mirrored) mode... RAID Important: Before you easily manage your RAID system, including changing the RAID configuration and formatting the device. MY BOOK STUDIO EDITION II USER MANUAL 6 WD RAID Manager for Mac WD RAID Manager is preconfigured for RAID 0 (Striped) mode for maximum capacity and accelerated ...
User Manual
Page 21
MY BOOK STUDIO EDITION II USER MANUAL 1. The checkmark indicates the current RAID configuration. 2. As standard precaution, the system prompts you for answer ID# 1787. Enter this information and ... RAID setting, click on an Intel-based Macintosh, go to support.wdc.com and search for an administrator's name and password to authenticate your My Book bootable on a device from the menu to confirm, click Configure again. 4.
MY BOOK STUDIO EDITION II USER MANUAL 1. The checkmark indicates the current RAID configuration. 2. As standard precaution, the system prompts you for answer ID# 1787. Enter this information and ... RAID setting, click on an Intel-based Macintosh, go to support.wdc.com and search for an administrator's name and password to authenticate your My Book bootable on a device from the menu to confirm, click Configure again. 4.

User Manual
Page 22
To view the device status as well as the status of each internal hard drive, including which drive (A or B) may have experienced a fault, click on a device and then click Info, which brings up a drawer on the right hand side of each drive and take the appropriate action. WD RAID MANAGER FOR MAC - 19 MY BOOK STUDIO EDITION II USER MANUAL RAID Troubleshooting WD RAID Manager monitors the activity of the drives in the RAID system so you can view the status of the main window.
To view the device status as well as the status of each internal hard drive, including which drive (A or B) may have experienced a fault, click on a device and then click Info, which brings up a drawer on the right hand side of each drive and take the appropriate action. WD RAID MANAGER FOR MAC - 19 MY BOOK STUDIO EDITION II USER MANUAL RAID Troubleshooting WD RAID Manager monitors the activity of the drives in the RAID system so you can view the status of the main window.


