

English Manual
Page 1
If you have questions, or if parts are damaged or missing, DO NOT CONTACT THE STORE; IMPORTANT: Please register this product (see the limited warranty on the back cover of this manual) ... all precautions and instructions in the space above for future reference. MT Sat. 8 a.m.-4 p.m. Keep this manual before contacting Customer Care. please contact Customer Care. www.weslo.com Model No. WLEX81312.0 Serial No.
If you have questions, or if parts are damaged or missing, DO NOT CONTACT THE STORE; IMPORTANT: Please register this product (see the limited warranty on the back cover of this manual) ... all precautions and instructions in the space above for future reference. MT Sat. 8 a.m.-4 p.m. Keep this manual before contacting Customer Care. please contact Customer Care. www.weslo.com Model No. WLEX81312.0 Serial No.

English Manual
Page 2
...ICON IP, Inc. 2 WESLO is missing or illegible, see the front cover of the warning decal(s). TABLE OF CONTENTS WARNING DECAL PLACEMENT 2 IMPORTANT PRECAUTIONS 3 BEFORE YOU BEGIN 4 PART IDENTIFICATION CHART 5 ASSEMBLY 6 HOW TO USE THE EXERCISE BIKE 11 MAINTENANCE AND TROUBLESHOOTING 15... FCC INFORMATION 16 EXERCISE GUIDELINES 17 PART LIST 18 EXPLODED DRAWING 19 ORDERING REPLACEMENT PARTS Back Cover LIMITED WARRANTY Back Cover WARNING...
...ICON IP, Inc. 2 WESLO is missing or illegible, see the front cover of the warning decal(s). TABLE OF CONTENTS WARNING DECAL PLACEMENT 2 IMPORTANT PRECAUTIONS 3 BEFORE YOU BEGIN 4 PART IDENTIFICATION CHART 5 ASSEMBLY 6 HOW TO USE THE EXERCISE BIKE 11 MAINTENANCE AND TROUBLESHOOTING 15... FCC INFORMATION 16 EXERCISE GUIDELINES 17 PART LIST 18 EXPLODED DRAWING 19 ORDERING REPLACEMENT PARTS Back Cover LIMITED WARRANTY Back Cover WARNING...

English Manual
Page 3
...arch your back. 13. Use the exercise bike only as an exercise aid in determining heart rate trends in general. 6. Keep the exercise bike indoors, away from the exercise bike at least 2 ft. (0.6 m) of all parts regularly. Various factors may result in a ...commercial, rental, or institutional setting. 5. Reduce your exercise bike before using the exercise bike; Before beginning any worn parts immediately. 8. The exercise bike should ...
...arch your back. 13. Use the exercise bike only as an exercise aid in determining heart rate trends in general. 6. Keep the exercise bike indoors, away from the exercise bike at least 2 ft. (0.6 m) of all parts regularly. Various factors may result in a ...commercial, rental, or institutional setting. 5. Reduce your exercise bike before using the exercise bike; Before beginning any worn parts immediately. 8. The exercise bike should ...

English Manual
Page 4
...review the drawing below and familiarize yourself with the labeled parts. Cycling is not included 4 To help us . BEFORE YOU BEGIN Thank you have questions after reading this manual, please see the front cover of this manual. The PURSUIT R 2.2 exercise bike provides a selection of this manual. The model number and... Knob Water Bottle Holder* Seat Post Knob Leveling Cap Pedal/Strap *Water bottle is an effective exercise for selecting the new WESLO® PURSUIT R 2.2 exercise bike. If you for increasing cardiovascular fitness, building endurance, and toning the body.
...review the drawing below and familiarize yourself with the labeled parts. Cycling is not included 4 To help us . BEFORE YOU BEGIN Thank you have questions after reading this manual, please see the front cover of this manual. The PURSUIT R 2.2 exercise bike provides a selection of this manual. The model number and... Knob Water Bottle Holder* Seat Post Knob Leveling Cap Pedal/Strap *Water bottle is an effective exercise for selecting the new WESLO® PURSUIT R 2.2 exercise bike. If you for increasing cardiovascular fitness, building endurance, and toning the body.

English Manual
Page 5
The number in the hardware kit, check to identify the small parts needed for assembly. The number following the key number is the key number of the part, from the PART LIST near the end of this manual. Note: If a part is not in parentheses below to see if it has been preassembled. M8 Locknut (10)-6 M8 Split Washer (50)-3 M4 x 15mm Screw (48)-6 M8 x 15mm Screw (34)-3 M8 x 60mm Screw (30)-4 M8 x 65mm Bolt (49)-2 M10 x 70mm Screw (33)-2 5 PART IDENTIFICATION CHART Use the drawings below each drawing is the quantity needed for assembly. Extra parts may be included.
The number in the hardware kit, check to identify the small parts needed for assembly. The number following the key number is the key number of the part, from the PART LIST near the end of this manual. Note: If a part is not in parentheses below to see if it has been preassembled. M8 Locknut (10)-6 M8 Split Washer (50)-3 M4 x 15mm Screw (48)-6 M8 x 15mm Screw (34)-3 M8 x 60mm Screw (30)-4 M8 x 65mm Bolt (49)-2 M10 x 70mm Screw (33)-2 5 PART IDENTIFICATION CHART Use the drawings below each drawing is the quantity needed for assembly. Extra parts may be included.

English Manual
Page 6
... a set of pliers Assembly may be easier if you finish all assembly steps. • Left parts are marked "L" or "Left" and right parts are marked "R" or "Right." • To identify small parts, see page 5. • In addition to assemble this product, call 1-800-445-2480. •...the Rear Stabilizer (6) into the Frame (1). Attach the Rear Stabilizer with four M8 x 60mm 1 Screws (30). 6 1 30 6 To avoid damaging parts, do not use power tools. 1. ASSEMBLY • To hire an authorized service technician to the included tool(s), assembly requires the following tools: one Phillips...
... a set of pliers Assembly may be easier if you finish all assembly steps. • Left parts are marked "L" or "Left" and right parts are marked "R" or "Right." • To identify small parts, see page 5. • In addition to assemble this product, call 1-800-445-2480. •...the Rear Stabilizer (6) into the Frame (1). Attach the Rear Stabilizer with four M8 x 60mm 1 Screws (30). 6 1 30 6 To avoid damaging parts, do not use power tools. 1. ASSEMBLY • To hire an authorized service technician to the included tool(s), assembly requires the following tools: one Phillips...

English Manual
Page 10
...(24). Adjust the strap on the Right Pedal (not shown) in the Seat Post. After the exercise bike is assembled, inspect it to the desired height, and insert the Seat Post Knob (9) through the indicated hole... the Seat Post to make sure that it is inserted into the Frame (1). Place a mat beneath the exercise bike to the desired position, and press the end of the strap onto the tab on the Left Pedal (24)... Holes 1 Hole 9 21 10. Make sure that it functions properly. Note: Extra parts may be included. Make sure that the Seat Post Knob is assembled correctly and that all...
...(24). Adjust the strap on the Right Pedal (not shown) in the Seat Post. After the exercise bike is assembled, inspect it to the desired height, and insert the Seat Post Knob (9) through the indicated hole... the Seat Post to make sure that it is inserted into the Frame (1). Place a mat beneath the exercise bike to the desired position, and press the end of the strap onto the tab on the Left Pedal (24)... Holes 1 Hole 9 21 10. Make sure that it functions properly. Note: Extra parts may be included. Make sure that the Seat Post Knob is assembled correctly and that all...

English Manual
Page 15
...mild detergent. Loosen, but do not remove, the #8 x 16mm Screw (41). Turn the Crank (21) for a moment. To clean the exercise bike, use a damp cloth and a small amount of direct sunlight. CONSOLE TROUBLESHOOTING If the console display becomes dim, replace the batteries; To replace the batteries... the Magnet (38), and then retighten the #8 x 16mm Screw (41). Next, remove all parts of the exercise bike regularly. there are the result of low batteries. Replace any worn parts immediately. HOW TO ADJUST THE REED SWITCH If the console does not display correct feedback, the reed...
...mild detergent. Loosen, but do not remove, the #8 x 16mm Screw (41). Turn the Crank (21) for a moment. To clean the exercise bike, use a damp cloth and a small amount of direct sunlight. CONSOLE TROUBLESHOOTING If the console display becomes dim, replace the batteries; To replace the batteries... the Magnet (38), and then retighten the #8 x 16mm Screw (41). Next, remove all parts of the exercise bike regularly. there are the result of low batteries. Replace any worn parts immediately. HOW TO ADJUST THE REED SWITCH If the console does not display correct feedback, the reed...
English Manual
Page 16
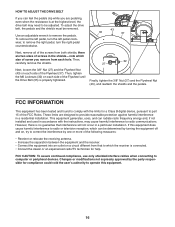
..., use only shielded interface cables when connecting to remove the pedals. To adjust the drive belt, the pedals and the shields must be adjusted. to part 15 of screw you are pedaling, even when the resistance is connected. • Consult the dealer or an experienced radio/TV technician for a Class B digital...
..., use only shielded interface cables when connecting to remove the pedals. To adjust the drive belt, the pedals and the shields must be adjusted. to part 15 of screw you are pedaling, even when the resistance is connected. • Consult the dealer or an experienced radio/TV technician for a Class B digital...
English Manual
Page 17
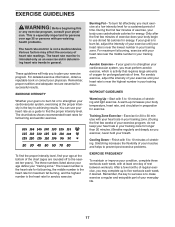
... To find the proper intensity level, find the proper intensity level. Remember, the key to success is the key to make exercise a regular and enjoyable part of the chart (ages are essential for successful results. Various factors may complete up increases your physician. You can use stored fat calories for energy...
... To find the proper intensity level, find the proper intensity level. Remember, the key to success is the key to make exercise a regular and enjoyable part of the chart (ages are essential for successful results. Various factors may complete up increases your physician. You can use stored fat calories for energy...
English Manual
Page 18
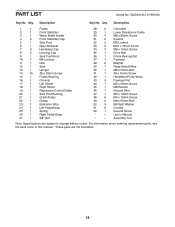
... 1 M5 x 16mm Screw 48 6 M4 x 15mm Screw 49 2 M8 x 65mm Bolt 50 3 M8 Split Washer 51 2 Contact 52 1 Ground Screw * - For information about ordering replacement parts, see the back cover of this manual. *These parts are subject to change without notice. Qty. PART LIST Model No. WLEX81312.0 R0912A Key No.
... 1 M5 x 16mm Screw 48 6 M4 x 15mm Screw 49 2 M8 x 65mm Bolt 50 3 M8 Split Washer 51 2 Contact 52 1 Ground Screw * - For information about ordering replacement parts, see the back cover of this manual. *These parts are subject to change without notice. Qty. PART LIST Model No. WLEX81312.0 R0912A Key No.

English Manual
Page 20
...do not allow limitations on how long an implied warranty lasts. ICON Health & Fitness, Inc., 1500 S. 1000 W., Logan, UT 84321-9813 Part No. 337946 R0912A Printed in workmanship and material, under warranty. ICON Health & Fitness, Inc. (ICON) warrants this product to repairing or... replacing, at ICON's option, the product through one of its authorized service centers. If replacement parts are warranted for a minimal handling charge. damages with the use or performance of the product; Accordingly, the above limitation may not ...
...do not allow limitations on how long an implied warranty lasts. ICON Health & Fitness, Inc., 1500 S. 1000 W., Logan, UT 84321-9813 Part No. 337946 R0912A Printed in workmanship and material, under warranty. ICON Health & Fitness, Inc. (ICON) warrants this product to repairing or... replacing, at ICON's option, the product through one of its authorized service centers. If replacement parts are warranted for a minimal handling charge. damages with the use or performance of the product; Accordingly, the above limitation may not ...


