

Uk Manual
Page 1
... there are committed to providing complete customer satisfaction. USER'S MANUAL Keep this equipment. WLEVEX71808.0 Serial No. Model No. Serial Number Decal QUESTIONS? As a manufacturer, we are missing parts, please contact us: Call: 08457 089 009 Outside UK: 0 (44) 113 3877133 Fax: 0 (44) 113 3877125 E-mail: [email protected] Write: ICON Health & Fitness, Ltd. Unit 4 Revie Road Industrial Estate Revie Road...
... there are committed to providing complete customer satisfaction. USER'S MANUAL Keep this equipment. WLEVEX71808.0 Serial No. Model No. Serial Number Decal QUESTIONS? As a manufacturer, we are missing parts, please contact us: Call: 08457 089 009 Outside UK: 0 (44) 113 3877133 Fax: 0 (44) 113 3877125 E-mail: [email protected] Write: ICON Health & Fitness, Ltd. Unit 4 Revie Road Industrial Estate Revie Road...

Uk Manual
Page 2
... 4 ASSEMBLY 5 HOW TO USE THE EXERCISE CYCLE 11 MAINTENANCE AND TROUBLESHOOTING 16 EXERCISE GUIDELINES 17 PART LIST 18 EXPLODED DRAWING 19 ORDERING REPLACEMENT PARTS Back Cover WARNING DECAL PLACEMENT This drawing shows the location(s) of ICON IP, Inc. 2 Do not allow children on the front cover of this manual and request a free replacement decal. This produc t is missing or illegible, call the telephone number on or around machin e. User weight must...
... 4 ASSEMBLY 5 HOW TO USE THE EXERCISE CYCLE 11 MAINTENANCE AND TROUBLESHOOTING 16 EXERCISE GUIDELINES 17 PART LIST 18 EXPLODED DRAWING 19 ORDERING REPLACEMENT PARTS Back Cover WARNING DECAL PLACEMENT This drawing shows the location(s) of ICON IP, Inc. 2 Do not allow children on the front cover of this manual and request a free replacement decal. This produc t is missing or illegible, call the telephone number on or around machin e. User weight must...
Uk Manual
Page 3
... affect the accuracy of all parts regularly. The pulse sensor is enough clearance around your exercise cycle only as an exercise aid in determining heart rate trends in a commercial, rental, or institutional setting. 8. Always wear athletic shoes for home use your exercise cycle. Make sure that all users of the exercise cycle are adequately informed of heart rate readings. Inspect and properly tighten all precautions. 3. Keep your...
... affect the accuracy of all parts regularly. The pulse sensor is enough clearance around your exercise cycle only as an exercise aid in determining heart rate trends in a commercial, rental, or institutional setting. 8. Always wear athletic shoes for home use your exercise cycle. Make sure that all users of the exercise cycle are adequately informed of heart rate readings. Inspect and properly tighten all precautions. 3. Keep your...

Uk Manual
Page 4
... reading this manual, please see the front cover of your benefit, read this manual. Handlebar Seat Seat Knob Console Pivot Handle Pulse Sensor Resistance Knob Seat Post Knob Leveling Cap Pedal/Strap 4 Before reading further, please review the drawing below and familiarize yourself with the labeled parts. For your home. To help us . The model number and the location of the serial number decal are shown on the front cover of this healthful exercise in the...
... reading this manual, please see the front cover of your benefit, read this manual. Handlebar Seat Seat Knob Console Pivot Handle Pulse Sensor Resistance Knob Seat Post Knob Leveling Cap Pedal/Strap 4 Before reading further, please review the drawing below and familiarize yourself with the labeled parts. For your home. To help us . The model number and the location of the serial number decal are shown on the front cover of this healthful exercise in the...

Uk Manual
Page 5
... kit, check to identify the small parts used in assembly. The number in a cleared area and remove the packing materials. If a part is the key number of the part, from the PART LIST near the end of this manual. Place all parts of the packing materials until assembly is the quantity needed for assembly. Do not dispose of the exercise cycle in parentheses below to see if...
... kit, check to identify the small parts used in assembly. The number in a cleared area and remove the packing materials. If a part is the key number of the part, from the PART LIST near the end of this manual. Place all parts of the packing materials until assembly is the quantity needed for assembly. Do not dispose of the exercise cycle in parentheses below to see if...
Uk Manual
Page 6
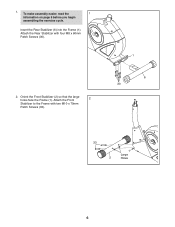
Insert the Rear Stabilizer (6) into the Frame (1). Attach the Rear Stabilizer with two M10 x 70mm Patch Screws (33). 1 6 30 33 1 Large 2 Holes 6 Orient the Front Stabilizer (2) so that the large holes face the Frame (1). Attach the Front 2 Stabilizer to the Frame with four M8 x 60mm Patch Screws (30). 2. To make assembly easier, read the 1 information on page 5 before you begin assembling the exercise cycle. 1.
Insert the Rear Stabilizer (6) into the Frame (1). Attach the Rear Stabilizer with two M10 x 70mm Patch Screws (33). 1 6 30 33 1 Large 2 Holes 6 Orient the Front Stabilizer (2) so that the large holes face the Frame (1). Attach the Front 2 Stabilizer to the Frame with four M8 x 60mm Patch Screws (30). 2. To make assembly easier, read the 1 information on page 5 before you begin assembling the exercise cycle. 1.
Uk Manual
Page 7
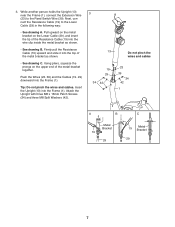
... 29 7 Next, connect the Resistance Cable (19) to the Reed Switch Wire (39). While another person holds the Upright (13) near the Frame (1), connect the Extension Wire (23) to the Lower Cable (29) in the following way: • See drawing A. 3. Tip: Do not pinch the wires and cables. Using pliers, squeeze the prongs on the Lower Cable (29), and insert the tip of the Resistance Cable (19) into...
... 29 7 Next, connect the Resistance Cable (19) to the Reed Switch Wire (39). While another person holds the Upright (13) near the Frame (1), connect the Extension Wire (23) to the Lower Cable (29) in the following way: • See drawing A. 3. Tip: Do not pinch the wires and cables. Using pliers, squeeze the prongs on the Lower Cable (29), and insert the tip of the Resistance Cable (19) into...
Uk Manual
Page 8
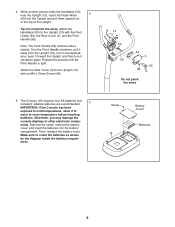
.... 4. Remove the screw, remove the battery cover, and insert the batteries into the Upright and pull them upward out of the top of the Upright. Attach the Handlebar (50) to room temperature before inserting batteries. Note: The Pivot Handle (55) functions like a ratchet. alkaline batteries are recommended. 5 IMPORTANT: If the Console has been exposed to orient the batteries as shown by the diagram inside...
.... 4. Remove the screw, remove the battery cover, and insert the batteries into the Upright and pull them upward out of the top of the Upright. Attach the Handlebar (50) to room temperature before inserting batteries. Note: The Pivot Handle (55) functions like a ratchet. alkaline batteries are recommended. 5 IMPORTANT: If the Console has been exposed to orient the batteries as shown by the diagram inside...

Uk Manual
Page 9
... on the Upright (13). Insert the excess wire downward into the hole in the bracket on the underside of the Seat (12). Set the Seat Carriage (58) in the Seat Block (57). Next, connect the console pulse wires to the Upright (13) with four M4 x 15mm Screws (48). 6 Pulse Wires Ground Wires 59 13 16 Console Wire 23 48 7. 6. Attach the Console (16) to the Pulse Wires (59). en the Seat Knob. 12...
... on the Upright (13). Insert the excess wire downward into the hole in the bracket on the underside of the Seat (12). Set the Seat Carriage (58) in the Seat Block (57). Next, connect the console pulse wires to the Upright (13) with four M4 x 15mm Screws (48). 6 Pulse Wires Ground Wires 59 13 16 Console Wire 23 48 7. 6. Attach the Console (16) to the Pulse Wires (59). en the Seat Knob. 12...
Uk Manual
Page 10
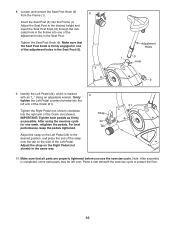
Loosen and remove the Seat Post Knob (9) from the Frame (1). 8 Insert the Seat Post (5) into the right arm of the Crank (not shown). Tighten the Seat Post Knob (9). Make sure that all parts are properly tightened before you use the exercise cycle. Using an adjustable wrench, firmly 9 tighten the Left Pedal counterclockwise into the left over. After using the exercise cycle for one of the adjustment holes in the Seat Post. For...
Loosen and remove the Seat Post Knob (9) from the Frame (1). 8 Insert the Seat Post (5) into the right arm of the Crank (not shown). Tighten the Seat Post Knob (9). Make sure that all parts are properly tightened before you use the exercise cycle. Using an adjustable wrench, firmly 9 tighten the Left Pedal counterclockwise into the left over. After using the exercise cycle for one of the adjustment holes in the Seat Post. For...

Uk Manual
Page 11
... resistance, turn it clockwise again. IMPORTANT: Stop turning the knob when turning becomes difficult, or damage may result. Leveling Caps 11 cise, the seat should be at the proper height. Seat Seat Knob To increase the resistance of the seat, first loosen and remove the Hole seat post knob. HOW TO USE THE EXERCISE CYCLE HOW TO ADJUST THE SEAT POST HOW TO ADJUST THE PEDALING RESISTANCE For effective exer- Resistance Knob HOW TO ADJUST...
... resistance, turn it clockwise again. IMPORTANT: Stop turning the knob when turning becomes difficult, or damage may result. Leveling Caps 11 cise, the seat should be at the proper height. Seat Seat Knob To increase the resistance of the seat, first loosen and remove the Hole seat post knob. HOW TO USE THE EXERCISE CYCLE HOW TO ADJUST THE SEAT POST HOW TO ADJUST THE PEDALING RESISTANCE For effective exer- Resistance Knob HOW TO ADJUST...

Uk Manual
Page 12
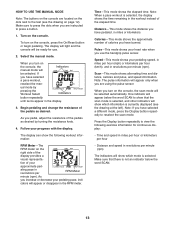
... exercise feedback. The console also offers two pace workouts that batteries are installed (see assembly step 5 on the display, remove the plastic. 12 To use the manual mode, see page 15. To use a pace workout, see page 13. As you through an effective exercise session. HOW TO USE THE EXERCISE CYCLE CONSOLE DIAGRAM On/Reset Button Display Button Workout Select Button FEATURES OF THE CONSOLE The console offers a selection of clear plastic on page 8). Before using the handgrip pulse sensor...
... exercise feedback. The console also offers two pace workouts that batteries are installed (see assembly step 5 on the display, remove the plastic. 12 To use the manual mode, see page 15. To use a pace workout, see page 13. As you through an effective exercise session. HOW TO USE THE EXERCISE CYCLE CONSOLE DIAGRAM On/Reset Button Display Button Workout Select Button FEATURES OF THE CONSOLE The console offers a selection of clear plastic on page 8). Before using the handgrip pulse sensor...
Uk Manual
Page 13
... sure to press the dots when you turn on the console, the Indicators manual mode will show which mode is selected, the display shows the time remaining in the workout instead of calories you have burned. When you are instructed to press a button. 1. Follow your approximate ped- The display can show the following exercise information for use the handgrip pulse sensor. Speed-This mode shows your pedaling speed, in miles per hour...
... sure to press the dots when you turn on the console, the Indicators manual mode will show which mode is selected, the display shows the time remaining in the workout instead of calories you have burned. When you are instructed to press a button. 1. Follow your approximate ped- The display can show the following exercise information for use the handgrip pulse sensor. Speed-This mode shows your pedaling speed, in miles per hour...
Uk Manual
Page 14
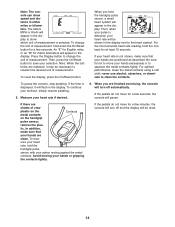
... the handgrip pulse sensor, remove the plas- never use alcohol, abrasives, or chemicals to change the unit of measurement, hold the contacts for a few seconds. Measure your hands or gripping the contacts tightly. If your heart rate is not shown, make sure that your heart rate will turn off automatically. To pause the console, stop pedaling. Avoid moving your heart rate if desired. 6. Press the Display button to clean...
... the handgrip pulse sensor, remove the plas- never use alcohol, abrasives, or chemicals to change the unit of measurement, hold the contacts for a few seconds. Measure your hands or gripping the contacts tightly. If your heart rate is not shown, make sure that your heart rate will turn off automatically. To pause the console, stop pedaling. Avoid moving your heart rate if desired. 6. Press the Display button to clean...
Uk Manual
Page 15
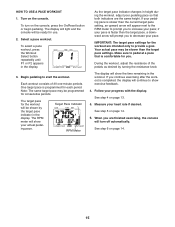
... only to start the workout. During the workout, adjust the resistance of 30 one-minute periods. See step 5 on page 14. 15 If you . The RPM meter will be slower than the current target pace setting, an upward arrow will prompt you to decrease your pace is completed, the display will turn on the console, press the On/Reset button or begin pedaling. Target...
... only to start the workout. During the workout, adjust the resistance of 30 one-minute periods. See step 5 on page 14. 15 If you . The RPM meter will be slower than the current target pace setting, an upward arrow will prompt you to decrease your pace is completed, the display will turn on the console, press the On/Reset button or begin pedaling. Target...
Uk Manual
Page 16
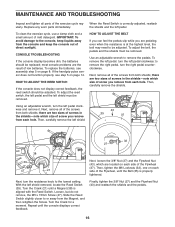
... Screw (47). If the handgrip pulse sensor does not function properly, see assembly step 5 on page 14. Next, remove all of direct sunlight. Turn the Crank (21) until the console displays correct feedback. Replace any worn parts immediately. When the Reed Switch is at the highest level, the belt may need to or away from both shields; IMPORTANT: To avoid damage to the lowest setting. HOW TO ADJUST THE REED SWITCH...
... Screw (47). If the handgrip pulse sensor does not function properly, see assembly step 5 on page 14. Next, remove all of direct sunlight. Turn the Crank (21) until the console displays correct feedback. Replace any worn parts immediately. When the Reed Switch is at the highest level, the belt may need to or away from both shields; IMPORTANT: To avoid damage to the lowest setting. HOW TO ADJUST THE REED SWITCH...
Uk Manual
Page 17
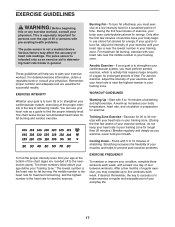
... maximum fat burning, exercise with pre-existing health problems. The pulse sensor is activity that requires large amounts of oxygen for energy. The three numbers listed above your age define your physician. Various factors may complete up increases your body temperature, heart rate, and circulation in your breath. For detailed exercise information, obtain a reputable book or consult your "training zone." Stretching increases the...
... maximum fat burning, exercise with pre-existing health problems. The pulse sensor is activity that requires large amounts of oxygen for energy. The three numbers listed above your age define your physician. Various factors may complete up increases your body temperature, heart rate, and circulation in your breath. For detailed exercise information, obtain a reputable book or consult your "training zone." Stretching increases the...
Uk Manual
Page 18
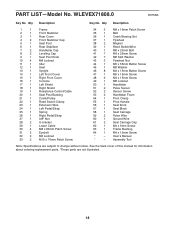
... Cover 15 1 Right Front Cover 16 1 Console 17 1 Left Shield 18 1 Right Shield 19 1 Resistance Control/Cable 20 1 Seat Post Bushing 21 1 Crank/Pulley 22 1 Reed Switch Clamp 23 1 Extension Wire 24 1 Left Pedal/Strap 25 1 Spring 26 1 Right Pedal/Strap 27 1 3/8" Nut 28 2 U-bracket 29 1 Lower Cable 30 4 M8 x 60mm Patch Screw 31 2 Eyebolt 32 2 M6 Locknut 33 2 M10 x 70mm Patch Screw 34 3 M8 x 16mm Patch Screw 35 1 Belt 36 1 Crank Bearing Set...
... Cover 15 1 Right Front Cover 16 1 Console 17 1 Left Shield 18 1 Right Shield 19 1 Resistance Control/Cable 20 1 Seat Post Bushing 21 1 Crank/Pulley 22 1 Reed Switch Clamp 23 1 Extension Wire 24 1 Left Pedal/Strap 25 1 Spring 26 1 Right Pedal/Strap 27 1 3/8" Nut 28 2 U-bracket 29 1 Lower Cable 30 4 M8 x 60mm Patch Screw 31 2 Eyebolt 32 2 M6 Locknut 33 2 M10 x 70mm Patch Screw 34 3 M8 x 16mm Patch Screw 35 1 Belt 36 1 Crank Bearing Set...
Uk Manual
Page 19
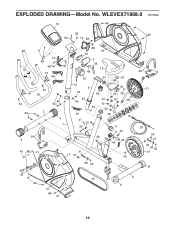
EXPLODED DRAWING-Model No. WLEVEX71808.0 R0708A 16 46 62 46 60 15 48 53 7 14 48 48 44 51 59 52 51 50 52 33 2 42 34 4 1 24 4 48 18 54 3 55 12 48 19 61 58 13 5 34 56 42 63 42 23 42 10 10 64 20 42 36 10 57 61 38 38 47 22 39 49 9 11 40 25 45 46 41 31 17 27 43 28 32 26 21 29 43 31 43 28 32 37 8 41 46 41 46 41 35 30 6 8 19
EXPLODED DRAWING-Model No. WLEVEX71808.0 R0708A 16 46 62 46 60 15 48 53 7 14 48 48 44 51 59 52 51 50 52 33 2 42 34 4 1 24 4 48 18 54 3 55 12 48 19 61 58 13 5 34 56 42 63 42 23 42 10 10 64 20 42 36 10 57 61 38 38 47 22 39 49 9 11 40 25 45 46 41 31 17 27 43 28 32 26 21 29 43 31 43 28 32 37 8 41 46 41 46 41 35 30 6 8 19

Uk Manual
Page 20
ORDERING REPLACEMENT PARTS To order replacement parts, please see the PART LIST and the EXPLODED DRAWING near the end of this manual) Part No. 265985 R0708A Printed in China © 2008 ICON IP, Inc. To help us assist you, be prepared to provide the following information when contacting us: • the model number and serial number of the product (see the front cover of this manual) • the name of the product (see the front cover of this manual) • the key number and description of the replacement part(s) (see the front cover of this manual.
ORDERING REPLACEMENT PARTS To order replacement parts, please see the PART LIST and the EXPLODED DRAWING near the end of this manual) Part No. 265985 R0708A Printed in China © 2008 ICON IP, Inc. To help us assist you, be prepared to provide the following information when contacting us: • the model number and serial number of the product (see the front cover of this manual) • the name of the product (see the front cover of this manual) • the key number and description of the replacement part(s) (see the front cover of this manual.


