
English Manual
Page 1
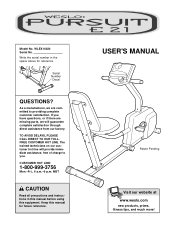
... trained technicians on our customer hot line will guarantee complete satisfaction through direct assistance from our factory. MST CAUTION Read all precautions and instructions in the space above for future reference. As a manufacturer, we will provide immediate assistance, free of charge to providing complete customer satisfaction. Keep this equipment. Write the serial number in this manual before using this manual...
... trained technicians on our customer hot line will guarantee complete satisfaction through direct assistance from our factory. MST CAUTION Read all precautions and instructions in the space above for future reference. As a manufacturer, we will provide immediate assistance, free of charge to providing complete customer satisfaction. Keep this equipment. Write the serial number in this manual before using this manual...

English Manual
Page 2
TABLE OF CONTENTS IMPORTANT PRECAUTIONS 3 BEFORE YOU BEGIN 4 ASSEMBLY 5 HOW TO USE THE EXERCISE CYCLE 9 MAINTENANCE AND STORAGE 11 CONDITIONING GUIDELINES 13 PART LIST 14 EXPLODED DRAWING 15 ORDERING REPLACEMENT PARTS Back Cover LIMITED WARRANTY Back Cover WESLO is a registered trademark of ICON Health & Fitness, Inc. 2
TABLE OF CONTENTS IMPORTANT PRECAUTIONS 3 BEFORE YOU BEGIN 4 ASSEMBLY 5 HOW TO USE THE EXERCISE CYCLE 9 MAINTENANCE AND STORAGE 11 CONDITIONING GUIDELINES 13 PART LIST 14 EXPLODED DRAWING 15 ORDERING REPLACEMENT PARTS Back Cover LIMITED WARRANTY Back Cover WESLO is a registered trademark of ICON Health & Fitness, Inc. 2

English Manual
Page 3
... and properly tighten all instructions in a commercial, rental, or institutional setting. 12. Various factors, including the user's movement, may affect the accuracy of this manual before using the exercise cycle. 2. It is not a medical device. Keep children under the exercise cycle to move until the flywheel stops. Do not use of heart rate readings. The pulse sensor is the responsibility of the owner to ensure that...
... and properly tighten all instructions in a commercial, rental, or institutional setting. 12. Various factors, including the user's movement, may affect the accuracy of this manual before using the exercise cycle. 2. It is not a medical device. Keep children under the exercise cycle to move until the flywheel stops. Do not use of heart rate readings. The pulse sensor is the responsibility of the owner to ensure that...
English Manual
Page 4
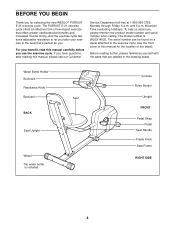
... parts that offers greater cardiovascular benefits and increased muscle toning. The PURSUIT E 21 exercise cycle offers an effective form of the decal). The model number is included Console Pulse Sensor Upright FRONT Pedal Strap Pedal Seat Handle Frame Knob Seat Frame RIGHT SIDE 4 Water Bottle Holder* Bookrack Resistance Knob Backrest BACK Seat Upright Seat Wheel *No water bottle is WLEX14020. If you have questions after reading this manual carefully before you use the exercise...
... parts that offers greater cardiovascular benefits and increased muscle toning. The PURSUIT E 21 exercise cycle offers an effective form of the decal). The model number is included Console Pulse Sensor Upright FRONT Pedal Strap Pedal Seat Handle Frame Knob Seat Frame RIGHT SIDE 4 Water Bottle Holder* Bookrack Resistance Knob Backrest BACK Seat Upright Seat Wheel *No water bottle is WLEX14020. If you have questions after reading this manual carefully before you use the exercise...
English Manual
Page 5
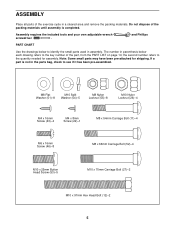
... Screw (46)-8 M8 x 66mm Carriage Bolt (52)-4 M10 x 25mm Button Head Screw (53)-5 M10 x 70mm Carriage Bolt (27)-2 M10 x 97mm Hex Head Bolt (12)-2 5 ASSEMBLY Place all parts of the packing materials until assembly is not in the parts bag, check to the key number of the part, from the PART LIST on page 14; the second number refers to identify the small parts used in assembly. and Phillips PART CHART Use...
... Screw (46)-8 M8 x 66mm Carriage Bolt (52)-4 M10 x 25mm Button Head Screw (53)-5 M10 x 70mm Carriage Bolt (27)-2 M10 x 97mm Hex Head Bolt (12)-2 5 ASSEMBLY Place all parts of the packing materials until assembly is not in the parts bag, check to the key number of the part, from the PART LIST on page 14; the second number refers to identify the small parts used in assembly. and Phillips PART CHART Use...
English Manual
Page 6
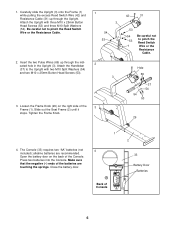
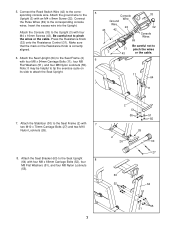
... (54). 1. Attach the Upright with two M10 Split Washers (54) and two M10 x 25mm Button Head Screws (53). 3 3. Attach the Handlebar (37) to pinch the Reed Switch Wire or the Resistance Cable. 1 3 54 53 2. Slide out the Seat Frame (2) until it stops. Hole 69 37 54 54 53 29 1 4. Press two batteries into the Console. The Console (33) requires two "AA" batteries (not 4 included); Tighten the Frame Knob. 42...
... (54). 1. Attach the Upright with two M10 Split Washers (54) and two M10 x 25mm Button Head Screws (53). 3 3. Attach the Handlebar (37) to pinch the Reed Switch Wire or the Resistance Cable. 1 3 54 53 2. Slide out the Seat Frame (2) until it stops. Hole 69 37 54 54 53 29 1 4. Press two batteries into the Console. The Console (33) requires two "AA" batteries (not 4 included); Tighten the Frame Knob. 42...
English Manual
Page 7
... Nylon Locknuts (55). Attach the Seat Upright (64) to 31 pinch the wires 3 43 or the cable. 6 11 64 11 7. Note: It may be helpful to tip the exercise cycle on the Resistance Knob is correctly aligned. 6. Insert the excess wire into the Upright. Press the Resistance Knob (32) onto the Resistance Control (31). Connect the Reed Switch Wire (42) to the Upright (3) with 7 two M10 x 70mm Carriage Bolts (27) and...
... Nylon Locknuts (55). Attach the Seat Upright (64) to 31 pinch the wires 3 43 or the cable. 6 11 64 11 7. Note: It may be helpful to tip the exercise cycle on the Resistance Knob is correctly aligned. 6. Insert the excess wire into the Upright. Press the Resistance Knob (32) onto the Resistance Control (31). Connect the Reed Switch Wire (42) to the Upright (3) with 7 two M10 x 70mm Carriage Bolts (27) and...
English Manual
Page 8
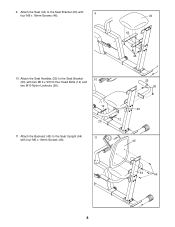
Attach the Seat (44) to the Seat Bracket (63) with four M6 x 16mm Screws (46). 63 12 45 64 46 8 Attach the Backrest (45) to the Seat Bracket 10 (63) with two M10 x 97mm Hex Head Bolts (12) and two M10 Nylon Locknuts (26). 25 26 12 25 11. 9. Attach the Seat Handles (25) to the Seat Upright (64) 11 with 9 four M6 x 16mm Screws (46). 44 63 46 10.
Attach the Seat (44) to the Seat Bracket (63) with four M6 x 16mm Screws (46). 63 12 45 64 46 8 Attach the Backrest (45) to the Seat Bracket 10 (63) with two M10 x 97mm Hex Head Bolts (12) and two M10 Nylon Locknuts (26). 25 26 12 25 11. 9. Attach the Seat Handles (25) to the Seat Upright (64) 11 with 9 four M6 x 16mm Screws (46). 44 63 46 10.
English Manual
Page 9
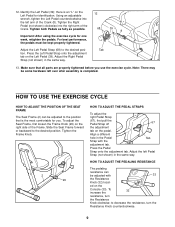
... Crank (8). To adjust the Seat Frame, first loosen the Frame Knob (29) on the Left Pedal for identification. Tighten the Frame Knob. 2 29 HOW TO ADJUST THE PEDAL STRAPS To adjust the right Pedal Strap (67), first pull the Pedal Strap off 67 the adjustment tab on the pedal. Press the Pedal Strap onto the adjustment tab. to the position that all parts are properly tightened before you . To 32 increase the resistance, turn the Resistance Knob...
... Crank (8). To adjust the Seat Frame, first loosen the Frame Knob (29) on the Left Pedal for identification. Tighten the Frame Knob. 2 29 HOW TO ADJUST THE PEDAL STRAPS To adjust the right Pedal Strap (67), first pull the Pedal Strap off 67 the adjustment tab on the pedal. Press the Pedal Strap onto the adjustment tab. to the position that all parts are properly tightened before you . To 32 increase the resistance, turn the Resistance Knob...
English Manual
Page 10
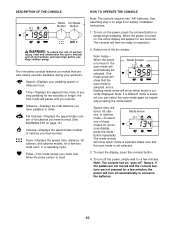
... that provide instant exercise feedback during your workouts: Speed-Displays your heart rate when the pulse sensor is cur- Scan-Displays the speed, time, distance, fat calories, and calories modes, for a few minutes, the power will turn on the power, press the on/reset button or simply begin pedaling. Select one of these modes for contin- When the power Mode Arrows is not selected. 3. Speed, time, dis- Note: If you stop pedaling for ten seconds...
... that provide instant exercise feedback during your workouts: Speed-Displays your heart rate when the pulse sensor is cur- Scan-Displays the speed, time, distance, fat calories, and calories modes, for a few minutes, the power will turn on the power, press the on/reset button or simply begin pedaling. Select one of these modes for contin- When the power Mode Arrows is not selected. 3. Speed, time, dis- Note: If you stop pedaling for ten seconds...
English Manual
Page 11
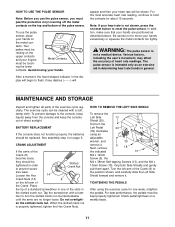
... on/reset button to prevent exces- Slotted Crank Nut sive wear. Grip both Side Shields and gently pull them apart. Check pedal tightness on page 6. tacts. For the most accurate heart rate reading, continue to turn the Left Pedal 20 (39) clockwise 8 13 using the exercise cycle for about 15 seconds. WARNING: The pulse sensor is properly tightened, tighten the Hex Crank Nuts. CRANK ADJUSTMENT If the arms...
... on/reset button to prevent exces- Slotted Crank Nut sive wear. Grip both Side Shields and gently pull them apart. Check pedal tightness on page 6. tacts. For the most accurate heart rate reading, continue to turn the Left Pedal 20 (39) clockwise 8 13 using the exercise cycle for about 15 seconds. WARNING: The pulse sensor is properly tightened, tighten the Hex Crank Nuts. CRANK ADJUSTMENT If the arms...
English Manual
Page 12
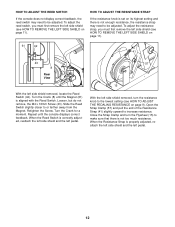
... resistance strap, you must first remove the left side shield removed, locate the Reed Switch (42). Loosen, but do not remove, the M4 x 16mm Screw (43). Retighten the Screw. HOW TO ADJUST THE RESISTANCE STRAP If the resistance knob is set on page 9). Repeat until the Magnet (61) is aligned with the Reed Switch. When the Resistance Strap is not enough resistance, the resistance strap may need to be adjusted. Turn the Crank (8) until the console displays correct feedback. Turn...
... resistance strap, you must first remove the left side shield removed, locate the Reed Switch (42). Loosen, but do not remove, the M4 x 16mm Screw (43). Retighten the Screw. HOW TO ADJUST THE RESISTANCE STRAP If the resistance knob is set on page 9). Repeat until the Magnet (61) is aligned with the Reed Switch. When the Resistance Strap is not enough resistance, the resistance strap may need to be adjusted. Turn the Crank (8) until the console displays correct feedback. Turn...
English Manual
Page 13
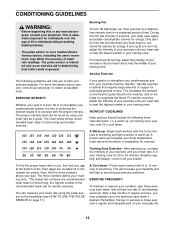
..., with pre-existing health problems. • The pulse sensor is in preparation for energy. The lowest two numbers are rounded off to prevent post-exercise problems. EXERCISE FREQUENCY To maintain or improve your heart rate is not a medical device. Aerobic Exercise The following three important parts: (1) a warm-up . The three numbers define your body uses easily accessible carbohydrate calories for exercise. Training Zone Exercise-After warming up to...
..., with pre-existing health problems. • The pulse sensor is in preparation for energy. The lowest two numbers are rounded off to prevent post-exercise problems. EXERCISE FREQUENCY To maintain or improve your heart rate is not a medical device. Aerobic Exercise The following three important parts: (1) a warm-up . The three numbers define your body uses easily accessible carbohydrate calories for exercise. Training Zone Exercise-After warming up to...
English Manual
Page 14
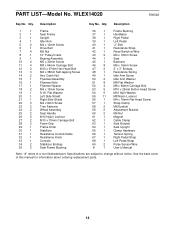
PART LIST-Model No. Specifications are subject to a non-illustrated part. Qty. See the back cover of this manual for information about ordering replacement parts. 14 Qty. Description Key No. WLEX14020 R0602A Key No. Description 1 1 Frame 2 1 Seat Frame 3 1 Upright 4 1 Idler Arm 5 2 M4 x 12mm Screw 6 1 Drive Belt 7 4 M5 Nut 8 1 12" Pulley/Crank 9 1 Bearing Assembly 10 4 M5 x 30mm Screw 11 4 M8 x 54mm Carriage Bolt 12 2 M10 x 97mm Hex Head Bolt 13 3 M4 x 38mm Self-tapping Screw 14 2 Hex...
PART LIST-Model No. Specifications are subject to a non-illustrated part. Qty. See the back cover of this manual for information about ordering replacement parts. 14 Qty. Description Key No. WLEX14020 R0602A Key No. Description 1 1 Frame 2 1 Seat Frame 3 1 Upright 4 1 Idler Arm 5 2 M4 x 12mm Screw 6 1 Drive Belt 7 4 M5 Nut 8 1 12" Pulley/Crank 9 1 Bearing Assembly 10 4 M5 x 30mm Screw 11 4 M8 x 54mm Carriage Bolt 12 2 M10 x 97mm Hex Head Bolt 13 3 M4 x 38mm Self-tapping Screw 14 2 Hex...
English Manual
Page 15
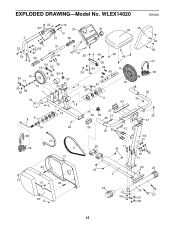
WLEX14020 R0602A 22 10 42 33 32 10 3 31 69 45 44 7 37 53 54 53 54 69 54 43 55 4 49 46 46 54 60 59 55 53 15 60 17 58 56 19 57 16 34 59 55 58 1 50 40 26 50 66 65 48 5 43 42 62 8 61 28 34 5 18 9 26 63 18 9 8 47 22 29 12 28 46 46 67 38 25 26 47 14 68 41 39 22 6 21 36 25 52 12 35 11 43 64 51 51 55 11 23 13 13 23 20 13 43 2 24 51 55 26 24 30 27 51 55 15 EXPLODED DRAWING-Model No.
WLEX14020 R0602A 22 10 42 33 32 10 3 31 69 45 44 7 37 53 54 53 54 69 54 43 55 4 49 46 46 54 60 59 55 53 15 60 17 58 56 19 57 16 34 59 55 58 1 50 40 26 50 66 65 48 5 43 42 62 8 61 28 34 5 18 9 26 63 18 9 8 47 22 29 12 28 46 46 67 38 25 26 47 14 68 41 39 22 6 21 36 25 52 12 35 11 43 64 51 51 55 11 23 13 13 23 20 13 43 2 24 51 55 26 24 30 27 51 55 15 EXPLODED DRAWING-Model No.
English Manual
Page 16
... manual) • The KEY NUMBER and DESCRIPTION of purchase. Mountain Time (excluding holidays). No other rights which warranty claims are made must be free from the date of the part(s) (see the PART LIST on how long an implied warranty lasts. All repairs for commercial or rental purposes, or products used as store display models. Some states do not allow limitations on page 14) LIMITED WARRANTY ICON Health & Fitness...
... manual) • The KEY NUMBER and DESCRIPTION of purchase. Mountain Time (excluding holidays). No other rights which warranty claims are made must be free from the date of the part(s) (see the PART LIST on how long an implied warranty lasts. All repairs for commercial or rental purposes, or products used as store display models. Some states do not allow limitations on page 14) LIMITED WARRANTY ICON Health & Fitness...


