

English Manual
Page 1
... the limited warranty on the back cover of this manual for reference. USER’'S MANUAL www.weslo.com Model No. MT Sat. 8 a.m.–-4 p.m. Keep this manual) before using this equipment. please contact Customer Care. Serial Number Decal QUESTIONS? MT ON THE WEB: www.wesloservice.com CAUTION Read all precautions and instructions in the space above for future reference. WLEX89912.0 Serial No. Write the serial number in this manual...
... the limited warranty on the back cover of this manual for reference. USER’'S MANUAL www.weslo.com Model No. MT Sat. 8 a.m.–-4 p.m. Keep this manual) before using this equipment. please contact Customer Care. Serial Number Decal QUESTIONS? MT ON THE WEB: www.wesloservice.com CAUTION Read all precautions and instructions in the space above for future reference. WLEX89912.0 Serial No. Write the serial number in this manual...

English Manual
Page 2
... PRECAUTIONS 3 BEFORE YOU BEGIN 4 ASSEMBLY 5 HOW TO USE THE EXERCISE BIKE 8 FCC INFORMATION 10 MAINTENANCE AND TROUBLESHOOTING 11 EXERCISE GUIDELINES 12 PART LIST 14 EXPLODED DRAWING 15 ORDERING REPLACEMENT PARTS Back Cover LIMITED WARRANTY Back Cover WARNING DECAL PLACEMENT This drawing shows the location(s) of this manual and request a free replacement decal. Note: The decal(s) may not be shown at actual size. If a decal is a registered trademark of ICON IP, Inc. 2 Apply...
... PRECAUTIONS 3 BEFORE YOU BEGIN 4 ASSEMBLY 5 HOW TO USE THE EXERCISE BIKE 8 FCC INFORMATION 10 MAINTENANCE AND TROUBLESHOOTING 11 EXERCISE GUIDELINES 12 PART LIST 14 EXPLODED DRAWING 15 ORDERING REPLACEMENT PARTS Back Cover LIMITED WARRANTY Back Cover WARNING DECAL PLACEMENT This drawing shows the location(s) of this manual and request a free replacement decal. Note: The decal(s) may not be shown at actual size. If a decal is a registered trademark of ICON IP, Inc. 2 Apply...

English Manual
Page 3
... have a free wheel; Reduce your physician. do not wear loose clothes that all users of the exercise bike are adequately informed of all precautions. 4. If you feel faint or if you experience pain while exercising, stop immediately and cool down. 3 Keep the exercise bike indoors, away from the exercise bike at least 2 ft. (0.6 m) of clearance around the exercise bike. Replace any exercise program, consult your pedaling speed in...
... have a free wheel; Reduce your physician. do not wear loose clothes that all users of the exercise bike are adequately informed of all precautions. 4. If you feel faint or if you experience pain while exercising, stop immediately and cool down. 3 Keep the exercise bike indoors, away from the exercise bike at least 2 ft. (0.6 m) of clearance around the exercise bike. Replace any exercise program, consult your pedaling speed in...

English Manual
Page 4
... toning the body. If you use the exercise bike. For your workouts at home more effective and enjoyable. Before reading further, please review the drawing below and familiarize yourself with the labeled parts. Length: 3 ft. 4 in. (102 cm) Width: 1 ft. 7 in. (48 cm) Weight: 44 lbs. (20 kg) Handlebar Seat Seat Post Seat Knob Pedal Shield Console Resistance Knob Flywheel Leveling Cap 4 To help us . The PURSUIT R 1.2 exercise bike provides...
... toning the body. If you use the exercise bike. For your workouts at home more effective and enjoyable. Before reading further, please review the drawing below and familiarize yourself with the labeled parts. Length: 3 ft. 4 in. (102 cm) Width: 1 ft. 7 in. (48 cm) Weight: 44 lbs. (20 kg) Handlebar Seat Seat Post Seat Knob Pedal Shield Console Resistance Knob Flywheel Leveling Cap 4 To help us . The PURSUIT R 1.2 exercise bike provides...

English Manual
Page 5
... assembly steps. •• Left parts are marked “"L”" or “"Left”" and right parts are facing away from the saddle bracket 2 on the Frame (1). Turn the Front Stabilizer (5) so that the slot faces downward, and insert the Rear Stabilizer into the 1 Frame (1). Attach the Front Stabilizer with four M6 x 10mm Machine Screws (56). 56 2 1 Slot 2. Attach the Rear...
... assembly steps. •• Left parts are marked “"L”" or “"Left”" and right parts are facing away from the saddle bracket 2 on the Frame (1). Turn the Front Stabilizer (5) so that the slot faces downward, and insert the Rear Stabilizer into the 1 Frame (1). Attach the Front Stabilizer with four M6 x 10mm Machine Screws (56). 56 2 1 Slot 2. Attach the Rear...

English Manual
Page 6
... Pivot Axle, and tighten an M8 Locknut (9) onto each end of the Pivot Axle (3). 50 40 32 Hole 1 38 9 50 4. 3. Slide the Left and Right Handlebars (40, 41) onto 41 the ends of the Console (7). Next, plug the Reed Switch Wire (28) fully into the Console. Remove all parts from the back of the included grease to the Pivot Axle...
... Pivot Axle, and tighten an M8 Locknut (9) onto each end of the Pivot Axle (3). 50 40 32 Hole 1 38 9 50 4. 3. Slide the Left and Right Handlebars (40, 41) onto 41 the ends of the Console (7). Next, plug the Reed Switch Wire (28) fully into the Console. Remove all parts from the back of the included grease to the Pivot Axle...

English Manual
Page 7
... parts are properly tightened before you use the exercise bike. Repeat this step to the Seat. Attach the Seat (11) to protect the floor or carpet from the Right Pedal. 5. Remove only the Right Pedal Nut (47) and the Pedal Bushing (46) from damage. 7 Then, orient the Pedal Bushing (46) as possible. Note: Extra parts may be preattached to attach the Left Pedal (not shown), turning the Left Pedal...
... parts are properly tightened before you use the exercise bike. Repeat this step to the Seat. Attach the Seat (11) to protect the floor or carpet from the Right Pedal. 5. Remove only the Right Pedal Nut (47) and the Pedal Bushing (46) from damage. 7 Then, orient the Pedal Bushing (46) as possible. Note: Extra parts may be preattached to attach the Left Pedal (not shown), turning the Left Pedal...

English Manual
Page 8
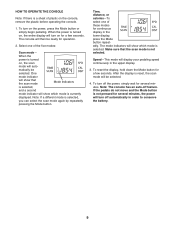
... USE THE EXERCISE BIKE HOW TO ADJUST THE SEAT HOW TO INSTALL A BATTERY For effective exer- DESCRIPTION OF THE CONSOLE The console features five modes that provide instant exercise feedback during your exercise, the pedaling resistance can be operated, a battery must be installed. To increase the resistance, turn one or both of calories you have burned. •• Distance (DIST) mode—-Displays the total distance you stop pedaling for a few seconds, the time mode...
... USE THE EXERCISE BIKE HOW TO ADJUST THE SEAT HOW TO INSTALL A BATTERY For effective exer- DESCRIPTION OF THE CONSOLE The console features five modes that provide instant exercise feedback during your exercise, the pedaling resistance can be operated, a battery must be installed. To increase the resistance, turn one or both of calories you have burned. •• Distance (DIST) mode—-Displays the total distance you stop pedaling for a few seconds, the time mode...
English Manual
Page 9
... lower display, press the Mode button repeatedly. Speed—-This mode will display your pedaling speed continuously in order to conserve the battery. 9 When the power is selected. The console will then be selected. Select one of these modes for operation. 2. The mode indicators will show which mode is turned on, the scan mode will auto- One mode indicator will show which mode is turned on for several minutes. To reset the display...
... lower display, press the Mode button repeatedly. Speed—-This mode will display your pedaling speed continuously in order to conserve the battery. 9 When the power is selected. The console will then be selected. Select one of these modes for operation. 2. The mode indicators will show which mode is turned on, the scan mode will auto- One mode indicator will show which mode is turned on for several minutes. To reset the display...

English Manual
Page 10
...: To assure continued compliance, use only shielded interface cables when connecting to provide reasonable protection against harmful interference in a particular installation. If this equipment. 10 These limits are designed to computer or peripheral devices. However, there is connected. •• Consult the dealer or an experienced radio/TV technician for help. Changes or modifications not expressly approved...
...: To assure continued compliance, use only shielded interface cables when connecting to provide reasonable protection against harmful interference in a particular installation. If this equipment. 10 These limits are designed to computer or peripheral devices. However, there is connected. •• Consult the dealer or an experienced radio/TV technician for help. Changes or modifications not expressly approved...

English Manual
Page 11
... crank nut is cre- To tighten the chain, loosen, but do not remove, the axle nuts on page 6). ted crank nut counterclockwise until the arms are no longer loose. Make sure that must be adjusted. Replace any worn parts immediately. To clean the exercise bike, use a damp cloth and a small amount of direct sunlight. BATTERY REPLACEMENT If the console does not function properly, replace the battery (see assembly step...
... crank nut is cre- To tighten the chain, loosen, but do not remove, the axle nuts on page 6). ted crank nut counterclockwise until the arms are no longer loose. Make sure that must be adjusted. Replace any worn parts immediately. To clean the exercise bike, use a damp cloth and a small amount of direct sunlight. BATTERY REPLACEMENT If the console does not function properly, replace the battery (see assembly step...

English Manual
Page 12
... aerobic exercise, adjust the intensity of your exercise until your heart rate is to 10 minutes of exercise does your heart rate. WORKOUT GUIDELINES Warming Up—-Start with 5 to use your wrist as a guide to find your body begin to 10 minutes of time. never hold your “"training zone.”" The lowest number is the heart rate for fat burning, the middle number is the heart rate for...
... aerobic exercise, adjust the intensity of your exercise until your heart rate is to 10 minutes of exercise does your heart rate. WORKOUT GUIDELINES Warming Up—-Start with 5 to use your wrist as a guide to find your body begin to 10 minutes of time. never hold your “"training zone.”" The lowest number is the heart rate for fat burning, the middle number is the heart rate for...
English Manual
Page 13
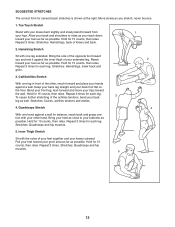
...The correct form for 15 counts, then relax. Keep your back leg straight and your hips toward your heel as close to relax as possible. Quadriceps Stretch 4 With one leg in front... you stretch; Stretches: Quadriceps and hip muscles. 5. Bend your front leg, lean forward and move your back foot flat on the floor. Hold for several basic stretches is... the sole of the opposite foot toward your knees outward. Hold for each leg. Repeat 3 times for 15 counts, then relax. Stretches: Hamstrings, lower back and groin. 3. Stretches: Quadriceps and hip muscles. 5 13 Stretches...
...The correct form for 15 counts, then relax. Keep your back leg straight and your hips toward your heel as close to relax as possible. Quadriceps Stretch 4 With one leg in front... you stretch; Stretches: Quadriceps and hip muscles. 5. Bend your front leg, lean forward and move your back foot flat on the floor. Hold for several basic stretches is... the sole of the opposite foot toward your knees outward. Hold for each leg. Repeat 3 times for 15 counts, then relax. Stretches: Hamstrings, lower back and groin. 3. Stretches: Quadriceps and hip muscles. 5 13 Stretches...

English Manual
Page 14
PART LIST Model No. User’'s Manual * –- Description 1 1 Frame 2 1 Rear Stabilizer 3 1 Pivot Axle 4 1 Frame Bushing 5 1 Front Stabilizer 6 2 Leveling Cap 7 1 Console 8 4 M8 Spring Washer 9 10 M8 Locknut 10 1 Seat Post 11 1 Seat 12 1 Right Shield 13 2 Bronze Bushing 14 4 M8 Curved Washer 15 6 M5 x 15mm Self-tapping Screw 16 1 Flywheel 17 1 Resistance Strap 18 2 M8 x 40mm Carriage Bolt 19 1 Crank Bearing Assembly 20 1 Crank 21 1 Left Pedal 22...
PART LIST Model No. User’'s Manual * –- Description 1 1 Frame 2 1 Rear Stabilizer 3 1 Pivot Axle 4 1 Frame Bushing 5 1 Front Stabilizer 6 2 Leveling Cap 7 1 Console 8 4 M8 Spring Washer 9 10 M8 Locknut 10 1 Seat Post 11 1 Seat 12 1 Right Shield 13 2 Bronze Bushing 14 4 M8 Curved Washer 15 6 M5 x 15mm Self-tapping Screw 16 1 Flywheel 17 1 Resistance Strap 18 2 M8 x 40mm Carriage Bolt 19 1 Crank Bearing Assembly 20 1 Crank 21 1 Left Pedal 22...

English Manual
Page 15
EXPLODED DRAWING Model No. WLEX89912.0 R0712A 23 27 29 55 27 7 13 26 25 28 42 11 13 54 29 4 8 8 9 9 31 10 39 56 2 39 35 42 55 16 38 9 50 19 41 3 43 20 40 43 50 38 9 43 43 32 24 52 30 53 44 46 52 34 48 21 49 36 20 15 51 19 22 47 46 33 9 14 37 17 44 49 45 15 14 9 37 14 33 36 1 6 5 12 15 6 18 15
EXPLODED DRAWING Model No. WLEX89912.0 R0712A 23 27 29 55 27 7 13 26 25 28 42 11 13 54 29 4 8 8 9 9 31 10 39 56 2 39 35 42 55 16 38 9 50 19 41 3 43 20 40 43 50 38 9 43 43 32 24 52 30 53 44 46 52 34 48 21 49 36 20 15 51 19 22 47 46 33 9 14 37 17 44 49 45 15 14 9 37 14 33 36 1 6 5 12 15 6 18 15

English Manual
Page 16
... removal or installation; All repairs for a particular purpose are shipped while the product is used for service needed under warranty, the customer will be free from state to the terms set forth above is authorized by ICON. Some states do not allow the exclusion or limitation of incidental or consequential damages. ICON’'s obligation under normal use or performance of the product; If replacement parts...
... removal or installation; All repairs for a particular purpose are shipped while the product is used for service needed under warranty, the customer will be free from state to the terms set forth above is authorized by ICON. Some states do not allow the exclusion or limitation of incidental or consequential damages. ICON’'s obligation under normal use or performance of the product; If replacement parts...


