

English Manual
Page 4
...Foam Grip (42) onto each Nylon Locknut until assembly is turned so the square holes are facing away from the Frame. Remove the Shipping Insert (54) from the Frame (1) and discard it. Assembly requires a phillips screwdriver and an adjustable wrench . Make sure that the slot faces... downward, and insert the Rear Stabilizer into the Frame (1). ASSEMBLY Place all parts from the Pivot Axle (3). Turn the Rear Stabilizer (2) so that the Front Stabilizer is completed. Align ...
...Foam Grip (42) onto each Nylon Locknut until assembly is turned so the square holes are facing away from the Frame. Remove the Shipping Insert (54) from the Frame (1) and discard it. Assembly requires a phillips screwdriver and an adjustable wrench . Make sure that the slot faces... downward, and insert the Rear Stabilizer into the Frame (1). ASSEMBLY Place all parts from the Pivot Axle (3). Turn the Rear Stabilizer (2) so that the Front Stabilizer is completed. Align ...
English Manual
Page 5
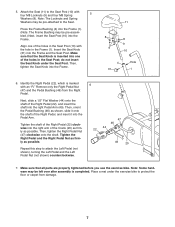
...sible. Repeat this step to the inset drawing. Note: Some hardware may be pre-assembled.) Next, insert the Seat Post (10) into the Frame (1). (Note: The Frame Bushing may be pre-attached to the Seat. Remove the battery door from the back of the Console (7). Then, reattach the battery door. Press... the Frame Bushing (4) into the Frame. Insert the Seat Pin (31) into place. 5. do not insert the Seat Pin under the exercise cycle to the Seat Post (10)...
...sible. Repeat this step to the inset drawing. Note: Some hardware may be pre-assembled.) Next, insert the Seat Post (10) into the Frame (1). (Note: The Frame Bushing may be pre-attached to the Seat. Remove the battery door from the back of the Console (7). Then, reattach the battery door. Press... the Frame Bushing (4) into the Frame. Insert the Seat Pin (31) into place. 5. do not insert the Seat Pin under the exercise cycle to the Seat Post (10)...
English Manual
Page 6
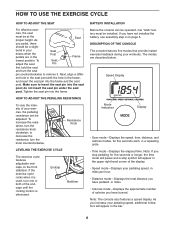
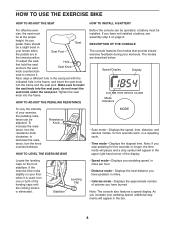
cise, the seat must be at the proper height. Make sure to insert the seat pin into the frame. do not insert the seat pin under the seat post. To increase the resistance, turn the knob counterclockwise. As you pedal, there should be adjusted. ..., in miles. • Calories mode-Displays the approximate number of the display. • Speed mode-Displays your pedaling speed, additional indicators will appear in the frame, and insert the seat pin into the frame and the seat post. Note: If you stop pedaling for five seconds each, in the Seat Post...
cise, the seat must be at the proper height. Make sure to insert the seat pin into the frame. do not insert the seat pin under the seat post. To increase the resistance, turn the knob counterclockwise. As you pedal, there should be adjusted. ..., in miles. • Calories mode-Displays the approximate number of the display. • Speed mode-Displays your pedaling speed, additional indicators will appear in the frame, and insert the seat pin into the frame and the seat post. Note: If you stop pedaling for five seconds each, in the Seat Post...

English Manual
Page 10
... No. See the back cover of this manual for information about ordering replacement parts. 10 Description Key No. Description 1 1 Frame 2 1 Rear Stabilizer 3 1 Pivot Axle 4 1 Frame Bushing 5 1 Front Stabilizer 6 2 Front Stabilizer Endcap 7 1 Console 8 4 M8 Spring Washer 9 10 M8 Nylon Locknut... 40mm Carriage Bolt 19 1 Crank Bearing Assembly 20 1 Crank 21 1 Left Pedal 22 1 Right Pedal 23 1 Chain 24 1 Resistance Cable/Knob 25 4 7/16" Flat Washer 26 1 Flywheel Axle 27 4 3/8" Axle Nut 28 1 Reed Switch/Wire 29 2 3/8" Axle Nut 30 1 M5...
... No. See the back cover of this manual for information about ordering replacement parts. 10 Description Key No. Description 1 1 Frame 2 1 Rear Stabilizer 3 1 Pivot Axle 4 1 Frame Bushing 5 1 Front Stabilizer 6 2 Front Stabilizer Endcap 7 1 Console 8 4 M8 Spring Washer 9 10 M8 Nylon Locknut... 40mm Carriage Bolt 19 1 Crank Bearing Assembly 20 1 Crank 21 1 Left Pedal 22 1 Right Pedal 23 1 Chain 24 1 Resistance Cable/Knob 25 4 7/16" Flat Washer 26 1 Flywheel Axle 27 4 3/8" Axle Nut 28 1 Reed Switch/Wire 29 2 3/8" Axle Nut 30 1 M5...
English Manual
Page 5
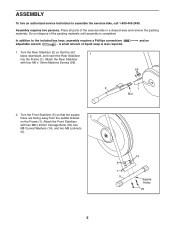
...10mm Machine Screws (56). 56 2 1 Slot 2. In addition to assemble the exercise bike, call 1-800-445-2480. Turn the Front Stabilizer (5) so that the slot faces downward, and insert the Rear Stabilizer 1 into the Frame (1). Do not dispose of liquid soap is completed. and an 1. Turn the Rear... Stabilizer (2) so that the square holes are facing away from the saddle bracket 2 on the Frame (1). Place all parts of the exercise bike in a cleared area and remove the packing materials. ASSEMBLY To hire an authorized service technician to the included hex keys...
...10mm Machine Screws (56). 56 2 1 Slot 2. In addition to assemble the exercise bike, call 1-800-445-2480. Turn the Front Stabilizer (5) so that the slot faces downward, and insert the Rear Stabilizer 1 into the Frame (1). Do not dispose of liquid soap is completed. and an 1. Turn the Rear... Stabilizer (2) so that the square holes are facing away from the saddle bracket 2 on the Frame (1). Place all parts of the exercise bike in a cleared area and remove the packing materials. ASSEMBLY To hire an authorized service technician to the included hex keys...
English Manual
Page 6
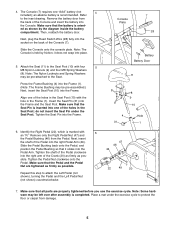
... end of the Pivot Axle (3). 38 9 Apply a small amount of liquid soap to the upper end of the Frame. Remove the battery door from the Pivot Axle (3). 3 Insert the Pivot Axle (3) into the Frame (1), and align the hole in the center of the Pivot Axle with the hole in each Handlebar. 50... (38) onto each end of the Console (7). Next, plug the Reed Switch Wire (28) fully into the Console. it will not snap into the 42 Frame and the Pivot Axle. en an M5 x 16mm Machine Screw (32) into place. an alkaline battery is a Handlebar Cap (55) in the center of each...
... end of the Pivot Axle (3). 38 9 Apply a small amount of liquid soap to the upper end of the Frame. Remove the battery door from the Pivot Axle (3). 3 Insert the Pivot Axle (3) into the Frame (1), and align the hole in the center of the Pivot Axle with the hole in each Handlebar. 50... (38) onto each end of the Console (7). Next, plug the Reed Switch Wire (28) fully into the Console. it will not snap into the 42 Frame and the Pivot Axle. en an M5 x 16mm Machine Screw (32) into place. an alkaline battery is a Handlebar Cap (55) in the center of each...
English Manual
Page 7
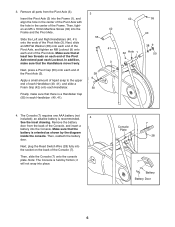
... Pedal Bushing (46) as possible. Note: Some hardware may be pre-assembled.) Next, insert the Seat Post (10) into the Frame. do not insert the Seat Knob under the exercise bike to the Seat. Tighten the shaft of the Right Pedal (22) clockwise into the right arm of the Crank (20) as... sure that all parts are properly tightened before you use the exercise bike. Tighten the Right Pedal and the Right Pedal Nut as firmly as possible. Next, slide a 1/2" Flat Washer (44) onto the shaft of the holes in the Frame (1). Attach the Seat (11) to attach the Left Pedal (not shown), turning...
... Pedal Bushing (46) as possible. Note: Some hardware may be pre-assembled.) Next, insert the Seat Post (10) into the Frame. do not insert the Seat Knob under the exercise bike to the Seat. Tighten the shaft of the Right Pedal (22) clockwise into the right arm of the Crank (20) as... sure that all parts are properly tightened before you use the exercise bike. Tighten the Right Pedal and the Right Pedal Nut as firmly as possible. Next, slide a 1/2" Flat Washer (44) onto the shaft of the holes in the Frame (1). Attach the Seat (11) to attach the Left Pedal (not shown), turning...
English Manual
Page 8
...appear in the upper right-hand corner of your workouts. HOW TO USE THE EXERCISE BIKE HOW TO ADJUST THE SEAT For effective exer- As you have pedaled, in the frame, and insert the seat knob into the frame and the seat post. Note: If you stop pedaling for five seconds each, ... Seat Post the lowest position. do not insert the seat knob under the seat post. to insert the seat knob into the frame. Resistance Knob HOW TO LEVEL THE EXERCISE BIKE Locate the leveling caps on page 6. If you have not installed a battery, see assembly step 4 on the front stabilizer. The ...
...appear in the upper right-hand corner of your workouts. HOW TO USE THE EXERCISE BIKE HOW TO ADJUST THE SEAT For effective exer- As you have pedaled, in the frame, and insert the seat knob into the frame and the seat post. Note: If you stop pedaling for five seconds each, ... Seat Post the lowest position. do not insert the seat knob under the seat post. to insert the seat knob into the frame. Resistance Knob HOW TO LEVEL THE EXERCISE BIKE Locate the leveling caps on page 6. If you have not installed a battery, see assembly step 4 on the front stabilizer. The ...
English Manual
Page 14
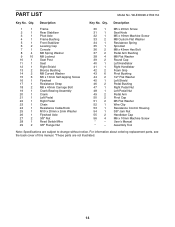
PART LIST Model No. Userʼs Manual * - Description 1 1 Frame 2 1 Rear Stabilizer 3 1 Pivot Axle 4 1 Frame Bushing 5 1 Front Stabilizer 6 2 Leveling Cap 7 1 Console 8 4 M8 Spring Washer 9 10 M8 Locknut 10 1 Seat Post 11 1 Seat 12 1 Right...Strap 18 2 M8 x 40mm Carriage Bolt 19 1 Crank Bearing Assembly 20 1 Crank 21 1 Left Pedal 22 1 Right Pedal 23 1 Chain 24 1 Resistance Cable/Knob 25 1 M10 x 20mm x 2mm Washer 26 1 Flywheel Axle 27 2 3/8" Nut 28 1 Reed Switch/Wire 29 2 3/8" Flange Nut 30 1 M5 x 20mm Screw 31...
PART LIST Model No. Userʼs Manual * - Description 1 1 Frame 2 1 Rear Stabilizer 3 1 Pivot Axle 4 1 Frame Bushing 5 1 Front Stabilizer 6 2 Leveling Cap 7 1 Console 8 4 M8 Spring Washer 9 10 M8 Locknut 10 1 Seat Post 11 1 Seat 12 1 Right...Strap 18 2 M8 x 40mm Carriage Bolt 19 1 Crank Bearing Assembly 20 1 Crank 21 1 Left Pedal 22 1 Right Pedal 23 1 Chain 24 1 Resistance Cable/Knob 25 1 M10 x 20mm x 2mm Washer 26 1 Flywheel Axle 27 2 3/8" Nut 28 1 Reed Switch/Wire 29 2 3/8" Flange Nut 30 1 M5 x 20mm Screw 31...