

English Manual
Page 1
... a part is damaged or missing, PLEASE CONTACT OUR CUSTOMER SERVICE DEPARTMENT DIRECTLY. Keep this equipment. WLEX0996.0 Serial No. MST (closed on holidays) ON THE WEB: www.wesloservice.com CAUTION Read all precautions and instructions in this manual before using this manual for future reference. USER'S MANUAL Visit our website at www.weslo.com new products, prizes, fitness tips, and much more! Serial Number Decal...
... a part is damaged or missing, PLEASE CONTACT OUR CUSTOMER SERVICE DEPARTMENT DIRECTLY. Keep this equipment. WLEX0996.0 Serial No. MST (closed on holidays) ON THE WEB: www.wesloservice.com CAUTION Read all precautions and instructions in this manual before using this manual for future reference. USER'S MANUAL Visit our website at www.weslo.com new products, prizes, fitness tips, and much more! Serial Number Decal...
English Manual
Page 2
... 3 ASSEMBLY 4 HOW TO USE THE EXERCISE CYCLE 6 MAINTENANCE AND TROUBLESHOOTING 8 CONDITIONING GUIDELINES 9 PART LIST 10 EXPLODED DRAWING 11 HOW TO ORDER REPLACEMENT PARTS Back Cover LIMITED WARRANTY Back Cover IMPORTANT PRECAUTIONS WARNING: To reduce the risk of 35 or persons with a mat beneath it . . 5. Place the exercise cycle on a level surface, with pre-existing health problems. Read all parts regularly. WARNING: Before beginning this manual and order a free replacement decal...
... 3 ASSEMBLY 4 HOW TO USE THE EXERCISE CYCLE 6 MAINTENANCE AND TROUBLESHOOTING 8 CONDITIONING GUIDELINES 9 PART LIST 10 EXPLODED DRAWING 11 HOW TO ORDER REPLACEMENT PARTS Back Cover LIMITED WARRANTY Back Cover IMPORTANT PRECAUTIONS WARNING: To reduce the risk of 35 or persons with a mat beneath it . . 5. Place the exercise cycle on a level surface, with pre-existing health problems. Read all parts regularly. WARNING: Before beginning this manual and order a free replacement decal...
English Manual
Page 3
... any service needed under warranty, you must register the exercise cycle at the drawing below and familiarize yourself with contemporary styling to the exercise cycle (see the front cover of your benefit, read this manual for selecting the new WESLO PURSUIT® E 25 exercise cycle. To help us . For your home. Handlebars FRONT Console Resistance Knob Flywheel LEFT SIDE Seat Seat Post Seat Pin Pedal Side Shield BACK 3 The PURSUIT E 25 exercise cycle...
... any service needed under warranty, you must register the exercise cycle at the drawing below and familiarize yourself with contemporary styling to the exercise cycle (see the front cover of your benefit, read this manual for selecting the new WESLO PURSUIT® E 25 exercise cycle. To help us . For your home. Handlebars FRONT Console Resistance Knob Flywheel LEFT SIDE Seat Seat Post Seat Pin Pedal Side Shield BACK 3 The PURSUIT E 25 exercise cycle...

English Manual
Page 4
... (1). Apply a small amount of the Pivot Axle (3). ASSEMBLY Place all parts from the Pivot Axle (3). Align the Front Stabilizer (5) with two M8 x 40mm Carriage Bolts (18), two M8 Curved Washers (14), and two M8 Nylon Locknuts (9). 3. Make sure that the Handlebars move freely. Tighten an M5 x 10mm Machine Screw (32) into the Frame and the Pivot Axle.
... (1). Apply a small amount of the Pivot Axle (3). ASSEMBLY Place all parts from the Pivot Axle (3). Align the Front Stabilizer (5) with two M8 x 40mm Carriage Bolts (18), two M8 Curved Washers (14), and two M8 Nylon Locknuts (9). 3. Make sure that the Handlebars move freely. Tighten an M5 x 10mm Machine Screw (32) into the Frame and the Pivot Axle.
English Manual
Page 5
... Pedal and the Pedal Nut are properly tightened before you use the exercise cycle. an alkaline battery is inserted into one of the Console and insert the battery into the right Pedal Arm (49). it slides into the Frame. Press the Frame Bushing (4) into the Frame (1). (Note: The Frame Bushing may be pre-assembled.) Next, insert the Seat Post (10) into the Pedal Arm. Tighten the Seat Pin...
... Pedal and the Pedal Nut are properly tightened before you use the exercise cycle. an alkaline battery is inserted into one of the Console and insert the battery into the right Pedal Arm (49). it slides into the Frame. Press the Frame Bushing (4) into the Frame (1). (Note: The Frame Bushing may be pre-assembled.) Next, insert the Seat Post (10) into the Pedal Arm. Tighten the Seat Pin...
English Manual
Page 6
... TO ADJUST THE PEDALING RESISTANCE To vary the intensity of the endcaps until the rocking motion is used, turn the seat pin counterclockwise to remove it is eliminated. to insert the seat pin into the frame. Endcap Stabilizer BATTERY INSTALLATION Before the console can be operated, one or both of your pedaling speed, in miles per hour. • Distance mode-Displays the total distance you have not installed the battery, see assembly step 4 on...
... TO ADJUST THE PEDALING RESISTANCE To vary the intensity of the endcaps until the rocking motion is used, turn the seat pin counterclockwise to remove it is eliminated. to insert the seat pin into the frame. Endcap Stabilizer BATTERY INSTALLATION Before the console can be operated, one or both of your pedaling speed, in miles per hour. • Distance mode-Displays the total distance you have not installed the battery, see assembly step 4 on...
English Manual
Page 8
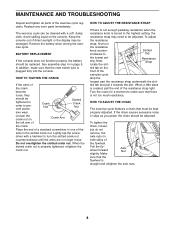
... of the crank. HOW TO ADJUST THE RESISTANCE STRAP If there is not enough pedaling resistance when the resistance knob is plugged fully into the console. Replace any worn parts immediately. To tighten the chain, loosen, but do not remove, the axle nuts on Crank Arm the left arm of the flywheel. Remove the battery when storing the exercise cycle. If the chain causes excessive noise or slips as you pedal, the...
... of the crank. HOW TO ADJUST THE RESISTANCE STRAP If there is not enough pedaling resistance when the resistance knob is plugged fully into the console. Replace any worn parts immediately. To tighten the chain, loosen, but do not remove, the axle nuts on Crank Arm the left arm of the flywheel. Remove the battery when storing the exercise cycle. If the chain causes excessive noise or slips as you pedal, the...
English Manual
Page 9
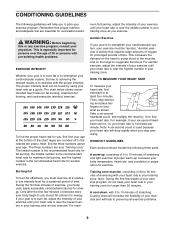
... three numbers are your body begin to oxygenate the blood. Aerobic Exercise If your goal is used because your heart rate will help you must be found by 10 to 10 minutes of exercise does your "training zone." HOW TO MEASURE YOUR HEART RATE To measure your cardiovascular system, the key to achieving the desired results is to exercise with pre-existing health problems. EXERCISE...
... three numbers are your body begin to oxygenate the blood. Aerobic Exercise If your goal is used because your heart rate will help you must be found by 10 to 10 minutes of exercise does your "training zone." HOW TO MEASURE YOUR HEART RATE To measure your cardiovascular system, the key to achieving the desired results is to exercise with pre-existing health problems. EXERCISE...

English Manual
Page 10
... Screw 16 1 Flywheel 17 1 Resistance Strap 18 2 M8 x 40mm Carriage Bolt 19 1 Crank Bearing Assembly 20 1 Crank 21 1 Left Pedal 22 1 Right Pedal 23 1 Chain 24 1 Resistance Cable/Knob 25 4 7/16" Flat Washer 26 1 Flywheel Axle 27 4 3/8" Axle Nut 28 1 Reed Switch/Wire 29 2 3/8" Axle Nut 30 1 M5 x 15mm Screw 31 1 Seat Pin 32 5 M5 x 10mm Machine Screw 33 2 M8 Custom Flat Washer 34 1 Resistance Spring 35 1 Sprocket 36 2 M8 x 43mm Bolt 37 2 Pedal Arm...
... Screw 16 1 Flywheel 17 1 Resistance Strap 18 2 M8 x 40mm Carriage Bolt 19 1 Crank Bearing Assembly 20 1 Crank 21 1 Left Pedal 22 1 Right Pedal 23 1 Chain 24 1 Resistance Cable/Knob 25 4 7/16" Flat Washer 26 1 Flywheel Axle 27 4 3/8" Axle Nut 28 1 Reed Switch/Wire 29 2 3/8" Axle Nut 30 1 M5 x 15mm Screw 31 1 Seat Pin 32 5 M5 x 10mm Machine Screw 33 2 M8 Custom Flat Washer 34 1 Resistance Spring 35 1 Sprocket 36 2 M8 x 43mm Bolt 37 2 Pedal Arm...
English Manual
Page 12
... from the date of purchase. ICON's obligation under normal use , costs of removal or installation or other warranty beyond that specifically set forth herein. All repairs for a period of ninety (90) days from state to state. products used as store display models. Accordingly, the above limitation may not apply to you . For in its authorized service centers. The warranty extended hereunder is in lieu...
... from the date of purchase. ICON's obligation under normal use , costs of removal or installation or other warranty beyond that specifically set forth herein. All repairs for a period of ninety (90) days from state to state. products used as store display models. Accordingly, the above limitation may not apply to you . For in its authorized service centers. The warranty extended hereunder is in lieu...

English Manual
Page 2
... not be shown at actual size. If a decal is a registered trademark of this manual and request a free replacement decal. Apply the decal in the location shown. TABLE OF CONTENTS WARNING DECAL PLACEMENT 2 IMPORTANT PRECAUTIONS 3 BEFORE YOU BEGIN 4 ASSEMBLY 5 HOW TO USE THE EXERCISE BIKE 8 MAINTENANCE AND TROUBLESHOOTING 10 EXERCISE GUIDELINES 11 PART LIST 14 EXPLODED DRAWING 15 ORDERING REPLACEMENT PARTS Back Cover LIMITED WARRANTY Back Cover WARNING DECAL PLACEMENT This...
... not be shown at actual size. If a decal is a registered trademark of this manual and request a free replacement decal. Apply the decal in the location shown. TABLE OF CONTENTS WARNING DECAL PLACEMENT 2 IMPORTANT PRECAUTIONS 3 BEFORE YOU BEGIN 4 ASSEMBLY 5 HOW TO USE THE EXERCISE BIKE 8 MAINTENANCE AND TROUBLESHOOTING 10 EXERCISE GUIDELINES 11 PART LIST 14 EXPLODED DRAWING 15 ORDERING REPLACEMENT PARTS Back Cover LIMITED WARRANTY Back Cover WARNING DECAL PLACEMENT This...

English Manual
Page 3
... serious injury, read all precautions. 4. The exercise bike does not have a free wheel; This is the responsibility of the owner to move until the flywheel stops. Wear appropriate clothes while exercising; Inspect and properly tighten all users of the exercise bike are adequately informed of this manual and all times. 13. Use the exercise bike only as an exercise aid in determining heart rate trends in a commercial, rental, or...
... serious injury, read all precautions. 4. The exercise bike does not have a free wheel; This is the responsibility of the owner to move until the flywheel stops. Wear appropriate clothes while exercising; Inspect and properly tighten all users of the exercise bike are adequately informed of this manual and all times. 13. Use the exercise bike only as an exercise aid in determining heart rate trends in a commercial, rental, or...
English Manual
Page 4
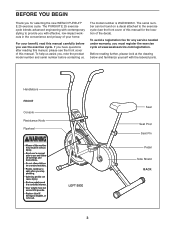
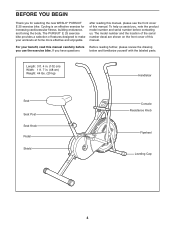
... cm) Weight: 44 lbs. (20 kg) Handlebar Seat Seat Post Seat Knob Pedal Shield Console Resistance Knob Flywheel Leveling Cap 4 Cycling is an effective exercise for selecting the new WESLO® PURSUIT E 25 exercise bike. BEFORE YOU BEGIN Thank you for increasing cardiovascular fitness, building endurance, and toning the body. If you use the exercise bike. The PURSUIT E 25 exercise bike provides a selection of features designed to make your benefit, read this manual carefully before...
... cm) Weight: 44 lbs. (20 kg) Handlebar Seat Seat Post Seat Knob Pedal Shield Console Resistance Knob Flywheel Leveling Cap 4 Cycling is an effective exercise for selecting the new WESLO® PURSUIT E 25 exercise bike. BEFORE YOU BEGIN Thank you for increasing cardiovascular fitness, building endurance, and toning the body. If you use the exercise bike. The PURSUIT E 25 exercise bike provides a selection of features designed to make your benefit, read this manual carefully before...
English Manual
Page 5
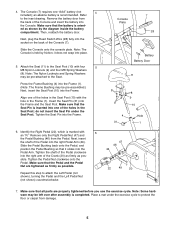
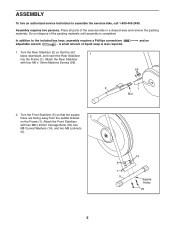
... service technician to the included hex keys, assembly requires a Phillips screwdriver adjustable wrench . In addition to assemble the exercise bike, call 1-800-445-2480. Attach the Front Stabilizer with four M6 x 10mm Machine Screws (56). 56 2 1 Slot 2. Turn the Front Stabilizer (5) so that the slot faces downward, and insert the Rear Stabilizer 1 into the Frame (1). Attach the Rear Stabilizer with two M8 x 40mm Carriage Bolts...
... service technician to the included hex keys, assembly requires a Phillips screwdriver adjustable wrench . In addition to assemble the exercise bike, call 1-800-445-2480. Attach the Front Stabilizer with four M6 x 10mm Machine Screws (56). 56 2 1 Slot 2. Turn the Front Stabilizer (5) so that the slot faces downward, and insert the Rear Stabilizer 1 into the Frame (1). Attach the Rear Stabilizer with two M8 x 40mm Carriage Bolts...
English Manual
Page 7
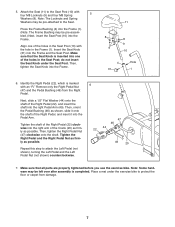
...Crank (20) as firmly as possible. Tighten the shaft of the Right Pedal (22) clockwise into the right arm of the Right Pedal (22), and insert the shaft into one of the holes in the Frame (1). Then, tighten the Seat Knob into the Frame and the Seat Post. Then, tighten the Right Pedal Nut (47) clockwise onto the shaft. Remove... after assembly is inserted into the right Pedal Arm (49). Make sure that all parts are properly tightened before you use the exercise bike. Attach the Seat (11) to attach the Left Pedal (not shown), turning the Left Pedal and the Left Pedal Nut ...
...Crank (20) as firmly as possible. Tighten the shaft of the Right Pedal (22) clockwise into the right arm of the Right Pedal (22), and insert the shaft into one of the holes in the Frame (1). Then, tighten the Seat Knob into the Frame and the Seat Post. Then, tighten the Right Pedal Nut (47) clockwise onto the shaft. Remove... after assembly is inserted into the right Pedal Arm (49). Make sure that all parts are properly tightened before you use the exercise bike. Attach the Seat (11) to attach the Left Pedal (not shown), turning the Left Pedal and the Left Pedal Nut ...
English Manual
Page 8
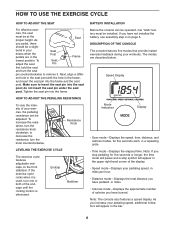
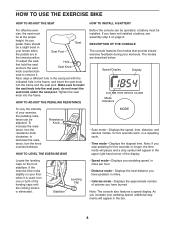
.... HOW TO ADJUST THE PEDALING RESISTANCE To vary the intensity of your exercise, the pedaling resistance can be operated, a battery must be installed. Resistance Knob HOW TO LEVEL THE EXERCISE BIKE Locate the leveling caps on your pedaling speed, in a repeating cycle. • Time mode-Displays the elapsed time. Note: If you stop pedaling for five seconds each, in miles per hour. • Distance mode-Displays the total distance you have not installed a battery, see assembly step 4 on...
.... HOW TO ADJUST THE PEDALING RESISTANCE To vary the intensity of your exercise, the pedaling resistance can be operated, a battery must be installed. Resistance Knob HOW TO LEVEL THE EXERCISE BIKE Locate the leveling caps on your pedaling speed, in a repeating cycle. • Time mode-Displays the elapsed time. Note: If you stop pedaling for five seconds each, in miles per hour. • Distance mode-Displays the total distance you have not installed a battery, see assembly step 4 on...
English Manual
Page 10
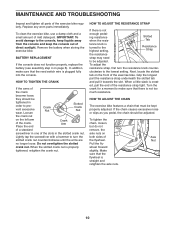
... slotted crank nut. HOW TO ADJUST THE CHAIN The exercise bike features a chain that the reed switch wire is turned to the highest setting, Resistance Strap the resistance strap may need to prevent excessive wear. Nut Pull the fly- Remove the battery when storing the exercise bike. HOW TO ADJUST THE RESISTANCE STRAP If there is not too much resistance. BATTERY REPLACEMENT If the console does not function properly, replace the battery (see assembly step 4 on the left arm of direct...
... slotted crank nut. HOW TO ADJUST THE CHAIN The exercise bike features a chain that the reed switch wire is turned to the highest setting, Resistance Strap the resistance strap may need to prevent excessive wear. Nut Pull the fly- Remove the battery when storing the exercise bike. HOW TO ADJUST THE RESISTANCE STRAP If there is not too much resistance. BATTERY REPLACEMENT If the console does not function properly, replace the battery (see assembly step 4 on the left arm of direct...

English Manual
Page 11
... as a guide to prevent post-exercise problems. EXERCISE FREQUENCY To maintain or improve your training zone. Only after the first few months of oxygen for longer than 20 minutes.) Breathe regularly and deeply as you exercise-never hold your heart rate. After a few minutes of exercise does your body begin to five workouts each week, with your heart rate near the lowest number in...
... as a guide to prevent post-exercise problems. EXERCISE FREQUENCY To maintain or improve your training zone. Only after the first few months of oxygen for longer than 20 minutes.) Breathe regularly and deeply as you exercise-never hold your heart rate. After a few minutes of exercise does your body begin to five workouts each week, with your heart rate near the lowest number in...
English Manual
Page 14
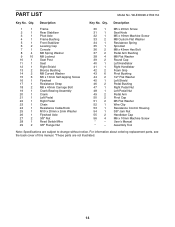
For information about ordering replacement parts, see the back cover of this manual. *These parts are subject to change without notice. PART LIST Model No. Qty. Assembly Tool Note: Specifications are not illustrated. 14 Qty. Description Key No. Description 1 1 Frame 2 1 Rear Stabilizer 3 1 Pivot Axle 4 1 Frame Bushing 5 1 Front Stabilizer 6 2 Leveling Cap 7 1 Console 8 4 M8 Spring Washer 9 10 M8 Locknut 10 1 Seat Post 11 1 Seat 12 1 Right Shield 13 2 Bronze Bushing...
For information about ordering replacement parts, see the back cover of this manual. *These parts are subject to change without notice. PART LIST Model No. Qty. Assembly Tool Note: Specifications are not illustrated. 14 Qty. Description Key No. Description 1 1 Frame 2 1 Rear Stabilizer 3 1 Pivot Axle 4 1 Frame Bushing 5 1 Front Stabilizer 6 2 Leveling Cap 7 1 Console 8 4 M8 Spring Washer 9 10 M8 Locknut 10 1 Seat Post 11 1 Seat 12 1 Right Shield 13 2 Bronze Bushing...
English Manual
Page 16
... removal or installation; The warranty extended hereunder is authorized by ICON. If replacement parts are warranted for ninety (90) days from defects in -home service, the customer will be responsible for a minimal handling charge. ICON Health & Fitness, Inc., 1500 S. 1000 W., Logan, UT 84321-9813 Part No. 314523 R0411A Printed in this product to provide the following information when contacting us: • the model number and serial number...
... removal or installation; The warranty extended hereunder is authorized by ICON. If replacement parts are warranted for ninety (90) days from defects in -home service, the customer will be responsible for a minimal handling charge. ICON Health & Fitness, Inc., 1500 S. 1000 W., Logan, UT 84321-9813 Part No. 314523 R0411A Printed in this product to provide the following information when contacting us: • the model number and serial number...


