

User Manual
Page 1
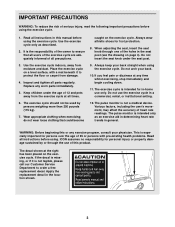
... CALL DIRECT TO OUR TOLL-FREE CUSTOMER HOT LINE. Keep this equipment. USER'S MANUAL VISIT OUR WEBSITE: www.weslo.com Serial Number Decal QUESTIONS? CUSTOMER HOT LINE: 1-888-936-4266 Mon.-Fri., 8h00-18h00 EST CAUTION Read all precautions and instructions in the space above for future reference. Write the serial number in this manual before using this manual for future reference. The trained technicians...
... CALL DIRECT TO OUR TOLL-FREE CUSTOMER HOT LINE. Keep this equipment. USER'S MANUAL VISIT OUR WEBSITE: www.weslo.com Serial Number Decal QUESTIONS? CUSTOMER HOT LINE: 1-888-936-4266 Mon.-Fri., 8h00-18h00 EST CAUTION Read all precautions and instructions in the space above for future reference. Write the serial number in this manual before using this manual for future reference. The trained technicians...

User Manual
Page 2
TABLE OF CONTENTS IMPORTANT PRECAUTIONS 3 BEFORE YOU BEGIN 4 PART IDENTIFICATION CHART 5 ASSEMBLY 6 HOW TO USE THE PURSUIT 895i 8 CONDITIONING GUIDELINES 10 MAINTENANCE AND TROUBLE-SHOOTING 12 PART LIST 14 EXPLODED DRAWING 15 ORDERING REPLACEMENT PARTS 16 CUSTOMER RECORD 17 LIMITED WARRANTY 18 2
TABLE OF CONTENTS IMPORTANT PRECAUTIONS 3 BEFORE YOU BEGIN 4 PART IDENTIFICATION CHART 5 ASSEMBLY 6 HOW TO USE THE PURSUIT 895i 8 CONDITIONING GUIDELINES 10 MAINTENANCE AND TROUBLE-SHOOTING 12 PART LIST 14 EXPLODED DRAWING 15 ORDERING REPLACEMENT PARTS 16 CUSTOMER RECORD 17 LIMITED WARRANTY 18 2
User Manual
Page 3
... pulse monitor is not legible, please call our Customer Service Department to ensure that could become caught on page 4). Read all instructions before using. If the decal is missing, or if it to protect the floor or carpet from moisture and dust. When adjusting the seat, insert the seat knob through the use the exercise cycle in the location shown. 3 Replace any exercise program, consult...
... pulse monitor is not legible, please call our Customer Service Department to ensure that could become caught on page 4). Read all instructions before using. If the decal is missing, or if it to protect the floor or carpet from moisture and dust. When adjusting the seat, insert the seat knob through the use the exercise cycle in the location shown. 3 Replace any exercise program, consult...

User Manual
Page 4
... to the PURSUIT 895i (see the front cover of this manual carefully before you use the PURSUIT 895i. Eastern Time (excluding holidays). Water Bottle Holder (bottle is WLCCEX69871. The model number is not included) Book Rack Seat Seat Post Seat Knob Pedal BACK Handlebars Console Resistance Knob FRONT RIGHT SIDE Front Wheels 4 To help us assist you have additional questions, please call our Customer Service Department toll-free at...
... to the PURSUIT 895i (see the front cover of this manual carefully before you use the PURSUIT 895i. Eastern Time (excluding holidays). Water Bottle Holder (bottle is WLCCEX69871. The model number is not included) Book Rack Seat Seat Post Seat Knob Pedal BACK Handlebars Console Resistance Knob FRONT RIGHT SIDE Front Wheels 4 To help us assist you have additional questions, please call our Customer Service Department toll-free at...

User Manual
Page 5
If a part is not found in the parts bag, check to the quantity used in assembly. The second number refers to see if it has been pre-attached. PART IDENTIFICATION CHART Use the chart below each part refers to the key number of the part. Note: Some parts may have been preattached for help identifying the small parts used in parenthesis below for shipping purposes. The number in assembly. M10 x 25mm Button Screw (8)-5 M8 x 90mm Carriage Bolt (9)-4 M4 x 16mm Screw (4)-5 M8 Split Washer (53)-4 M10 Split Washer (31)-5 M8 Nylon Locknut (21)-8 5
If a part is not found in the parts bag, check to the quantity used in assembly. The second number refers to see if it has been pre-attached. PART IDENTIFICATION CHART Use the chart below each part refers to the key number of the part. Note: Some parts may have been preattached for help identifying the small parts used in parenthesis below for shipping purposes. The number in assembly. M10 x 25mm Button Screw (8)-5 M8 x 90mm Carriage Bolt (9)-4 M4 x 16mm Screw (4)-5 M8 Split Washer (53)-4 M10 Split Washer (31)-5 M8 Nylon Locknut (21)-8 5
User Manual
Page 6
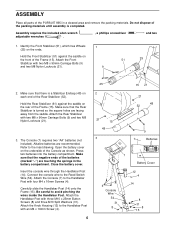
... four M4 x 16mm Screws (4). Attach the Knob Housing (12) to avoid pinching the wires inside the Handlebar Post. Insert the console wire through the Handlebar Post (14). Open the battery cover on the ends. ASSEMBLY Place all parts of the Console as shown. Attach the Front Stabilizer with two M8 x 90mm Carriage Bolts (9) and two M8 Nylon Locknuts (21). 3. Attach the Rear Stabilizer with two M8...
... four M4 x 16mm Screws (4). Attach the Knob Housing (12) to avoid pinching the wires inside the Handlebar Post. Insert the console wire through the Handlebar Post (14). Open the battery cover on the ends. ASSEMBLY Place all parts of the Console as shown. Attach the Front Stabilizer with two M8 x 90mm Carriage Bolts (9) and two M8 Nylon Locknuts (21). 3. Attach the Rear Stabilizer with two M8...
User Manual
Page 7
... adjustable wrench, tighten the Left Pedal counterclockwise into the left arm of the Crank (17). Do the same with the hole in the Seat Post; Attach the Handlebar (5) to the Side Shields. Attach the Seat (19) to the bottom of the Seat. 6. Note: The Nylon Locknuts and Split Washers may be pre-attached to the Seat Post (20) with two M10 x 25mm Button Screws...
... adjustable wrench, tighten the Left Pedal counterclockwise into the left arm of the Crank (17). Do the same with the hole in the Seat Post; Attach the Handlebar (5) to the Side Shields. Attach the Seat (19) to the bottom of the Seat. 6. Note: The Nylon Locknuts and Split Washers may be pre-attached to the Seat Post (20) with two M10 x 25mm Button Screws...
User Manual
Page 8
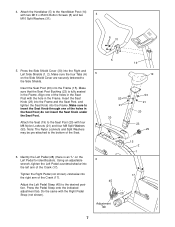
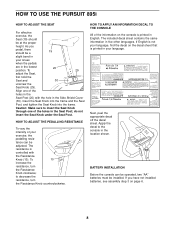
... Seat Post, and tighten the Seat Knob into the frame. The included decal sheet contains the same information in the location shown. As you have not installed batteries, see assembly step 3 on the console is printed in English. The resistance is not your exercise, the pedalling resis- Apply the decal to decrease the resistance, turn the Resistance Knob clockwise; HOW TO USE THE PURSUIT 895i HOW TO ADJUST THE SEAT For effective exercise, the Seat...
... Seat Post, and tighten the Seat Knob into the frame. The included decal sheet contains the same information in the location shown. As you have not installed batteries, see assembly step 3 on the console is printed in English. The resistance is not your exercise, the pedalling resis- Apply the decal to decrease the resistance, turn the Resistance Knob clockwise; HOW TO USE THE PURSUIT 895i HOW TO ADJUST THE SEAT For effective exercise, the Seat...
User Manual
Page 9
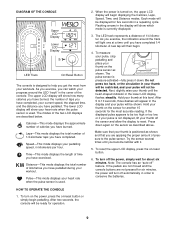
... current speed, the elapsed time, and the distance you have burned, the number of 1/4 kilometer. Pulse-This mode displays your heart rate when the pulse sensor is designed to 10 seconds, three dashes will then begin pedalling. Note: The console has an "auto-off the power, simply wait for operation. 9 DIAGRAM OF THE CONSOLE Upper LCD Display Lower LCD Display LED Track On/Reset Button The console is used . When the power is currently displayed. 3.
... current speed, the elapsed time, and the distance you have burned, the number of 1/4 kilometer. Pulse-This mode displays your heart rate when the pulse sensor is designed to 10 seconds, three dashes will then begin pedalling. Note: The console has an "auto-off the power, simply wait for operation. 9 DIAGRAM OF THE CONSOLE Upper LCD Display Lower LCD Display LED Track On/Reset Button The console is used . When the power is currently displayed. 3.
User Manual
Page 10
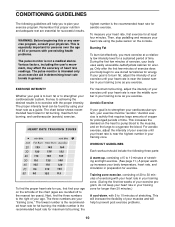
... heart rate is intended only as a guide. Then, stop pedalling and measure your heart rate using your training zone as you must be found by using the pulse sensor on the lungs to exercise with pre-existing health problems. The pulse monitor is the recommended heart rate for successful results. Aerobic Exercise If your exercise must exercise at least four minutes. the middle number is to prevent post-exercise problems. 10 For maximum fat burning, adjust...
... heart rate is intended only as a guide. Then, stop pedalling and measure your heart rate using your training zone as you must be found by using the pulse sensor on the lungs to exercise with pre-existing health problems. The pulse monitor is the recommended heart rate for successful results. Aerobic Exercise If your exercise must exercise at least four minutes. the middle number is to prevent post-exercise problems. 10 For maximum fat burning, adjust...
User Manual
Page 11
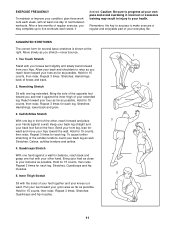
...exercise, you and rest it . Repeat 3 times for several basic stretches is make exercise a regular and enjoyable part of knees and back. 2. Stretches: Quadriceps and hip muscles. 1 2 3 4 5 11 SUGGESTED STRETCHES The correct form for each leg. Move...lower back and groin. 3. Toe Touch Stretch Stand with your knees bent slightly and slowly bend forward from your back foot flat on the floor. Quadriceps Stretch With one hand against a wall for each leg. Incorrect or excessive training...workouts each week, if desired. Pull your feet toward the wall. Remember, the key ...
...exercise, you and rest it . Repeat 3 times for several basic stretches is make exercise a regular and enjoyable part of knees and back. 2. Stretches: Quadriceps and hip muscles. 1 2 3 4 5 11 SUGGESTED STRETCHES The correct form for each leg. Move...lower back and groin. 3. Toe Touch Stretch Stand with your knees bent slightly and slowly bend forward from your back foot flat on the floor. Quadriceps Stretch With one hand against a wall for each leg. Incorrect or excessive training...workouts each week, if desired. Pull your feet toward the wall. Remember, the key ...

User Manual
Page 12
... Reed Switch is correctly adjusted, reattach the left arm of the Crank and remove it from 55 54 17 4 the Magnet. To replace the batteries, see assembly step 3 on the console. Using an adjustable wrench, turn the Slotted Crank Nut counter- Make sure that the console wire is aligned with the Reed Switch. Slide the Reed Switch slightly closer to prevent excessive wear. Repeat until the Magnet (55) is connected to the reed switch wire...
... Reed Switch is correctly adjusted, reattach the left arm of the Crank and remove it from 55 54 17 4 the Magnet. To replace the batteries, see assembly step 3 on the console. Using an adjustable wrench, turn the Slotted Crank Nut counter- Make sure that the console wire is aligned with the Reed Switch. Slide the Reed Switch slightly closer to prevent excessive wear. Repeat until the Magnet (55) is connected to the reed switch wire...
User Manual
Page 13
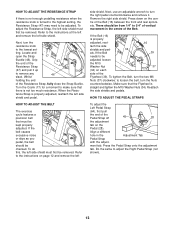
Next, turn the resistance knob to the instructions on the centre of the Resistance Strap, fully close the Strap Buckle. Locate and open the Strap 17 Buckle (46). When the Resis- Refer to the lowest set- There should be 16 kept properly adjusted. If the Belt 39 needs to 3/4" of vertical movement in the Adjustment Tab Pedal Strap with the adjust- Refer to turn the right pedal counterclockwise and remove it up...
Next, turn the resistance knob to the instructions on the centre of the Resistance Strap, fully close the Strap Buckle. Locate and open the Strap 17 Buckle (46). When the Resis- Refer to the lowest set- There should be 16 kept properly adjusted. If the Belt 39 needs to 3/4" of vertical movement in the Adjustment Tab Pedal Strap with the adjust- Refer to turn the right pedal counterclockwise and remove it up...
User Manual
Page 14
... 1 # 1 # 1 # 1 Description Adjustment Bracket M6 Nut Flywheel Axle Flywheel Crank Bearing Assembly Cable Clamp Assembly Right Pedal Strap Flywheel Bearing M10 Washer Left Pedal Strap Strap Buckle Resistance Strap Stabilizer Endcap Large Spring M4 x 38mm Screw Front Stabilizer Rear Stabilizer M8 Split Washer Reed Switch/Wire Magnet Crank Nut Flywheel Spacer Reed Switch Clamp User's Manual Console Decal Sheet Allen Wrench Note: "#" indicates a non-illustrated part. See the back cover of this manual for information about ordering replacement parts. 14...
... 1 # 1 # 1 # 1 Description Adjustment Bracket M6 Nut Flywheel Axle Flywheel Crank Bearing Assembly Cable Clamp Assembly Right Pedal Strap Flywheel Bearing M10 Washer Left Pedal Strap Strap Buckle Resistance Strap Stabilizer Endcap Large Spring M4 x 38mm Screw Front Stabilizer Rear Stabilizer M8 Split Washer Reed Switch/Wire Magnet Crank Nut Flywheel Spacer Reed Switch Clamp User's Manual Console Decal Sheet Allen Wrench Note: "#" indicates a non-illustrated part. See the back cover of this manual for information about ordering replacement parts. 14...
User Manual
Page 15
EXPLODED DRAWING-Model No. WLCCEX69871 R0500A 30 3 33 6 50 50 7 2 3 5 31 8 10 1 11 19 12 31 9 27 26 45 28 17 4 16 51 24 25 56 4 14 53 21 53 21 27 26 25 24 54 20 42 17 31 8 15 21 31 8 22 23 21 58 4 29 4 40 55 18 47 41 46 32 49 41 34 54 4 4 34 38 21 40 35 36 37 4 48 35 37 21 36 43 44 57 4 48 52 9 13 44 43 39 15
EXPLODED DRAWING-Model No. WLCCEX69871 R0500A 30 3 33 6 50 50 7 2 3 5 31 8 10 1 11 19 12 31 9 27 26 45 28 17 4 16 51 24 25 56 4 14 53 21 53 21 27 26 25 24 54 20 42 17 31 8 15 21 31 8 22 23 21 58 4 29 4 40 55 18 47 41 46 32 49 41 34 54 4 4 34 38 21 40 35 36 37 4 48 35 37 21 36 43 44 57 4 48 52 9 13 44 43 39 15

User Manual
Page 16
ORDERING REPLACEMENT PARTS To order replacement parts, simply call our Customer Service Department toll-free at 1-888-936-4266, Monday- To help us assist you, please be prepared to give the following information when calling: • The MODEL NUMBER of the product (WLCCEX69871). • The NAME of the product (WESLO PURSUIT® 895i). • The SERIAL NUMBER of the product (see the front cover of this manual). • The KEY NUMBER and DESCRIPTION of the part(s) (see the PART LIST on page 14 of this manual). 16 Friday, 8:00 am-6:30 pm EST (excluding holidays).
ORDERING REPLACEMENT PARTS To order replacement parts, simply call our Customer Service Department toll-free at 1-888-936-4266, Monday- To help us assist you, please be prepared to give the following information when calling: • The MODEL NUMBER of the product (WLCCEX69871). • The NAME of the product (WESLO PURSUIT® 895i). • The SERIAL NUMBER of the product (see the front cover of this manual). • The KEY NUMBER and DESCRIPTION of the part(s) (see the PART LIST on page 14 of this manual). 16 Friday, 8:00 am-6:30 pm EST (excluding holidays).

User Manual
Page 17
CUSTOMER RECORD Model No.: Retailer Name: Retailer Address: Serial No.: Purchase Date: ICON of Canada Inc. 900 de l'Industrie St-Jérôme, Québec Canada, J7Y 4B8 PLACE STAMP HERE 17
CUSTOMER RECORD Model No.: Retailer Name: Retailer Address: Serial No.: Purchase Date: ICON of Canada Inc. 900 de l'Industrie St-Jérôme, Québec Canada, J7Y 4B8 PLACE STAMP HERE 17
User Manual
Page 18
... equipment would you exercise? J Bicycle J Exercise Cycle J Treadmill J Home Gym J Weight Bench J Stepper J Cardio Glide J Other 11) Which type of magazines do you buy another manufacturer? J Yes J No THANK YOU FOR YOUR TIME © 1999 ICON of /du Canada Inc. All products for purchasing this ICON product? This warranty gives you ever purchased a ICON product before? LIMITED WARRANTY ICON OF/DU CANADA INC., (ICON), warrants this product...
... equipment would you exercise? J Bicycle J Exercise Cycle J Treadmill J Home Gym J Weight Bench J Stepper J Cardio Glide J Other 11) Which type of magazines do you buy another manufacturer? J Yes J No THANK YOU FOR YOUR TIME © 1999 ICON of /du Canada Inc. All products for purchasing this ICON product? This warranty gives you ever purchased a ICON product before? LIMITED WARRANTY ICON OF/DU CANADA INC., (ICON), warrants this product...


