

English Manual
Page 1
Patent Pending Sears, Roebuck and Co., Hoffman Estates, IL 60179 Keep this equipment. Serial Number Decal • Assembly • Operation • Maintenance • Part List and Drawing BIKE EXERCISER User's Manual CAUTION Read all precautions and instructions in this manual before using this manual for future reference. Model No. 831.283161 Serial No.
Patent Pending Sears, Roebuck and Co., Hoffman Estates, IL 60179 Keep this equipment. Serial Number Decal • Assembly • Operation • Maintenance • Part List and Drawing BIKE EXERCISER User's Manual CAUTION Read all precautions and instructions in this manual before using this manual for future reference. Model No. 831.283161 Serial No.

English Manual
Page 2
... PRECAUTIONS 2 BEFORE YOU BEGIN 3 ASSEMBLY 4 HOW TO OPERATE THE EXERCISE CYCLE 8 MAINTENANCE AND TROUBLESHOOTING 10 CONDITIONING GUIDELINES 11 PART LIST 14 EXPLODED DRAWING 15 ORDERING REPLACEMENT PARTS Back Cover LIMITED WARRANTY Back Cover IMPORTANT PRECAUTIONS WARNING: To reduce the risk of 12 and pets away from moisture and dust. Use the exercise cycle only as described in this manual before using the exercise cycle. 2. do not arch...
... PRECAUTIONS 2 BEFORE YOU BEGIN 3 ASSEMBLY 4 HOW TO OPERATE THE EXERCISE CYCLE 8 MAINTENANCE AND TROUBLESHOOTING 10 CONDITIONING GUIDELINES 11 PART LIST 14 EXPLODED DRAWING 15 ORDERING REPLACEMENT PARTS Back Cover LIMITED WARRANTY Back Cover IMPORTANT PRECAUTIONS WARNING: To reduce the risk of 12 and pets away from moisture and dust. Use the exercise cycle only as described in this manual before using the exercise cycle. 2. do not arch...

English Manual
Page 3
... Seat Frame REAR Console Resistance Knob FRONT Pedal/Strap Seat Seat Handle Adjustment Knob RIGHT SIDE *No water bottle is 831.283161. The PURSUIT 510 CS exercise cycle offers a selection of your benefit, read this manual, please call 1-800-4-MY- If you enjoy this manual for the location of the most effective exercises for selecting the new WESLO® PURSUIT 510 CS exercise cycle. To help us assist you use the exercise cycle. The model number is included 3 HOME...
... Seat Frame REAR Console Resistance Knob FRONT Pedal/Strap Seat Seat Handle Adjustment Knob RIGHT SIDE *No water bottle is 831.283161. The PURSUIT 510 CS exercise cycle offers a selection of your benefit, read this manual, please call 1-800-4-MY- If you enjoy this manual for the location of the most effective exercises for selecting the new WESLO® PURSUIT 510 CS exercise cycle. To help us assist you use the exercise cycle. The model number is included 3 HOME...
English Manual
Page 4
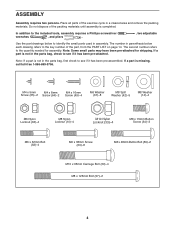
... wrenches , and pliers . , two adjustable Use the part drawings below each drawing refers to the quantity needed for shipping. Note: If a part is not in the parts bag, check to identify the small parts used in a cleared area and remove the packing materials. Place all parts of the packing materials until assembly is missing, call toll-free 1-866-699-3756. Note: Some...
... wrenches , and pliers . , two adjustable Use the part drawings below each drawing refers to the quantity needed for shipping. Note: If a part is not in the parts bag, check to identify the small parts used in a cleared area and remove the packing materials. Place all parts of the packing materials until assembly is missing, call toll-free 1-866-699-3756. Note: Some...

English Manual
Page 5
.... 5 14 57 14 14 10 53 14 52 5 Attach a Stabilizer (2) to the 4 Seat Frame (5) with two M4 x 8mm Screws (64). Next, firmly press the Seat Frame Bushing (20) into the Frame. Tighten the Adjustment Knob (9) into the Frame. 1. Secure the Seat Frame Bushing to the Frame (1) with two M8 x 125mm Bolts (57), four M8 Washers (14), and two M8 Nylon...
.... 5 14 57 14 14 10 53 14 52 5 Attach a Stabilizer (2) to the 4 Seat Frame (5) with two M4 x 8mm Screws (64). Next, firmly press the Seat Frame Bushing (20) into the Frame. Tighten the Adjustment Knob (9) into the Frame. 1. Secure the Seat Frame Bushing to the Frame (1) with two M8 x 125mm Bolts (57), four M8 Washers (14), and two M8 Nylon...
English Manual
Page 6
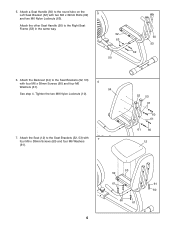
Attach a Seat Handle (50) to the Seat Brackets (52, 53) with two M6 x 32mm Bolts (62) and two M6 Nylon Locknuts (63). Attach the other Seat Handle (50) to the Seat Brackets (52, 53) with 7 four M6 x 38mm Screws (60) and four M6 Washers (61). 52 53 61 60 61 61 60 12 53 52 61 61... 60 60 61 6 5. Attach the Backrest (54) to the round tube on the 5 Left Seat Bracket (52) with four M6 x 38mm Screws (60) and four M6 6 Washers (61). 54 See step 4. Tighten the two M8 Nylon Locknuts (10). 7. Attach the Seat (12) to the Right Seat Frame (53) in the same way. 52...
Attach a Seat Handle (50) to the Seat Brackets (52, 53) with two M6 x 32mm Bolts (62) and two M6 Nylon Locknuts (63). Attach the other Seat Handle (50) to the Seat Brackets (52, 53) with 7 four M6 x 38mm Screws (60) and four M6 Washers (61). 52 53 61 60 61 61 60 12 53 52 61 61... 60 60 61 6 5. Attach the Backrest (54) to the round tube on the 5 Left Seat Bracket (52) with four M6 x 38mm Screws (60) and four M6 6 Washers (61). 54 See step 4. Tighten the two M8 Nylon Locknuts (10). 7. Attach the Seat (12) to the Right Seat Frame (53) in the same way. 52...

English Manual
Page 7
... Console (16) to avoid pinching the console wire. Next, connect the console cable to the Upright with four M4 x 16mm Screws (49). Attach the Handlebar to the Lower Cable (45) in the position shown, connect the console wire to avoid pinching the console wire. 9. While another person holds the Handlebar (15) near the Handlebar (15). The Console (16) requires three AA batteries (not included); Be careful to the Reed Switch Wire...
... Console (16) to avoid pinching the console wire. Next, connect the console cable to the Upright with four M4 x 16mm Screws (49). Attach the Handlebar to the Lower Cable (45) in the position shown, connect the console wire to avoid pinching the console wire. 9. While another person holds the Handlebar (15) near the Handlebar (15). The Console (16) requires three AA batteries (not included); Be careful to the Reed Switch Wire...

English Manual
Page 8
... arm of the pedals, turn the knob counterclockwise. After using the exercise cycle for one week, retighten the Pedals. Resistance Knob 8 To adjust the seat frame, first loosen the adjustment knob on the Left Pedal (24). to the desired position, and press the end of the Crank (21). Tighten the Right Pedal (not shown) clockwise into the left over. Identify the Left Pedal (24), which is completed, some extra parts...
... arm of the pedals, turn the knob counterclockwise. After using the exercise cycle for one week, retighten the Pedals. Resistance Knob 8 To adjust the seat frame, first loosen the adjustment knob on the Left Pedal (24). to the desired position, and press the end of the Crank (21). Tighten the Right Pedal (not shown) clockwise into the left over. Identify the Left Pedal (24), which is completed, some extra parts...

English Manual
Page 9
... continuous display, repeatedly press the Mode button. The console has an "auto-off automatically to save the batteries. 9 Speed-This mode displays your workouts. Speed, time, distance, calorie, or fat calorie mode-To select one of clear plastic on the power, press the On/Reset button or begin pedaling. To reset the display at any time, press the On/Reset button. 4. Time-This mode displays the elapsed time. Calorie-This mode displays the approximate number of these modes for use console...
... continuous display, repeatedly press the Mode button. The console has an "auto-off automatically to save the batteries. 9 Speed-This mode displays your workouts. Speed, time, distance, calorie, or fat calorie mode-To select one of clear plastic on the power, press the On/Reset button or begin pedaling. To reset the display at any time, press the On/Reset button. 4. Time-This mode displays the elapsed time. Calorie-This mode displays the approximate number of these modes for use console...

English Manual
Page 10
... Magnet. BATTERY REPLACEMENT If the console display becomes dim, the batteries should be removed. Using an adjustable wrench, turn the Left Pedal (24) clockwise and remove it. To replace the batteries, refer to the console, keep liquids away from the Left Side Shield (17). Carefully remove the Left Side Shield. When the Reed Switch is aligned with the Reed Switch. Retighten the Screw. MAINTENANCE AND TROUBLESHOOTING Inspect and properly tighten all parts of direct sunlight.
... Magnet. BATTERY REPLACEMENT If the console display becomes dim, the batteries should be removed. Using an adjustable wrench, turn the Left Pedal (24) clockwise and remove it. To replace the batteries, refer to the console, keep liquids away from the Left Side Shield (17). Carefully remove the Left Side Shield. When the Reed Switch is aligned with the Reed Switch. Retighten the Screw. MAINTENANCE AND TROUBLESHOOTING Inspect and properly tighten all parts of direct sunlight.
English Manual
Page 11
..., adjust the intensity of exercise, your body uses easily accessible carbohydrate calories for exercise. The chart below shows recommended heart rates for longer than 20 minutes. A cool-down, with 5 to 10 minutes of exercising with the proper intensity. CONDITIONING GUIDELINES The following three parts: A warm-up increases your body temperature, heart rate, and circulation in your training zone as you to plan your exercise program. During...
..., adjust the intensity of exercise, your body uses easily accessible carbohydrate calories for exercise. The chart below shows recommended heart rates for longer than 20 minutes. A cool-down, with 5 to 10 minutes of exercising with the proper intensity. CONDITIONING GUIDELINES The following three parts: A warm-up increases your body temperature, heart rate, and circulation in your training zone as you to plan your exercise program. During...

English Manual
Page 12
...toward your toes as far as possible. EXERCISE FREQUENCY To maintain or improve your condition, plan three workouts each week, if desired. Move slowly as possible. Allow your back and shoulders to your buttocks as you reach down toward your back leg as possible. Hold for 15 counts, ...as well. Repeat 3 times for several basic stretches is make exercise a regular and enjoyable part of your feet together and your hips. Hold for 15 counts, then relax. Stretches: Hamstrings, back of rest between workouts. Inner Thigh Stretch Sit with your knees bent slightly and slowly...
...toward your toes as far as possible. EXERCISE FREQUENCY To maintain or improve your condition, plan three workouts each week, if desired. Move slowly as possible. Allow your back and shoulders to your buttocks as you reach down toward your back leg as possible. Hold for 15 counts, ...as well. Repeat 3 times for several basic stretches is make exercise a regular and enjoyable part of your feet together and your hips. Hold for 15 counts, then relax. Stretches: Hamstrings, back of rest between workouts. Inner Thigh Stretch Sit with your knees bent slightly and slowly...

English Manual
Page 14
... cover of this manual for information about ordering replacement parts. 14 Description 1 1 Frame 2 2 Stabilizer 3 1 M8 x 21mm Bolt 4 4 Stabilizer Endcap 5 1 Seat Frame 6 2 M4 x 16mm Flat Head Screw 7 4 Handlebar Endcap 8 4 Foam Grip 9 1 Adjustment Knob 10 8 M8 Nylon Locknut 11 1 C-Magnet 12 1 Seat 13 1 Upright 14 5 M8 Washer 15 1 Handlebar 16 1 Console 17 1 Left Side Shield 18 1 Right Side Shield 19 1 Resistance Control/Cable 20 1 Seat Frame Bushing 21 1 Crank/Pulley 22 1 Reed Switch...
... cover of this manual for information about ordering replacement parts. 14 Description 1 1 Frame 2 2 Stabilizer 3 1 M8 x 21mm Bolt 4 4 Stabilizer Endcap 5 1 Seat Frame 6 2 M4 x 16mm Flat Head Screw 7 4 Handlebar Endcap 8 4 Foam Grip 9 1 Adjustment Knob 10 8 M8 Nylon Locknut 11 1 C-Magnet 12 1 Seat 13 1 Upright 14 5 M8 Washer 15 1 Handlebar 16 1 Console 17 1 Left Side Shield 18 1 Right Side Shield 19 1 Resistance Control/Cable 20 1 Seat Frame Bushing 21 1 Crank/Pulley 22 1 Reed Switch...

English Manual
Page 15
EXPLODED DRAWING-Model No. 831.283161 49 16 R0604A 49 34 42 59 34 42 42 15 7 34 42 13 19 27 49 10 4 30 2 7 8 18 58 24 44 29 54 58 21 38 39 37 23 31 25 26 35 10 4 28 40 32 11 12 45 31 32 46 67 67 10 28 47 33 9 65 1 49 43 65 22 68 10 36 66 66 64 10 20 55 56 8 57 55 53 14 48 7 50 61 60 63 63 49 41 17 3 14 51 32 55 61 6 60 62 6160 61 60 41 8 55 14 7 10 61 6 61 60 5 33 33 4 60 10 14 63 50 60 61 52 62 4 2 30 15
EXPLODED DRAWING-Model No. 831.283161 49 16 R0604A 49 34 42 59 34 42 42 15 7 34 42 13 19 27 49 10 4 30 2 7 8 18 58 24 44 29 54 58 21 38 39 37 23 31 25 26 35 10 4 28 40 32 11 12 45 31 32 46 67 67 10 28 47 33 9 65 1 49 43 65 22 68 10 36 66 66 64 10 20 55 56 8 57 55 53 14 48 7 50 61 60 63 63 49 41 17 3 14 51 32 55 61 6 60 62 6160 61 60 41 8 55 14 7 10 61 6 61 60 5 33 33 4 60 10 14 63 50 60 61 52 62 4 2 30 15

English Manual
Page 16
... Part No. 204405 R0604A Printed in this Sears Bike Exerciser, contact the nearest Sears Service Center throughout the United States and Sears will repair or replace the Bike Exerciser, free of purchase, if failure occurs due to state. FULL 90 DAY WARRANTY For 90 days from state to defect in material or workmanship in China © 2004 Sears, Roebuck and Co. This warranty gives you specific...
... Part No. 204405 R0604A Printed in this Sears Bike Exerciser, contact the nearest Sears Service Center throughout the United States and Sears will repair or replace the Bike Exerciser, free of purchase, if failure occurs due to state. FULL 90 DAY WARRANTY For 90 days from state to defect in material or workmanship in China © 2004 Sears, Roebuck and Co. This warranty gives you specific...


