

English Manual
Page 1
... are missing parts, we will provide immediate assistance, free of charge to providing complete customer satisfaction. CUSTOMER HOT LINE: 1-866-699-3756 Mon.-Fri., 6 a.m.-6 p.m. MST CAUTION Read all precautions and instructions in this manual before using this manual for future reference. USER'S MANUAL Visit our website at www.weslo.com new products, prizes, fitness tips, and much more! WLEX11040 Serial No.
... are missing parts, we will provide immediate assistance, free of charge to providing complete customer satisfaction. CUSTOMER HOT LINE: 1-866-699-3756 Mon.-Fri., 6 a.m.-6 p.m. MST CAUTION Read all precautions and instructions in this manual before using this manual for future reference. USER'S MANUAL Visit our website at www.weslo.com new products, prizes, fitness tips, and much more! WLEX11040 Serial No.

English Manual
Page 2
... instructions in this product. 2 the pedals will continue to protect the floor. 4. WARNING: Before beginning this manual before using the exercise cycle. TABLE OF CONTENTS IMPORTANT PRECAUTIONS 2 BEFORE YOU BEGIN 3 ASSEMBLY 4 HOW TO OPERATE THE EXERCISE CYCLE 8 MAINTENANCE AND TROUBLESHOOTING 10 CONDITIONING GUIDELINES 11 PART LIST 14 EXPLODED DRAWING 15 ORDERING REPLACEMENT PARTS Back Cover LIMITED WARRANTY Back Cover IMPORTANT PRECAUTIONS WARNING: To reduce the risk of heart rate...
... instructions in this product. 2 the pedals will continue to protect the floor. 4. WARNING: Before beginning this manual before using the exercise cycle. TABLE OF CONTENTS IMPORTANT PRECAUTIONS 2 BEFORE YOU BEGIN 3 ASSEMBLY 4 HOW TO OPERATE THE EXERCISE CYCLE 8 MAINTENANCE AND TROUBLESHOOTING 10 CONDITIONING GUIDELINES 11 PART LIST 14 EXPLODED DRAWING 15 ORDERING REPLACEMENT PARTS Back Cover LIMITED WARRANTY Back Cover IMPORTANT PRECAUTIONS WARNING: To reduce the risk of heart rate...
English Manual
Page 3
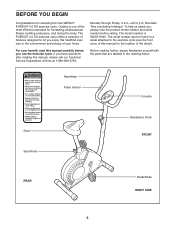
... the exercise cycle (see the front cover of this manual carefully before calling. Handlebar Pulse Sensor Console Seat Seat Knob Resistance Knob FRONT REAR Pedal/Strap RIGHT SIDE 3 If you have questions after reading this healthful exercise in the drawing below. BEFORE YOU BEGIN Congratulations for the location of the decal). The serial number can be found on a decal attached to let you use the exercise cycle. Cycling is WLEX11040. The model number is...
... the exercise cycle (see the front cover of this manual carefully before calling. Handlebar Pulse Sensor Console Seat Seat Knob Resistance Knob FRONT REAR Pedal/Strap RIGHT SIDE 3 If you have questions after reading this healthful exercise in the drawing below. BEFORE YOU BEGIN Congratulations for the location of the decal). The serial number can be found on a decal attached to let you use the exercise cycle. Cycling is WLEX11040. The model number is...

English Manual
Page 4
... person lifts the rear of the part, from the PART LIST on page 14. Note: Some small parts may have been preassembled. If a part is the key number of the Frame (1) slightly, attach the other Stabilizer (2) with two M10 x 30 75mm Carriage Bolts (30) and...number following the key number is completed. Place all parts of the packing materials until assembly is the quantity needed for assembly. Assembly requires the included tools and your own adjustable wrench driver , and pliers . , Phillips screw- Use the drawings below each drawing is not in a cleared area and remove...
... person lifts the rear of the part, from the PART LIST on page 14. Note: Some small parts may have been preassembled. If a part is the key number of the Frame (1) slightly, attach the other Stabilizer (2) with two M10 x 30 75mm Carriage Bolts (30) and...number following the key number is completed. Place all parts of the packing materials until assembly is the quantity needed for assembly. Assembly requires the included tools and your own adjustable wrench driver , and pliers . , Phillips screw- Use the drawings below each drawing is not in a cleared area and remove...

English Manual
Page 5
... Console (16) requires two AA batteries; Reattach the battery cover. 3 Battery Cover Batteries 16 4. Plug the Pulse Sensor Wire (56) into the jack in the Handlebar and out of the battery compartment. Be careful to the Extension Wire (40). While another person holds the Handlebar (15) near the Handlebar (15). Remove the battery cover from the back of 4 the Console. tom. Be careful to avoid pinching the wires...
... Console (16) requires two AA batteries; Reattach the battery cover. 3 Battery Cover Batteries 16 4. Plug the Pulse Sensor Wire (56) into the jack in the Handlebar and out of the battery compartment. Be careful to the Extension Wire (40). While another person holds the Handlebar (15) near the Handlebar (15). Remove the battery cover from the back of 4 the Console. tom. Be careful to avoid pinching the wires...
English Manual
Page 6
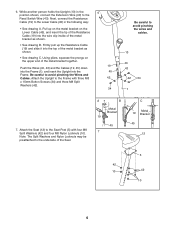
... C. Attach the Seat (12) to the Reed Switch Wire (43). 6. While another person holds the Upright (13) in the following way: • See drawing A. Using pliers, squeeze the prongs on the Lower Cable (45), and insert the tip of the Seat. Note: The Split Washers and Nylon Locknuts may be preattached to the Lower Cable (45) in the 6 position shown, connect the Extension Wire...
... C. Attach the Seat (12) to the Reed Switch Wire (43). 6. While another person holds the Upright (13) in the following way: • See drawing A. Using pliers, squeeze the prongs on the Lower Cable (45), and insert the tip of the Seat. Note: The Split Washers and Nylon Locknuts may be preattached to the Lower Cable (45) in the 6 position shown, connect the Extension Wire...

English Manual
Page 7
... (5) into the Frame and the Seat Post, and turn the Seat Knob clockwise until it . Important: Tighten both Pedals as firmly as possible. Adjust the left over. Place a mat beneath the exercise cycle to the desired position, and press the end of the Pedal Strap onto the tab on the side of the Crank. Turn the Seat Knob (9) counterclockwise and remove 8 it is marked with the...
... (5) into the Frame and the Seat Post, and turn the Seat Knob clockwise until it . Important: Tighten both Pedals as firmly as possible. Adjust the left over. Place a mat beneath the exercise cycle to the desired position, and press the end of the Pedal Strap onto the tab on the side of the Crank. Turn the Seat Knob (9) counterclockwise and remove 8 it is marked with the...
English Manual
Page 8
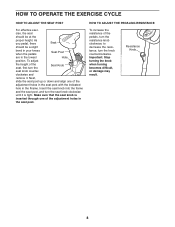
.... Important: Stop turning the knob when turning becomes difficult, or damage may result. clockwise and remove it is inserted through one of the adjustment holes in the seat post. to decrease the resistance, turn the seat knob clockwise until it . cise, the seat should be at the proper height. As you pedal, there Seat should be a slight bend in your knees when the pedals Seat Post...
.... Important: Stop turning the knob when turning becomes difficult, or damage may result. clockwise and remove it is inserted through one of the adjustment holes in the seat post. to decrease the resistance, turn the seat knob clockwise until it . cise, the seat should be at the proper height. As you pedal, there Seat should be a slight bend in your knees when the pedals Seat Post...

English Manual
Page 9
... , in the console (see assembly step 3 on the pulse sensors, peel off " feature. Note: If you stop pedaling, the time mode will appear briefly; Pulse Sensors bar, with your hands. cator in the display. One mode arrow will show that provide instant exercise feedback during your workouts. Speed, distance, time, odometer, or calories mode-To select one of clear plastic on the power, press the console button or begin pedaling. sole button repeatedly until...
... , in the console (see assembly step 3 on the pulse sensors, peel off " feature. Note: If you stop pedaling, the time mode will appear briefly; Pulse Sensors bar, with your hands. cator in the display. One mode arrow will show that provide instant exercise feedback during your workouts. Speed, distance, time, odometer, or calories mode-To select one of clear plastic on the power, press the console button or begin pedaling. sole button repeatedly until...

English Manual
Page 10
..., the reed switch should be adjusted. Using an adjustable wrench, turn the resistance knob to pinch the wires. To clean the exercise cycle, use a damp cloth and a small amount of low batteries. most console problems are the result of mild detergent. Turn the Crank (21) until the console displays correct feedback. Next, see step 2 on page 5 and insert three batteries into the console. Next, remove the five M4 x 28mm Round Head Screws (41...
..., the reed switch should be adjusted. Using an adjustable wrench, turn the resistance knob to pinch the wires. To clean the exercise cycle, use a damp cloth and a small amount of low batteries. most console problems are the result of mild detergent. Turn the Crank (21) until the console displays correct feedback. Next, see step 2 on page 5 and insert three batteries into the console. Next, remove the five M4 x 28mm Round Head Screws (41...

English Manual
Page 11
... level for a sustained period of the chart (ages are essential for fat burning, maximum fat burning, and cardiovascular (aerobic) exercise. Burning Fat A cool-down, with pre-existing health problems. The pulse sensor is near the middle number in your body temperature, heart rate, and circulation in your exercise program. After a few minutes of exercise does your body uses easily accessible carbohydrate calories for persons over...
... level for a sustained period of the chart (ages are essential for fat burning, maximum fat burning, and cardiovascular (aerobic) exercise. Burning Fat A cool-down, with pre-existing health problems. The pulse sensor is near the middle number in your body temperature, heart rate, and circulation in your exercise program. After a few minutes of exercise does your body uses easily accessible carbohydrate calories for persons over...
English Manual
Page 12
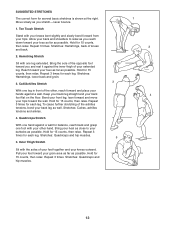
... stretch-never bounce. 1. Bend your front leg, lean forward and move your hips toward your knees outward. SUGGESTED STRETCHES The correct form for each leg. Stretches: Hamstrings, back of your back leg as close to relax as you reach down toward your groin area as far as possible. Stretches: Hamstrings, lower back and groin. 3 3. Stretches: Calves...
... stretch-never bounce. 1. Bend your front leg, lean forward and move your hips toward your knees outward. SUGGESTED STRETCHES The correct form for each leg. Stretches: Hamstrings, back of your back leg as close to relax as you reach down toward your groin area as far as possible. Stretches: Hamstrings, lower back and groin. 3 3. Stretches: Calves...

English Manual
Page 14
.... Specifications are subject to change without notice. Description Key No. PART LIST-Model No. Description 1 1 Frame 2 2 Stabilizer 3 2 M4 x 16mm Round Head Screw 4 4 Stabilizer Endcap 5 1 Seat Post 6 1 C-Magnet Bracket 7 2 Handlebar Endcap 8 2 Pulse Sensor 9 1 Adjustment Knob 10 7 M8 Nylon Locknut 11 1 C-Magnet 12 1 Seat 13 1 Upright 14 1 M8 Washer 15 1 Handlebar 16 1 Console 17 1 Left Side Shield 18 1 Right Side Shield 19 1 Resistance Control/Cable 20 1 Seat Post Bushing 21 1 Crank/Pulley 22 1 Reed Switch...
.... Specifications are subject to change without notice. Description Key No. PART LIST-Model No. Description 1 1 Frame 2 2 Stabilizer 3 2 M4 x 16mm Round Head Screw 4 4 Stabilizer Endcap 5 1 Seat Post 6 1 C-Magnet Bracket 7 2 Handlebar Endcap 8 2 Pulse Sensor 9 1 Adjustment Knob 10 7 M8 Nylon Locknut 11 1 C-Magnet 12 1 Seat 13 1 Upright 14 1 M8 Washer 15 1 Handlebar 16 1 Console 17 1 Left Side Shield 18 1 Right Side Shield 19 1 Resistance Control/Cable 20 1 Seat Post Bushing 21 1 Crank/Pulley 22 1 Reed Switch...

English Manual
Page 15
WLEX11040 7 3 7 R0704A 8 16 8 55 55 15 54 34 42 42 34 34 42 18 12 13 56 27 51 35 30 4 3 41 45 40 2 17 41 47 42 34 4 1 19 42 49 10 42 34 5 20 49 43 22 33 33 36 53 10 6 33 10 52 14 32 42 51 10 21 26 42 24 10 44 29 9 25 38 37 23 31 39 25 28 32 10 23 31 28 32 33 11 4 46 50 50 48 2 4 30 15 EXPLODED DRAWING-Model No.
WLEX11040 7 3 7 R0704A 8 16 8 55 55 15 54 34 42 42 34 34 42 18 12 13 56 27 51 35 30 4 3 41 45 40 2 17 41 47 42 34 4 1 19 42 49 10 42 34 5 20 49 43 22 33 33 36 53 10 6 33 10 52 14 32 42 51 10 21 26 42 24 10 44 29 9 25 38 37 23 31 39 25 28 32 10 23 31 28 32 33 11 4 46 50 50 48 2 4 30 15 EXPLODED DRAWING-Model No.

English Manual
Page 16
... warranty beyond that specifically set forth herein. No other rights which warranty claims are made must be prepared to give the following information: • The MODEL NUMBER of the product (WLEX11040) • The NAME of the product (WESLO PURSUIT 4.0 DX exercise cycle) • The SERIAL NUMBER of ICON IP, Inc. This warranty gives you . Accordingly, the above is a registered trademark of the product (see the PART LIST...
... warranty beyond that specifically set forth herein. No other rights which warranty claims are made must be prepared to give the following information: • The MODEL NUMBER of the product (WLEX11040) • The NAME of the product (WESLO PURSUIT 4.0 DX exercise cycle) • The SERIAL NUMBER of ICON IP, Inc. This warranty gives you . Accordingly, the above is a registered trademark of the product (see the PART LIST...


