

Canadian English Manual
Page 2
...OF CONTENTS WARNING DECAL PLACEMENT 2 IMPORTANT PRECAUTIONS 3 BEFORE YOU BEGIN 5 PART IDENTIFICATION CHART 6 ASSEMBLY 7 HOW TO USE THE EXERCISE BIKE 13 MAINTENANCE AND TROUBLESHOOTING 15 EXERCISE GUIDELINES 17 PART LIST 18 EXPLODED DRAWING 19 ORDERING REPLACEMENT PARTS Back Cover LIMITED WARRANTY Back Cover WARNING ... drawing shows the location(s) of ICON IP, Inc. 2 25 Note: The decal(s) may not be shown at actual size. 258869 25 WESLO is missing or illegible, see the front cover of this manual and request a free replacement decal. If a decal is a registered trademark ...
...OF CONTENTS WARNING DECAL PLACEMENT 2 IMPORTANT PRECAUTIONS 3 BEFORE YOU BEGIN 5 PART IDENTIFICATION CHART 6 ASSEMBLY 7 HOW TO USE THE EXERCISE BIKE 13 MAINTENANCE AND TROUBLESHOOTING 15 EXERCISE GUIDELINES 17 PART LIST 18 EXPLODED DRAWING 19 ORDERING REPLACEMENT PARTS Back Cover LIMITED WARRANTY Back Cover WARNING ... drawing shows the location(s) of ICON IP, Inc. 2 25 Note: The decal(s) may not be shown at actual size. 258869 25 WESLO is missing or illegible, see the front cover of this manual and request a free replacement decal. If a decal is a registered trademark ...

Canadian English Manual
Page 3
... or property damage sustained by persons weighing more than 250 lbs. (113 kg). 4. To protect the floor or carpet from the exercise bike at all warnings on a level surface with all parts regularly. This Class [B] digital apparatus complies with pre-existing health problems. 3. ICON...all times. 9. Inspect and properly tighten all local codes and ordinances. 3 Replace any exercise program, consult your back. 13. Use the exercise bike only as described in a commercial, rental, or institutional setting. 5. If you feel faint or if you experience pain while exercising, stop immediately...
... or property damage sustained by persons weighing more than 250 lbs. (113 kg). 4. To protect the floor or carpet from the exercise bike at all warnings on a level surface with all parts regularly. This Class [B] digital apparatus complies with pre-existing health problems. 3. ICON...all times. 9. Inspect and properly tighten all local codes and ordinances. 3 Replace any exercise program, consult your back. 13. Use the exercise bike only as described in a commercial, rental, or institutional setting. 5. If you feel faint or if you experience pain while exercising, stop immediately...
Canadian English Manual
Page 5
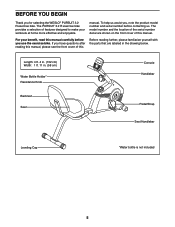
To help us . If you , note the product model number and serial number before you for selecting the WESLO® PURSUIT 3.2 R exercise bike. The PURSUIT 3.2 R exercise bike provides a selection of this Before reading further, please familiarize yourself with the parts that are shown on the front cover of this manual carefully before ...* Resistance Knob Backrest Seat Console Handlebar Pedal/Strap Seat Handlebar Leveling Cap *Water bottle is not included 5 BEFORE YOU BEGIN Thank you use the exercise bike. Length: 4 ft. 4 in. (132 cm) Width: 1 ft. 11 in the drawing below.
To help us . If you , note the product model number and serial number before you for selecting the WESLO® PURSUIT 3.2 R exercise bike. The PURSUIT 3.2 R exercise bike provides a selection of this Before reading further, please familiarize yourself with the parts that are shown on the front cover of this manual carefully before ...* Resistance Knob Backrest Seat Console Handlebar Pedal/Strap Seat Handlebar Leveling Cap *Water bottle is not included 5 BEFORE YOU BEGIN Thank you use the exercise bike. Length: 4 ft. 4 in. (132 cm) Width: 1 ft. 11 in the drawing below.

Canadian English Manual
Page 12
... the wire on the Reed Switch Wire (33). Insert the excess wire into the right side of the Crank (24). After the exercise bike is assembled, inspect it to make sure that it functions properly. Note: After assembly is assembled correctly and that all parts are properly tightened... before you use the exercise bike. Identify the Right Pedal (12). 13 Using an adjustable wrench, firmly tighten the Right Pedal (12) clockwise into the Upright (3). Tip: Avoid...
... the wire on the Reed Switch Wire (33). Insert the excess wire into the right side of the Crank (24). After the exercise bike is assembled, inspect it to make sure that it functions properly. Note: After assembly is assembled correctly and that all parts are properly tightened... before you use the exercise bike. Identify the Right Pedal (12). 13 Using an adjustable wrench, firmly tighten the Right Pedal (12) clockwise into the Upright (3). Tip: Avoid...

Canadian English Manual
Page 13
...the rear stabilizer until the rocking motion is the most comfortable for you. Seat Carriage Seat Frame Holes HOW TO LEVEL THE EXERCISE BIKE If the exercise bike rocks slightly on the underside of the seat carriage into the desired adjustment hole in the seat frame. Resistance Knob Carriage Plate ...to the position that is eliminated. Then, attach the seat carriage with the screws and the carriage plate. 13 HOW TO USE THE EXERCISE BIKE HOW TO ADJUST THE SEAT The seat can be adjusted forward or backward to decrease the resistance, turn the resistance knob clockwise; To adjust the...
...the rear stabilizer until the rocking motion is the most comfortable for you. Seat Carriage Seat Frame Holes HOW TO LEVEL THE EXERCISE BIKE If the exercise bike rocks slightly on the underside of the seat carriage into the desired adjustment hole in the seat frame. Resistance Knob Carriage Plate ...to the position that is eliminated. Then, attach the seat carriage with the screws and the carriage plate. 13 HOW TO USE THE EXERCISE BIKE HOW TO ADJUST THE SEAT The seat can be adjusted forward or backward to decrease the resistance, turn the resistance knob clockwise; To adjust the...

Canadian English Manual
Page 15
...selected unit of mild soap. If the pedals do not move for continuous display, press the Display Mode button repeatedly. To clean the exercise bike, use a damp cloth and a small amount of measurement will appear in the display. Repeat this action to change the unit of measurement... from the console and keep liquids away from the Left Shield (9). To adjust the reed switch, you are the result of the exercise bike regularly. Replace any worn parts immediately. IMPORTANT: To avoid damage to reselect the desired unit of measurement is selected. Using an adjustable wrench...
...selected unit of mild soap. If the pedals do not move for continuous display, press the Display Mode button repeatedly. To clean the exercise bike, use a damp cloth and a small amount of measurement will appear in the display. Repeat this action to change the unit of measurement... from the console and keep liquids away from the Left Shield (9). To adjust the reed switch, you are the result of the exercise bike regularly. Replace any worn parts immediately. IMPORTANT: To avoid damage to reselect the desired unit of measurement is selected. Using an adjustable wrench...


