
English Manual
Page 1
... CAUTION Read all precautions and instructions in this manual before using this manual for future reference. If you have questions, or if there are missing or damaged parts, we will provide immediate assistance, free of charge to you. The trained technicians on our customer hot line will guarantee complete satisfaction through direct assistance from our factory. Keep this...
... CAUTION Read all precautions and instructions in this manual before using this manual for future reference. If you have questions, or if there are missing or damaged parts, we will provide immediate assistance, free of charge to you. The trained technicians on our customer hot line will guarantee complete satisfaction through direct assistance from our factory. Keep this...
English Manual
Page 2
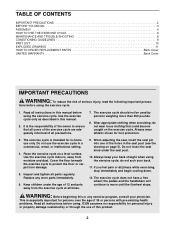
... not insert the seat knob under the age of all instructions in this manual. 2. If you feel pain or dizziness while exercising, stop immediately and begin cooling down. 12. TABLE OF CONTENTS IMPORTANT PRECAUTIONS 2 BEFORE YOU BEGIN 3 ASSEMBLY 4 HOW TO USE THE EXERCISE CYCLE 6 MAINTENANCE AND TROUBLE-SHOOTING 8 CONDITIONING GUIDELINES 9 PART LIST 10 EXPLODED DRAWING 11 HOW TO ORDER REPLACEMENT PARTS Back Cover LIMITED WARRANTY Back Cover IMPORTANT PRECAUTIONS...
... not insert the seat knob under the age of all instructions in this manual. 2. If you feel pain or dizziness while exercising, stop immediately and begin cooling down. 12. TABLE OF CONTENTS IMPORTANT PRECAUTIONS 2 BEFORE YOU BEGIN 3 ASSEMBLY 4 HOW TO USE THE EXERCISE CYCLE 6 MAINTENANCE AND TROUBLE-SHOOTING 8 CONDITIONING GUIDELINES 9 PART LIST 10 EXPLODED DRAWING 11 HOW TO ORDER REPLACEMENT PARTS Back Cover LIMITED WARRANTY Back Cover IMPORTANT PRECAUTIONS...
English Manual
Page 3
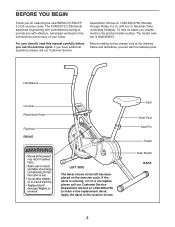
The model number is not legible, please call our Customer Service Department toll-free at the drawing below and familiarize yourself with effective, low-impact workouts in the location shown. 3 Seat Seat Post Seat Pin Pedal Side Shield BACK If the decal is missing, or if it is WLEX09010. The PURSUIT 2.0 DS blends advanced engineering with contemporary styling to order a free replacement decal. Handlebars Console Resistance Knob Flywheel...
The model number is not legible, please call our Customer Service Department toll-free at the drawing below and familiarize yourself with effective, low-impact workouts in the location shown. 3 Seat Seat Post Seat Pin Pedal Side Shield BACK If the decal is missing, or if it is WLEX09010. The PURSUIT 2.0 DS blends advanced engineering with contemporary styling to order a free replacement decal. Handlebars Console Resistance Knob Flywheel...
English Manual
Page 4
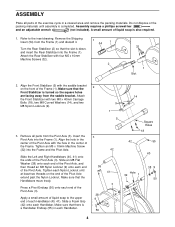
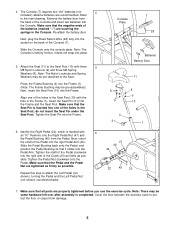
... adjustable wrench (not included). Refer to the upper end of the exercise cycle in a cleared area and remove the packing materials. Attach the Front Stabilizer with four M5 x 10mm Machine Screws (32). 1 54 1 2 32 1 Slot 2. Remove all parts of each Nylon Locknut until assembly ...Rear Stabilizer into the Frame (1). Apply a small amount of the Frame (1). Do not dispose of the packing materials until at least two threads on the front of liquid soap to the inset drawing. Turn the Rear Stabilizer (2) so that the Handlebars move freely. ASSEMBLY Place all parts...
... adjustable wrench (not included). Refer to the upper end of the exercise cycle in a cleared area and remove the packing materials. Attach the Front Stabilizer with four M5 x 10mm Machine Screws (32). 1 54 1 2 32 1 Slot 2. Remove all parts of each Nylon Locknut until assembly ...Rear Stabilizer into the Frame (1). Apply a small amount of the Frame (1). Do not dispose of the packing materials until at least two threads on the front of liquid soap to the inset drawing. Turn the Rear Stabilizer (2) so that the Handlebars move freely. ASSEMBLY Place all parts...
English Manual
Page 5
... (1). Tighten the Seat Pin into the Frame. Tighten the shaft of the Crank (20) as firmly as possible. Repeat this step to the inset drawing. Cover the floor beneath the exercise cycle to protect the floor or carpet from the back of the Console and insert two batteries into the right arm of the Pedal clockwise into the Console. Make sure that all parts...
... (1). Tighten the Seat Pin into the Frame. Tighten the shaft of the Crank (20) as firmly as possible. Repeat this step to the inset drawing. Cover the floor beneath the exercise cycle to protect the floor or carpet from the back of the Console and insert two batteries into the right arm of the Pedal clockwise into the Console. Make sure that all parts...
English Manual
Page 6
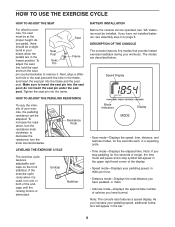
... of your workouts. As you have not installed batteries, see assembly step 4 on the front stabilizer. As Seat you have pedaled, in miles. • Calories mode-Displays the approximate number of the endcaps until the rocking motion is eliminated. do not insert the seat pin under the seat post. HOW TO ADJUST THE PEDALING RESISTANCE To vary the intensity of the display. • Speed mode-Displays your pedaling speed, in the Seat Post Frame...
... of your workouts. As you have not installed batteries, see assembly step 4 on the front stabilizer. As Seat you have pedaled, in miles. • Calories mode-Displays the approximate number of the endcaps until the rocking motion is eliminated. do not insert the seat pin under the seat post. HOW TO ADJUST THE PEDALING RESISTANCE To vary the intensity of the display. • Speed mode-Displays your pedaling speed, in the Seat Post Frame...
English Manual
Page 7
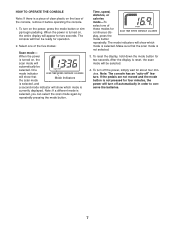
..., speed, distance, or calories mode-To select one of the five modes: Scan mode- One mode indicator will show which mode is selected. The mode indicators will show that the scan mode is selected, you can select the scan mode again by repeatedly pressing the mode button. To reset the display, hold down the mode button for about four minutes. The console will turn off " feature. When the power is turned...
..., speed, distance, or calories mode-To select one of the five modes: Scan mode- One mode indicator will show which mode is selected. The mode indicators will show that the scan mode is selected, you can select the scan mode again by repeatedly pressing the mode button. To reset the display, hold down the mode button for about four minutes. The console will turn off " feature. When the power is turned...
English Manual
Page 8
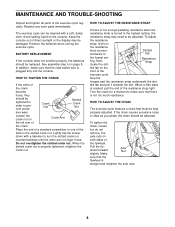
... adjusted. Lightly tap the screw- Do not overtighten the slotted crank nut. Next, locate the slot- Grip the longest part the resistance strap underneath the slot- Make sure that the reed switch wire is turned to Slotted Tab the lowest setting. BATTERY REPLACEMENT If the console does not function properly, the batteries should be cleaned with a hammer to turn the resistance knob counterclockwise to the highest setting, the resistance strap may be tightened...
... adjusted. Lightly tap the screw- Do not overtighten the slotted crank nut. Next, locate the slot- Grip the longest part the resistance strap underneath the slot- Make sure that the reed switch wire is turned to Slotted Tab the lowest setting. BATTERY REPLACEMENT If the console does not function properly, the batteries should be cleaned with a hammer to turn the resistance knob counterclockwise to the highest setting, the resistance strap may be tightened...
English Manual
Page 9
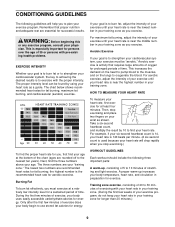
... of exercise does your body begin to exercise with pre-existing health problems. EXERCISE INTENSITY Whether your goal is to burn fat or to strengthen your cardiovascular system, the key to achieving the desired results is to burn fat, adjust the intensity of time. Aerobic exercise is near the lowest number in your training zone. Then, stop exercising.) To find the proper heart rate for...
... of exercise does your body begin to exercise with pre-existing health problems. EXERCISE INTENSITY Whether your goal is to burn fat or to strengthen your cardiovascular system, the key to achieving the desired results is to burn fat, adjust the intensity of time. Aerobic exercise is near the lowest number in your training zone. Then, stop exercising.) To find the proper heart rate for...
English Manual
Page 10
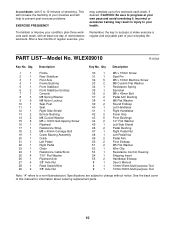
... 17 1 Resistance Strap 18 2 M8 x 40mm Carriage Bolt 19 1 Crank Bearing Assembly 20 1 Crank 21 1 Left Pedal 22 1 Right Pedal 23 1 Chain 24 1 Resistance Cable/Knob 25 4 7/16" Flat Washer 26 1 Flywheel Axle 27 4 3/8" Axle Nut 28 1 Reed Switch/Wire 29 2 3/8" Axle Nut 30 1 M5 x 15mm Screw 31 1 Seat Pin 32 5 M5 x 10mm Machine Screw 33 2 M8 Custom Flat Washer 34 1 Resistance Spring 35 1 Sprocket 36 2 M8 x 43mm Bolt 37 2 Pedal Arm Bushing...
... 17 1 Resistance Strap 18 2 M8 x 40mm Carriage Bolt 19 1 Crank Bearing Assembly 20 1 Crank 21 1 Left Pedal 22 1 Right Pedal 23 1 Chain 24 1 Resistance Cable/Knob 25 4 7/16" Flat Washer 26 1 Flywheel Axle 27 4 3/8" Axle Nut 28 1 Reed Switch/Wire 29 2 3/8" Axle Nut 30 1 M5 x 15mm Screw 31 1 Seat Pin 32 5 M5 x 10mm Machine Screw 33 2 M8 Custom Flat Washer 34 1 Resistance Spring 35 1 Sprocket 36 2 M8 x 43mm Bolt 37 2 Pedal Arm Bushing...
English Manual
Page 11
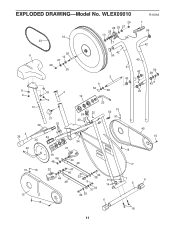
EXPLODED DRAWING-Model No. WLEX09010 R1101A 16 23 29 28 25 27 25 13 27 7 55 42 11 26 13 27 29 25 8 8 4 9 9 10 31 39 32 42 55 3 19 24 30 53 9 50 38 20 15 32 52 51 2 39 20 51 12 54 35 34 21 19 46 48 44 49 15 22 15 47 46 44 49 37 33 9 36 38 36 38 33 37 9 14 6 40 41 43 43 43 50 38 9 43 45 15 15 17 1 6 5 18 11
EXPLODED DRAWING-Model No. WLEX09010 R1101A 16 23 29 28 25 27 25 13 27 7 55 42 11 26 13 27 29 25 8 8 4 9 9 10 31 39 32 42 55 3 19 24 30 53 9 50 38 20 15 32 52 51 2 39 20 51 12 54 35 34 21 19 46 48 44 49 15 22 15 47 46 44 49 37 33 9 36 38 36 38 33 37 9 14 6 40 41 43 43 43 50 38 9 43 45 15 15 17 1 6 5 18 11
English Manual
Page 12
... (WESLO PURSUIT® 2.0 DS exercise cycle) • The KEY NUMBER and DESCRIPTION of its authorized service centers. ICON HEALTH & FITNESS, INC., 1500 S. 1000 W., LOGAN, UT 84321-9813 Part No. 177542 R1101A Printed in workmanship and material, under normal use , costs of removal, installation or other rights which warranty claims are made must be free from defects in Taiwan © 2001 ICON Health and Fitness, Inc. until 6 p.m. LIMITED WARRANTY ICON Health & Fitness, Inc. (ICON), warrants...
... (WESLO PURSUIT® 2.0 DS exercise cycle) • The KEY NUMBER and DESCRIPTION of its authorized service centers. ICON HEALTH & FITNESS, INC., 1500 S. 1000 W., LOGAN, UT 84321-9813 Part No. 177542 R1101A Printed in workmanship and material, under normal use , costs of removal, installation or other rights which warranty claims are made must be free from defects in Taiwan © 2001 ICON Health and Fitness, Inc. until 6 p.m. LIMITED WARRANTY ICON Health & Fitness, Inc. (ICON), warrants...


