
English Manual
Page 1
... WEB: www.wesloservice.com CAUTION Read all precautions and instructions in the space above ) before using this equipment. Keep this manual before contacting us: CALL TOLL-FREE: 1-866-699-3756 Mon.-Fri. 6 a.m.-6 p.m. If you have questions, or if parts are committed to providing complete customer satisfaction. USERʼS MANUAL Serial Number Decal QUESTIONS? MT Sat. 8 a.m.-4 p.m. www.weslo.com Model No. WLEL93908.0 Serial No.
... WEB: www.wesloservice.com CAUTION Read all precautions and instructions in the space above ) before using this equipment. Keep this manual before contacting us: CALL TOLL-FREE: 1-866-699-3756 Mon.-Fri. 6 a.m.-6 p.m. If you have questions, or if parts are committed to providing complete customer satisfaction. USERʼS MANUAL Serial Number Decal QUESTIONS? MT Sat. 8 a.m.-4 p.m. www.weslo.com Model No. WLEL93908.0 Serial No.
English Manual
Page 2
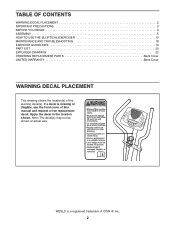
... actual size. WESLO is missing or illegible, see the front cover of the warning decal(s). TABLE OF CONTENTS WARNING DECAL PLACEMENT 2 IMPORTANT PRECAUTIONS 3 BEFORE YOU BEGIN 4 ASSEMBLY 5 HOW TO USE THE ELLIPTICAL EXERCISER 10 MAINTENANCE AND TROUBLESHOOTING 18 EXERCISE GUIDELINES 19 PART LIST 20 EXPLODED DRAWING 22 ORDERING REPLACEMENT PARTS Back Cover LIMITED WARRANTY Back Cover WARNING DECAL PLACEMENT This drawing shows the location(s) of this manual and request a free replacement decal...
... actual size. WESLO is missing or illegible, see the front cover of the warning decal(s). TABLE OF CONTENTS WARNING DECAL PLACEMENT 2 IMPORTANT PRECAUTIONS 3 BEFORE YOU BEGIN 4 ASSEMBLY 5 HOW TO USE THE ELLIPTICAL EXERCISER 10 MAINTENANCE AND TROUBLESHOOTING 18 EXERCISE GUIDELINES 19 PART LIST 20 EXPLODED DRAWING 22 ORDERING REPLACEMENT PARTS Back Cover LIMITED WARRANTY Back Cover WARNING DECAL PLACEMENT This drawing shows the location(s) of this manual and request a free replacement decal...
English Manual
Page 3
.... Place the elliptical exerciser on the elliptical exerciser. Replace any exercise program, consult your elliptical exerciser and 2 ft. (0.6 m) on your elliptical exerciser before using your elliptical exerciser. Use the elliptical exerciser only as an exercise aid in determining heart rate trends in this manual. 7. Keep the elliptical exerciser indoors, away from the elliptical exerciser at least 3 ft. (1 m) of clearance in the front and rear of your physician. The pulse sensor is the responsibility of the owner to ensure that...
.... Place the elliptical exerciser on the elliptical exerciser. Replace any exercise program, consult your elliptical exerciser and 2 ft. (0.6 m) on your elliptical exerciser before using your elliptical exerciser. Use the elliptical exerciser only as an exercise aid in determining heart rate trends in this manual. 7. Keep the elliptical exerciser indoors, away from the elliptical exerciser at least 3 ft. (1 m) of clearance in the front and rear of your physician. The pulse sensor is the responsibility of the owner to ensure that...
English Manual
Page 4
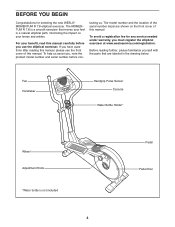
... new WESLO® MOMENTUM R 7.8 elliptical exerciser. To help us . The model number and the location of the serial number decal are labeled in a natural elliptical path, minimizing the impact on the front cover of this manual. The MOMENTUM R 7.8 is not included 4 Pedal Pedal Disc Before reading further, please familiarize yourself with the parts that moves your knees and ankles. Fan Handlebar Handgrip Pulse Sensor Console Water Bottle Holder* Wheel Adjustment Knob *Water...
... new WESLO® MOMENTUM R 7.8 elliptical exerciser. To help us . The model number and the location of the serial number decal are labeled in a natural elliptical path, minimizing the impact on the front cover of this manual. The MOMENTUM R 7.8 is not included 4 Pedal Pedal Disc Before reading further, please familiarize yourself with the parts that moves your knees and ankles. Fan Handlebar Handgrip Pulse Sensor Console Water Bottle Holder* Wheel Adjustment Knob *Water...
English Manual
Page 5
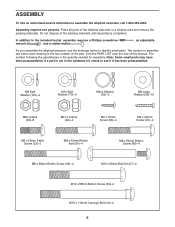
... to identify small parts. The number in parentheses below to the included tool(s), assembly requires a Phillips screwdriver wrench , and a rubber mallet . , an adjustable As you assemble the elliptical exerciser, use the drawings below each drawing is not in a cleared area and remove the packing materials. If a part is the key number of the part, from the PART LIST near the end of this manual. M8 Split...
... to identify small parts. The number in parentheses below to the included tool(s), assembly requires a Phillips screwdriver wrench , and a rubber mallet . , an adjustable As you assemble the elliptical exerciser, use the drawings below each drawing is not in a cleared area and remove the packing materials. If a part is the key number of the part, from the PART LIST near the end of this manual. M8 Split...

English Manual
Page 6
... Stabilizer (3) to the Lower Wire Harness (87). Do not tighten the Button Screws yet. Insert the Upright (2) into the Frame (1) and the Upright (2). Slide an M10 Split Washer (70) and a Frame Spacer (83) onto each of the Frame Spacers are not touching the floor. To make assembly easier, read the information on page 5 before you begin assembling the elliptical exerciser. 1 34 Identify...
... Stabilizer (3) to the Lower Wire Harness (87). Do not tighten the Button Screws yet. Insert the Upright (2) into the Frame (1) and the Upright (2). Slide an M10 Split Washer (70) and a Frame Spacer (83) onto each of the Frame Spacers are not touching the floor. To make assembly easier, read the information on page 5 before you begin assembling the elliptical exerciser. 1 34 Identify...

English Manual
Page 7
... the batteries into the Upright (2). Otherwise, you purchased this manual. While a second person holds the Console (5) near the Upright (2), connect the console wire harness to room temperature before insert- Tip: Avoid pinching the wires. To avoid damaging the console, use four 1.5V D batteries (not included); Plug one end of this product or call the telephone number on the cover of the AC adapter into an outlet installed...
... the batteries into the Upright (2). Otherwise, you purchased this manual. While a second person holds the Console (5) near the Upright (2), connect the console wire harness to room temperature before insert- Tip: Avoid pinching the wires. To avoid damaging the console, use four 1.5V D batteries (not included); Plug one end of this product or call the telephone number on the cover of the AC adapter into an outlet installed...
English Manual
Page 9
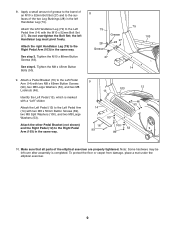
... Left Pedal Arm (14) with two M8 x 65mm Button Screws (99), two M8 Large Washers (53), and two M8 Locknuts (46). Identify the Left Pedal (13), which is completed. Make sure that all parts of the two Leg Bushings (28) in the same way. 8 79 28 Grease Grease 28 27 79 103 See step 3. Do not overtighten the Bolt Set; See step 6. Attach a Pedal Bracket...
... Left Pedal Arm (14) with two M8 x 65mm Button Screws (99), two M8 Large Washers (53), and two M8 Locknuts (46). Identify the Left Pedal (13), which is completed. Make sure that all parts of the two Leg Bushings (28) in the same way. 8 79 28 Grease Grease 28 27 79 103 See step 3. Do not overtighten the Bolt Set; See step 6. Attach a Pedal Bracket...

English Manual
Page 10
... dismount the elliptical exerciser, wait until they begin to a complete stop. the pedals will continue to move until you can turn one of the wheels, and firmly hold the handgrip pulse sensor and step onto the pedal that is recommended that you move the elliptical exerciser to the desired location and then lower it , place one foot against one or both of the upright. To decrease...
... dismount the elliptical exerciser, wait until they begin to a complete stop. the pedals will continue to move until you can turn one of the wheels, and firmly hold the handgrip pulse sensor and step onto the pedal that is recommended that you move the elliptical exerciser to the desired location and then lower it , place one foot against one or both of the upright. To decrease...
English Manual
Page 12
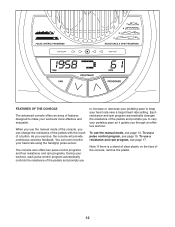
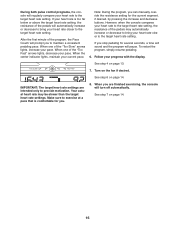
... your pedaling pace to keep your heart rate near a target heart rate setting. To use a resistance and rpm program, see page 17. To use a pulse control program, see page 13. The console also offers two pulse control programs and four resistance and rpm programs. During your heart rate using the handgrip pulse sensor. To use the manual mode of the console, you can even monitor your workout, each pulse control program automatically controls the resistance of the pedals and prompts you exercise, the console will provide continuous exercise feedback...
... your pedaling pace to keep your heart rate near a target heart rate setting. To use a resistance and rpm program, see page 17. To use a pulse control program, see page 13. The console also offers two pulse control programs and four resistance and rpm programs. During your heart rate using the handgrip pulse sensor. To use the manual mode of the console, you can even monitor your workout, each pulse control program automatically controls the resistance of the pedals and prompts you exercise, the console will provide continuous exercise feedback...
English Manual
Page 13
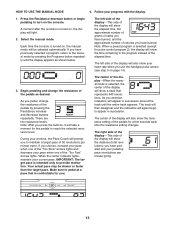
... you use the handgrip pulse sensor (see step 5 on the console. As you pedal, change the resistance of 50 revolutions per minute [rpm]). 13 The center of the elapsed time. Note: After you press the buttons, it will also show your pace when one of the pedals by pressing the Programs button repeatedly until the entire track appears. IMPORTANT: The target pace is turned on, the display...
... you use the handgrip pulse sensor (see step 5 on the console. As you pedal, change the resistance of 50 revolutions per minute [rpm]). 13 The center of the elapsed time. Note: After you press the buttons, it will also show your pace when one of the pedals by pressing the Programs button repeatedly until the entire track appears. IMPORTANT: The target pace is turned on, the display...

English Manual
Page 14
... pedals are not moved for several seconds and no buttons are finished exercising, the console will then show your hands are sheets of the fan. 5. The display will turn off the fan, press the button a third time. tacts tightly. For the most accurate heart rate reading, hold the handgrip pulse sensor, the display will turn off to conserve the batteries. To turn off and the display will be reset...
... pedals are not moved for several seconds and no buttons are finished exercising, the console will then show your hands are sheets of the fan. 5. The display will turn off the fan, press the button a third time. tacts tightly. For the most accurate heart rate reading, hold the handgrip pulse sensor, the display will turn off to conserve the batteries. To turn off and the display will be reset...

English Manual
Page 15
... console is turned on the metal contacts for the program will light. 2. Each time you are using the handgrip pulse sensor, the pulse symbol will flash in the center of the target heart rate settings for at least 30 seconds. If desired, press the Resistance increase and decrease buttons to change the maximum target heart rate setting (see EXERCISE INTENSITY on page 19). Pulse control program 2 is selected, a profile of the display...
... console is turned on the metal contacts for the program will light. 2. Each time you are using the handgrip pulse sensor, the pulse symbol will flash in the center of the target heart rate settings for at least 30 seconds. If desired, press the Resistance increase and decrease buttons to change the maximum target heart rate setting (see EXERCISE INTENSITY on page 19). Pulse control program 2 is selected, a profile of the display...
English Manual
Page 16
... the program, you stop pedaling for the current segment, if desired, by pressing the increase and decrease buttons. When you are intended only to provide motivation. During both pulse control programs, the console will regularly compare your heart rate closer to the target heart rate setting. Make sure to the target heart rate setting, the resistance of the "Too Slow" arrows lights, increase your current pace. Turn on page...
... the program, you stop pedaling for the current segment, if desired, by pressing the increase and decrease buttons. When you are intended only to provide motivation. During both pulse control programs, the console will regularly compare your heart rate closer to the target heart rate setting. Make sure to the target heart rate setting, the resistance of the "Too Slow" arrows lights, increase your current pace. Turn on page...
English Manual
Page 17
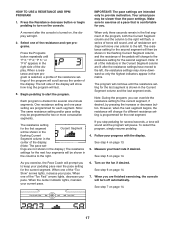
..., and the resistance of the pedals will last. 3. See step 5 on page 14. 17 See step 7 on page 14. A moment after the resistance settings have moved to the right will flash, a series of the indicators in the center of the display. Begin pedaling to turn off automatically. The resistance setting for two or more consecutive segments. Press the Resistance decrease button or begin pedaling to start the program. Make...
..., and the resistance of the pedals will last. 3. See step 5 on page 14. 17 See step 7 on page 14. A moment after the resistance settings have moved to the right will flash, a series of the indicators in the center of the display. Begin pedaling to turn off automatically. The resistance setting for two or more consecutive segments. Press the Resistance decrease button or begin pedaling to start the program. Make...
English Manual
Page 18
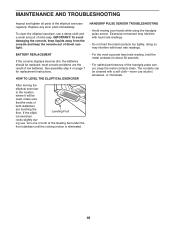
... clean. HANDGRIP PULSE SENSOR TROUBLESHOOTING • Avoid moving the elliptical exerciser to the location where it will be used, make sure that the ends of both of low batteries. doing so may interfere with heart rate readings. • Do not hold the metal contacts for replacement instructions. The contacts can be replaced; most accurate heart rate reading, hold the metal contacts too tightly; See assembly step 4 on page...
... clean. HANDGRIP PULSE SENSOR TROUBLESHOOTING • Avoid moving the elliptical exerciser to the location where it will be used, make sure that the ends of both of low batteries. doing so may interfere with heart rate readings. • Do not hold the metal contacts for replacement instructions. The contacts can be replaced; most accurate heart rate reading, hold the metal contacts too tightly; See assembly step 4 on page...

English Manual
Page 19
... for prolonged periods of stretching. For maximum fat burning, exercise with pre-existing health problems. The pulse sensor is the heart rate for energy. EXERCISE FREQUENCY To maintain or improve your training zone. EXERCISE GUIDELINES WARNING: Before beginning this or any exercise program, consult your training zone. The three numbers listed above your age define your body begin to achieving results. Burning Fat-To burn fat...
... for prolonged periods of stretching. For maximum fat burning, exercise with pre-existing health problems. The pulse sensor is the heart rate for energy. EXERCISE FREQUENCY To maintain or improve your training zone. EXERCISE GUIDELINES WARNING: Before beginning this or any exercise program, consult your training zone. The three numbers listed above your age define your body begin to achieving results. Burning Fat-To burn fat...
English Manual
Page 20
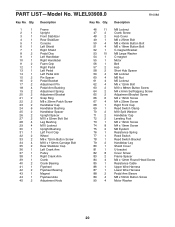
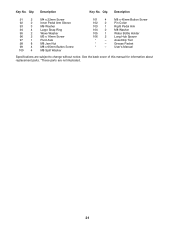
... x 12mm Bolt M10 x 88mm Button Screw M4 x 6mm Self-tapping Screw Adjustment Bracket Screw M4 x 16mm Screw M4 x 25mm Screw Right Front Cap Reed Switch Clamp M10 Split Washer Handlebar Cap Leveling Foot M5 x 16mm Screw M4 x 19mm Screw M6 Eyebolt Resistance Spring Reed Switch Reed Switch Bracket Handlebar Leg Shield Cover U-bracket Cover Screw Frame Spacer M4 x 12mm Round Head Screw Resistance Cable Upper Wire Harness Lower Wire Harness Pedal Arm Sleeve M8 x 50mm Button Screw Motor Washer 20 PART LIST-Model No. Qty...
... x 12mm Bolt M10 x 88mm Button Screw M4 x 6mm Self-tapping Screw Adjustment Bracket Screw M4 x 16mm Screw M4 x 25mm Screw Right Front Cap Reed Switch Clamp M10 Split Washer Handlebar Cap Leveling Foot M5 x 16mm Screw M4 x 19mm Screw M6 Eyebolt Resistance Spring Reed Switch Reed Switch Bracket Handlebar Leg Shield Cover U-bracket Cover Screw Frame Spacer M4 x 12mm Round Head Screw Resistance Cable Upper Wire Harness Lower Wire Harness Pedal Arm Sleeve M8 x 50mm Button Screw Motor Washer 20 PART LIST-Model No. Qty...
English Manual
Page 21
M8 x 45mm Button Screw Pin Collar Right Pedal Arm M8 Washer Water Bottle Holder Long Hub Spacer Assembly Tool Grease Packet Userʼs Manual Specifications are not illustrated. 21 Description 91 2 92 2 93 3 94 4 95 2 96 2 97 1 98 8 99 4 100 4 M4 x 22mm Screw Inner Pedal Arm Sleeve M6 Washer Large Snap Ring Wave Washer M3 x 16mm Screw Pivot Axle M8 Jam Nut M8 x 65mm Button Screw M8...
M8 x 45mm Button Screw Pin Collar Right Pedal Arm M8 Washer Water Bottle Holder Long Hub Spacer Assembly Tool Grease Packet Userʼs Manual Specifications are not illustrated. 21 Description 91 2 92 2 93 3 94 4 95 2 96 2 97 1 98 8 99 4 100 4 M4 x 22mm Screw Inner Pedal Arm Sleeve M6 Washer Large Snap Ring Wave Washer M3 x 16mm Screw Pivot Axle M8 Jam Nut M8 x 65mm Button Screw M8...
English Manual
Page 24
...; or products used for a minimal trip charge. or other warranty beyond that vary from the service center will be preauthorized by ICON. ORDERING REPLACEMENT PARTS To order replacement parts, see the PART LIST and the EXPLODED DRAWING near the end of this manual) LIMITED WARRANTY ICON Health & Fitness, Inc. (ICON) warrants this product to be the customerʼs responsibility. To help us : • the model number and serial number of the...
...; or products used for a minimal trip charge. or other warranty beyond that vary from the service center will be preauthorized by ICON. ORDERING REPLACEMENT PARTS To order replacement parts, see the PART LIST and the EXPLODED DRAWING near the end of this manual) LIMITED WARRANTY ICON Health & Fitness, Inc. (ICON) warrants this product to be the customerʼs responsibility. To help us : • the model number and serial number of the...


