Weslo Gym 750 Support and Manuals
Get Help and Manuals for this Weslo item

View All Support Options Below
Free Weslo Gym 750 manuals!
Problems with Weslo Gym 750?
Ask a Question
Free Weslo Gym 750 manuals!
Problems with Weslo Gym 750?
Ask a Question
Popular Weslo Gym 750 Manual Pages
Uk Manual - Page 1
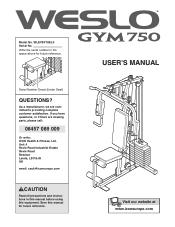
Write the serial number in this manual before using this manual for future reference. As a manufacturer, we are missing parts, please call:
08457 089 009
[email protected]
CAUTION
Read all precautions and instructions in the space above for future reference. USER'S MANUAL
Visit our website at www.iconeurope.com Save this equipment.
Model No.
Serial Number Decal (Under Seat)
...
Uk Manual - Page 2

... BEGIN 4 ASSEMBLY 5 ADJUSTMENTS 15 WEIGHT RESISTANCE CHART 16 CABLE DIAGRAM 17 TROUBLESHOOTING AND MAINTENANCE 18 ORDERING REPLACEMENT PARTS Back Cover Note: A PART IDENTIFICATION CHART and a PART LIST/EXPLODED DRAWING are attached in the location shown. If the decal is a registered trademark of this manual. WARNING DECAL PLACEMENT
The decal shown here has been placed on the...
Uk Manual - Page 3
...problems. Read all instructions before using . This
is intended for persons over the age of all precautions.
8. Replace...: Before beginning this manual and in a commercial, rental, or institutional setting.
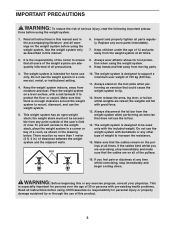
4. IMPORTANT PRECAUTIONS
WARNING...parts immediately.
7. Keep children under the age of serious injury, read the following important precau- The weight system is designed to support...
Uk Manual - Page 4
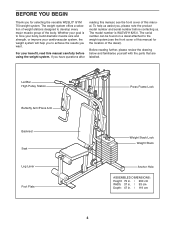
...manual for selecting the versatile WESLO® GYM 750 weight system. The serial number can be found on a decal attached to tone your body, build dramatic muscle size and strength, or improve your benefit, read this manual. Before reading further, please review the drawing below and familiarise yourself with the parts...you , please note the product model number and serial number before using ...
Uk Manual - Page 5
... realise that the versatile weight system has many parts and that the weight system can be assembled successfully by setting aside plenty of the Base (1).
Before beginning ...following information and instructions:
• Assembly requires two people.
• Place all parts are oriented as shown in the drawings.
• For help identifying small parts, use the PART IDENTIFICATION CHART....
Uk Manual - Page 6
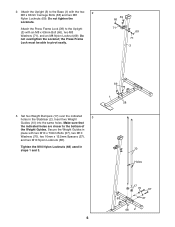
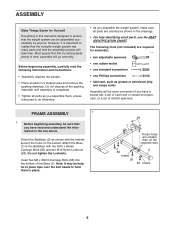
...Locknut (69).
Tighten the M10 Nylon Locknuts (68) used in the Stabiliser (2). Do not overtighten the Locknut; Set two Weight Bumpers (17) over the indicated
3
holes in steps 1 and 3.
69 1
58
10 Holes
17
...70
57
68
37
68 2
6 Secure the Weight Guides in
place with the two
2
M8 x 63mm Carriage Bolts (58) and two M8
Nylon Locknuts (69)....
Uk Manual - Page 9
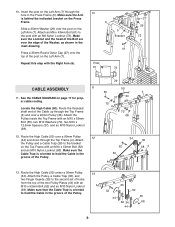
....
29
50
55
4
37
34
70 37
70 68
34 52 50
36 68 4
13. Make sure the
Cable Trap is oriented to the second set of holes
from the top of the Pulley.
9
35
52
50
44
35
36 34
68
44 Attach the Pulley, a Cable Trap (36), and
two...
Uk Manual - Page 14

... of all parts have been properly tightened. Repeat this manual for proper cable routing. The use of the Pad Tube. IMPORTANT: If the cables are not properly routed, they may be damaged when heavy weight is any slack in the cables, you will be explained in the Leg
32
Lever (9). see TROUBLESHOOTING AND...
Uk Manual - Page 15
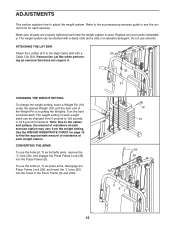
Replace any worn parts immediately.
ing an exercise that does not require it.
33
31
CHANGING THE WEIGHT SETTING
To change the weight setting, insert a Weight Pin (16) under the desired ... into the holes in 12.5-pound increments. Turn the bent end downward.
Refer to the accompanying exercise guide to adjust the weight system. ATTACHING THE LAT BAR
Attach the Lat Bar (31) to 106 pounds...
Uk Manual - Page 18

...(52) and re-attach the Pulley, the Cable Trap, and two Finger Guards to the new set of holes in the "U"-bracket with the Bolt and Locknut.
Slack can be removed from the cables..."U"-bracket (not shown) can also be adjusted in the Pulley Plates with the Bolt and Locknut. TROUBLESHOOTING AND MAINTENANCE
TIGHTENING THE CABLES
Woven cable, the type of cable used . Make sure that the ...
Uk Manual - Page 20

... provide the following information when ordering replacement parts:
• the MODEL NUMBER of the product (WLEVSY1825.0)
• the NAME of the product (WESLO GYM 750 weight system)
• the SERIAL NUMBER of the product (see the front cover of this manual)
• the KEY NUMBER and DESCRIPTION of the part(s) (see the PART LIST and EXPLODED DRAWING attached at...
Uk Manual - Page 21
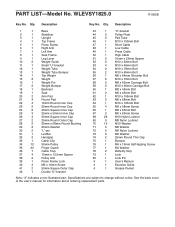
...
75
1
Bumper
76
1
M4 x 19mm Self-tapping Screw
77
1
M4 Washer
78
2
Butterfly Grip
79
1
Lock
80
1
Lock Pin
#
1
User's Manual
#
1
Exercise Guide
#
1
Grease Packet
Note: "#" indicates a non-illustrated part. See the back cover of the user's manual for information about ordering replacement parts. PART LIST-Model No. WLEVSY1825.0
R1005B
Key No. Description
Key No.
Uk Manual - Page 22

PART IDENTIFICATION CHART-Model No. WLEVSY1825.0
M4 x 19mm Selftapping Screw (76)
M6 x 16mm Screw (40)
M6 x 63mm Screw (67) M6 x 58mm Screw (65)
M4 Washer (77)
M10 x 52mm Bolt (...
Uk Manual - Page 23
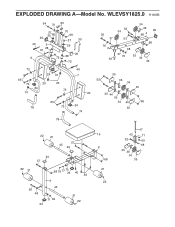
EXPLODED DRAWING A-Model No. WLEVSY1825.0 R1005B
64 70 25
27 29 26
49
5
28 61
6
72
70 68
27
30
29
26 28
72
55 37
70
50
...
Uk Manual - Page 24
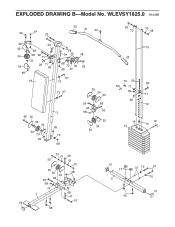
...
51
70
35
34
68
35
68 53
68
70
1 26
68 47 57
58
41 17
2
37 70
57
70
41 59 EXPLODED DRAWING B-Model No.
Weslo Gym 750 Reviews
We have not received any reviews for Weslo yet.