
English Manual
Page 1
... the serial number in before using, thN equipthent SaVetfilsmanual for reference. TO AVOID UNNECESSARY DELAYS, PLEASE CALL DIRECT TO OUR TOLL-FREE CUSTOMER HOT LINE. MST AUTIO I QUESTIONS? The trained technicians on our customer hot line will guarantee you . TOTAL TRAINING SYST Serial Number Dec.I Read all precautiorld andlh'ilrUc- Model No. As a manufacturer, we are missing or damaged parts, we...
... the serial number in before using, thN equipthent SaVetfilsmanual for reference. TO AVOID UNNECESSARY DELAYS, PLEASE CALL DIRECT TO OUR TOLL-FREE CUSTOMER HOT LINE. MST AUTIO I QUESTIONS? The trained technicians on our customer hot line will guarantee you . TOTAL TRAINING SYST Serial Number Dec.I Read all precautiorld andlh'ilrUc- Model No. As a manufacturer, we are missing or damaged parts, we...
English Manual
Page 2
... ASSEMBLY ADJUSTMENT PART LIST EXPLODED DRAWING ORDERING REPLACEMENT PARTS LIMITED WARRANTY 2 3 4 7 10 11 Back Cover Back Cover MPORTANT PRECAUT 0 WARNINGs: .To reduce the risk of the owner to ensure that all 0seeSof the C'ros:0-fri:101hg system are AlWaya,ittach Weightbands with pre-existing,health problems Read all : :.Instructions befoiauiing ICON no responsibility for personalinjury or property damage ''''sustained by or through the use the 'Crbss-training...
... ASSEMBLY ADJUSTMENT PART LIST EXPLODED DRAWING ORDERING REPLACEMENT PARTS LIMITED WARRANTY 2 3 4 7 10 11 Back Cover Back Cover MPORTANT PRECAUT 0 WARNINGs: .To reduce the risk of the owner to ensure that all 0seeSof the C'ros:0-fri:101hg system are AlWaya,ittach Weightbands with pre-existing,health problems Read all : :.Instructions befoiauiing ICON no responsibility for personalinjury or property damage ''''sustained by or through the use the 'Crbss-training...
English Manual
Page 3
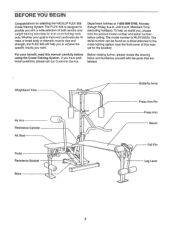
... call our Customer Service Before reading further, please review the drawing below and familiarize yourself with a wide selection of this manual carefully before calling. If you , please note the product model number and serial number before using the Cross-Training System. BEFORE YOU BEGIN Congratulations for true cross-training workouts. Weightband Tube Ab Arm Resistance Cylinder Ab Seat Pedal Resistance Bracket 0 • Base Butterfly Arms Press Arm Pin Press Arm Bench 0 10-N Pull Pin Leg Lever 3 For...
... call our Customer Service Before reading further, please review the drawing below and familiarize yourself with a wide selection of this manual carefully before calling. If you , please note the product model number and serial number before using the Cross-Training System. BEFORE YOU BEGIN Congratulations for true cross-training workouts. Weightband Tube Ab Arm Resistance Cylinder Ab Seat Pedal Resistance Bracket 0 • Base Butterfly Arms Press Arm Pin Press Arm Bench 0 10-N Pull Pin Leg Lever 3 For...
English Manual
Page 4
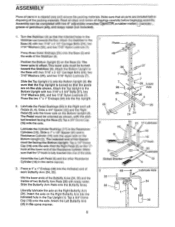
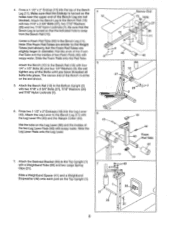
... sure that the Top Upright is offset.This lower axle must be turned toward the Stabilizer (4). Wet the lower ends of the Butterfly Arms (34, 35) and the insides of the Stabilizer (4). Read all steps and review all parts in the same manner. 3. The Pedal must be oriented as shown, with two 8" adjustable wrenches =:D, a rubber mallet grease or petroleum jelly, and...
... sure that the Top Upright is offset.This lower axle must be turned toward the Stabilizer (4). Wet the lower ends of the Butterfly Arms (34, 35) and the insides of the Stabilizer (4). Read all steps and review all parts in the same manner. 3. The Pedal must be oriented as shown, with two 8" adjustable wrenches =:D, a rubber mallet grease or petroleum jelly, and...
English Manual
Page 5
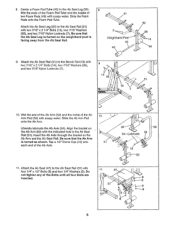
...turned so that the Endcap is away from the Bench Rail (10). Press two 1 1/2" x 2" Endcaps (13) into the top of the two Leg Lever Pads (42) with the Leg Lever Pin (43) and the Hairpin Cotter (44). Slide the Leg Lever Pads onto the Leg Lever. 6 13 43--_____4 4 0 .42 0, , N ,..,- ,40 0 44 Foam Pad Tube 42 7. Do not tighten... Tube (28) and two Large Spring Clips (31). Attach the Backrest Bracket (55) to the Weight Tubes (not shown), but the Foam Pad Tubes are not blocked. 4. Note: The Foam Pad Tubes are similar to the Top Upright (1) with soapy water.
...turned so that the Endcap is away from the Bench Rail (10). Press two 1 1/2" x 2" Endcaps (13) into the top of the two Leg Lever Pads (42) with the Leg Lever Pin (43) and the Hairpin Cotter (44). Slide the Leg Lever Pads onto the Leg Lever. 6 13 43--_____4 4 0 .42 0, , N ,..,- ,40 0 44 Foam Pad Tube 42 7. Do not tighten... Tube (28) and two Large Spring Clips (31). Attach the Backrest Bracket (55) to the Weight Tubes (not shown), but the Foam Pad Tubes are not blocked. 4. Note: The Foam Pad Tubes are similar to the Top Upright (1) with soapy water.
English Manual
Page 6
...Arm and the Ab Seat Rail. Do not tighten any of the Ab Axle. 32 ° 52 51 * ••• •54-• L.ub• .ric,.a..t.e.... 18 . 18 50 11. Attach the Ab Seat Rail (51) to the Bench Rail (10) with four 1/4" x 1/2" Bolts (8) and four 1/4" Washers (9). Attach the Ab Seat...10 7 . • . 10. Slide the Ab Arm Pad onto the Ab Arm. Insert the Ab Axle through the bracket on the Ab Arm (52) with soapy water. Be sure that the Ab Seat Leg is turned so the weightband post is turned as shown. Liberally lubricate the Ab Axle (54). Tap a 1/2" Dome Cap (...
...Arm and the Ab Seat Rail. Do not tighten any of the Ab Axle. 32 ° 52 51 * ••• •54-• L.ub• .ric,.a..t.e.... 18 . 18 50 11. Attach the Ab Seat Rail (51) to the Bench Rail (10) with four 1/4" x 1/2" Bolts (8) and four 1/4" Washers (9). Attach the Ab Seat...10 7 . • . 10. Slide the Ab Arm Pad onto the Ab Arm. Insert the Ab Axle through the bracket on the Ab Arm (52) with soapy water. Be sure that the Ab Seat Leg is turned so the weightband post is turned as shown. Liberally lubricate the Ab Axle (54). Tap a 1/2" Dome Cap (...
English Manual
Page 7
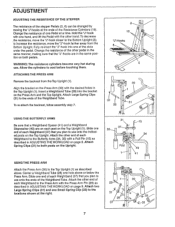
... Press Arm Pin (29) as described in the Top Upright (1). to increase the resistance, move the "J"-hook closer to use onto the indicated posts on page 9. Allow the cylinders to the ends of the Weightband Tube. To re-attach the backrest, follow assembly step 7. Slide one hole above . Fully re-insert the "J"-hook into the bracket on the Top Upright (1). Change the resistance...
... Press Arm Pin (29) as described in the Top Upright (1). to increase the resistance, move the "J"-hook closer to use onto the indicated posts on page 9. Allow the cylinders to the ends of the Weightband Tube. To re-attach the backrest, follow assembly step 7. Slide one hole above . Fully re-insert the "J"-hook into the bracket on the Top Upright (1). Change the resistance...
English Manual
Page 8
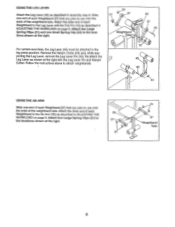
... 31 37 Weightband Tube 8 Remove the Hairpin Cotter (44) and, while supporting the Leg Lever, remove the Leg Lever Pin (43). Attach the other end of each Weightband (37) that you plan to the locations shown at the right. 33 31 37 Weightband Tube 40 37 15 0 For certain exercises, the Leg Lever (40) must be attached in assembly step 6. Slide one Small...
... 31 37 Weightband Tube 8 Remove the Hairpin Cotter (44) and, while supporting the Leg Lever, remove the Leg Lever Pin (43). Attach the other end of each Weightband (37) that you plan to the locations shown at the right. 33 31 37 Weightband Tube 40 37 15 0 For certain exercises, the Leg Lever (40) must be attached in assembly step 6. Slide one Small...
English Manual
Page 9
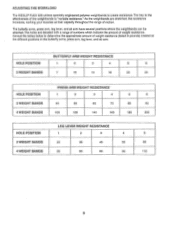
... 16 20 24 PRESS ARM WEIGHT RESISTANCE' HOLE POSITION 1 2 3 4 5 6 2 WEIGHT BANDS 45 55 65 75 85 95 4 WEIGHT BANDS 100 120 140 160 180 200 LEG LEVER WEIGHT RESISTANCE HOLE POSITION 1 2 3 4 5 2 WEIGHT BANDS 25 35 45 55 60 4 WEIGHT BANDS 50 65 80 95 110 9 ADJUSTING THE WORKLOAD The WESLO® FLEX 505 utilizes specially engineered polymer weightbands to the effectiveness of weight resistance. The key to create...
... 16 20 24 PRESS ARM WEIGHT RESISTANCE' HOLE POSITION 1 2 3 4 5 6 2 WEIGHT BANDS 45 55 65 75 85 95 4 WEIGHT BANDS 100 120 140 160 180 200 LEG LEVER WEIGHT RESISTANCE HOLE POSITION 1 2 3 4 5 2 WEIGHT BANDS 25 35 45 55 60 4 WEIGHT BANDS 50 65 80 95 110 9 ADJUSTING THE WORKLOAD The WESLO® FLEX 505 utilizes specially engineered polymer weightbands to the effectiveness of weight resistance. The key to create...
English Manual
Page 10
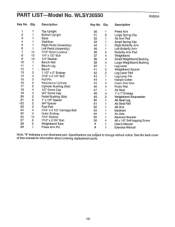
... Bushing Large Weightband Bushing Leg Lever Weightband Spacer Leg Lever Pad Leg Lever Pin Hairpin Cotter Foam Pad Tube Foam Pad Ab Seat 1" x 1" Endcap Weightband Stopwasher Ab Seat Leg Ab Seat Rail Ab Arm Backrest Ab Axle Backrest Bracket #8 x 1/2" Self-tapping Screw User's Manual Exercise Manual s• Note: "#" indicates a non-illustrated part. WLSY30550 R0895A Key No. Description Key No. Qty. Qty. Specifications are subject to change without notice. PART LIST Model No.
... Bushing Large Weightband Bushing Leg Lever Weightband Spacer Leg Lever Pad Leg Lever Pin Hairpin Cotter Foam Pad Tube Foam Pad Ab Seat 1" x 1" Endcap Weightband Stopwasher Ab Seat Leg Ab Seat Rail Ab Arm Backrest Ab Axle Backrest Bracket #8 x 1/2" Self-tapping Screw User's Manual Exercise Manual s• Note: "#" indicates a non-illustrated part. WLSY30550 R0895A Key No. Description Key No. Qty. Qty. Specifications are subject to change without notice. PART LIST Model No.
English Manual
Page 12
... a product caused by ICON. Some states do not allow the exclusion or limitation of removal, installation or other warranty beyond that specifically set forth herein. The warranty extended hereunder is limited to replacing or repairing, at ICON's option, the product at 1-800-999-3765, Monday through Friday, 6 a.m. This warranty gives you . ICON HEALTH & FITNESS, INC., 1500 S. 1000 W., LOGAN, UT 84321-9813 Part No. 125054 R0895A 1995 ICON Health & Fitness, Inc.
... a product caused by ICON. Some states do not allow the exclusion or limitation of removal, installation or other warranty beyond that specifically set forth herein. The warranty extended hereunder is limited to replacing or repairing, at ICON's option, the product at 1-800-999-3765, Monday through Friday, 6 a.m. This warranty gives you . ICON HEALTH & FITNESS, INC., 1500 S. 1000 W., LOGAN, UT 84321-9813 Part No. 125054 R0895A 1995 ICON Health & Fitness, Inc.


