
English Manual
Page 1
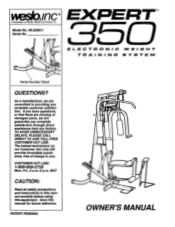
... to you. TO AVOID UNNECESSARY DELAYS, PLEASE CALL DIRECT TO OUR TOLL-FREE CUSTOMER HOT LINE. Save this equipment. MST CAUTION: Read all safety precautions andinstructionsIn this manual carefully before using this manual for future reference. PATENT PENDING 0 O O OWNER'S MANUAL Inc. WL035011 Serial No. 350 ELECTRONIC TRAINING WEIGHT SYSTEM Serial Number Decal QUESTIONS? The trained technicians on our Customer Hot Line will guarantee you...
... to you. TO AVOID UNNECESSARY DELAYS, PLEASE CALL DIRECT TO OUR TOLL-FREE CUSTOMER HOT LINE. Save this equipment. MST CAUTION: Read all safety precautions andinstructionsIn this manual carefully before using this manual for future reference. PATENT PENDING 0 O O OWNER'S MANUAL Inc. WL035011 Serial No. 350 ELECTRONIC TRAINING WEIGHT SYSTEM Serial Number Decal QUESTIONS? The trained technicians on our Customer Hot Line will guarantee you...
English Manual
Page 2
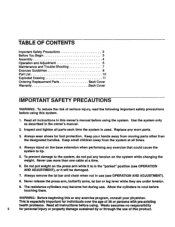
... system is in the owner's manual. 2. Replace any exercise that could cause the system to tip. 5. Always remove the lat bar and chain when not in this product. WARNING: Before beginning this system. 1. TABLE OF CONTENTS Important Safety Precautions Before You Begin Assembly Operation and Adjustment Maintenance and Trouble-Shooting Exercise Guidelines Part List Exploded Drawing Ordering Replacement Parts Warranty 2 3 4 5 7 8 10 11 Back Cover Back Cover IMPORTANT SAFETY PRECAUTIONS...
... system is in the owner's manual. 2. Replace any exercise that could cause the system to tip. 5. Always remove the lat bar and chain when not in this product. WARNING: Before beginning this system. 1. TABLE OF CONTENTS Important Safety Precautions Before You Begin Assembly Operation and Adjustment Maintenance and Trouble-Shooting Exercise Guidelines Part List Exploded Drawing Ordering Replacement Parts Warranty 2 3 4 5 7 8 10 11 Back Cover Back Cover IMPORTANT SAFETY PRECAUTIONS...
English Manual
Page 3
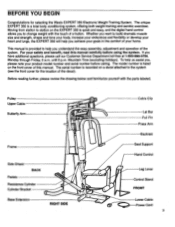
... the location of the decal). The unique EXPERT 350 is listed on the front cover of your product model number and serial number before using the system. Whether you want to help you understand the easy assembly, adjustment and operation of a button. Pulley Upper Cable Butterfly Arm Frame Side Shield BACK Pedals Resistance Cylinder Cylinder Bracket Base Extension RIGHT SIDE O 0 0 Cable Clip Lat Bar run Pin Press Arm Backrest Seat Support Hand Control Leg Lever Control Stand FRONT Lower Cable Power Cord 3 until 6 p.m. Moving...
... the location of the decal). The unique EXPERT 350 is listed on the front cover of your product model number and serial number before using the system. Whether you want to help you understand the easy assembly, adjustment and operation of a button. Pulley Upper Cable Butterfly Arm Frame Side Shield BACK Pedals Resistance Cylinder Cylinder Bracket Base Extension RIGHT SIDE O 0 0 Cable Clip Lat Bar run Pin Press Arm Backrest Seat Support Hand Control Leg Lever Control Stand FRONT Lower Cable Power Cord 3 until 6 p.m. Moving...
English Manual
Page 4
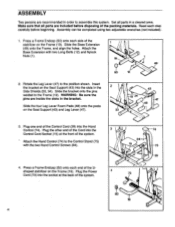
... using two adjustable wrenches (not included). 1. Plug the other end of the Cord into the socket at the front of the system. 73 . , 50 - _ 19 4 Press a Frame Endcap (50) onto each end of the stabilizer on the Seat Support (43) and Leg Lever (47). 3. Insert the bracket on the Frame (19). Attach the Hand Control (74) to assemble this system. Set all parts...
... using two adjustable wrenches (not included). 1. Plug the other end of the Cord into the socket at the front of the system. 73 . , 50 - _ 19 4 Press a Frame Endcap (50) onto each end of the stabilizer on the Seat Support (43) and Leg Lever (47). 3. Insert the bracket on the Frame (19). Attach the Hand Control (74) to assemble this system. Set all parts...

English Manual
Page 5
... 3 WEIGHT 4 ON/OFF O 5 TURNING ON THE POWER AND RESETTING THE SYSTEM Press the on/off button. The weight display will read "E-." Lightly grease the Press Arm Bushings (37) in the Frame (19). Thread a Short Bolt (81), with the Press Arm Bushings (37) in the Frame. Insert the Press Arm Axle (38) through the lower holes in the end of the Axle. DIAGRAM OF THE HAND CONTROL 1. Turn the Axle, using the...
... 3 WEIGHT 4 ON/OFF O 5 TURNING ON THE POWER AND RESETTING THE SYSTEM Press the on/off button. The weight display will read "E-." Lightly grease the Press Arm Bushings (37) in the Frame (19). Thread a Short Bolt (81), with the Press Arm Bushings (37) in the Frame. Insert the Press Arm Axle (38) through the lower holes in the end of the Axle. DIAGRAM OF THE HAND CONTROL 1. Turn the Axle, using the...
English Manual
Page 6
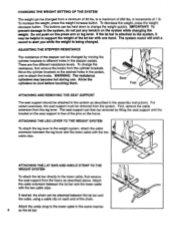
... during use. To change the weight quickly. To decrease the weight, press the weight decrease button. Do not push on each end of the stepper can be removed from the leg lever. ADJUSTING THE STEPPER RESISTANCE The resistance of the chain. For certain exercises, the seat support must be attached between the lat bar and the cable, using a cable clip on the press arm or leg lever. Attach the cable extension between the leg lever and the lower cable...
... during use. To change the weight quickly. To decrease the weight, press the weight decrease button. Do not push on each end of the stepper can be removed from the leg lever. ADJUSTING THE STEPPER RESISTANCE The resistance of the chain. For certain exercises, the seat support must be attached between the lat bar and the cable, using a cable clip on the press arm or leg lever. Attach the cable extension between the leg lever and the lower cable...
English Manual
Page 7
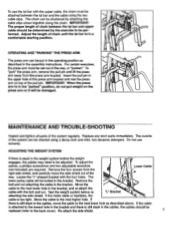
... a comfortable starting position. Locate the "L"-shaped bracket with the four holes. Re-attach the side shield. 7 MAINTENANCE AND TROUBLE-SHOOTING Inspect and tighten all parts of the way, or "parked." Replace any worn parts immediately. To adjust the cables, a phillips screwdriver and two adjustable wrenches Lower Cable (not included) are required. Move the cable to the next lower hole in ( the upper hole of the press arm bracket and...
... a comfortable starting position. Locate the "L"-shaped bracket with the four holes. Re-attach the side shield. 7 MAINTENANCE AND TROUBLE-SHOOTING Inspect and tighten all parts of the way, or "parked." Replace any worn parts immediately. To adjust the cables, a phillips screwdriver and two adjustable wrenches Lower Cable (not included) are required. Move the cable to the next lower hole in ( the upper hole of the press arm bracket and...
English Manual
Page 8
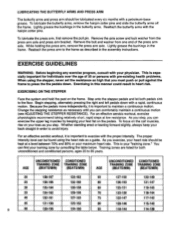
...-existing health problems. When using the heart rate as a guide. Lightly grease the bushings in the assembly instructions. Reattach the press arm to the frame as you step. Change the stepping resistance as necessary until you can find your training zone by keeping your toes as described in the frame. To lubricate the butterfly arms, remove the hairpin cotter pins and slide the butterfly arms off the frame. Because the pedals move independently...
...-existing health problems. When using the heart rate as a guide. Lightly grease the bushings in the assembly instructions. Reattach the press arm to the frame as you step. Change the stepping resistance as necessary until you can find your training zone by keeping your toes as described in the frame. To lubricate the butterfly arms, remove the hairpin cotter pins and slide the butterfly arms off the frame. Because the pedals move independently...
English Manual
Page 9
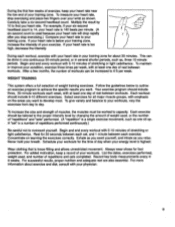
... your heart rate near the low end of your physician. 9 To maintain or improve your condition, exercise three times per week, with your training zone. Schedule your breath. Each workout should be tailored to the proper intensity level by 10 to overexert yourself. List the dates, exercises performed, weight used , or the number of "repetitions" and "sets" performed. (A "repetition" is a number of...
... your heart rate near the low end of your physician. 9 To maintain or improve your condition, exercise three times per week, with your training zone. Schedule your breath. Each workout should be tailored to the proper intensity level by 10 to overexert yourself. List the dates, exercises performed, weight used , or the number of "repetitions" and "sets" performed. (A "repetition" is a number of...
English Manual
Page 10
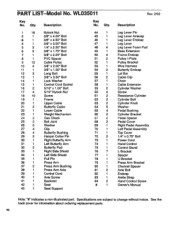
... Extension Frame Endcap Pulley I-Plate Pulley Bracket Wire Harness Butterfly Endcap Lat Bar Cable Clip Chain Cable Extension Cylinder Washer Screw Resistance Cylinder Cylinder Bolt Cylinder Knob Washer Pedal Bushing Cylinder Bracket Pedal Spacer Pedal Cover Right Pedal Assembly Left Pedal Assembly Top Cover 1/4" x 0.75" Bolt Power Cord Hand Control Control Stand L-Bracket Spacer U-Bracket Press Arm Bracket Channel Spacer Axle Bolt Endcap Ankle Strap Hand Control Screw Owner's Manual Note: "#" indicates a non-illustrated part. Description Key No. PART LIST Model No. WLO35O11 Key No.
... Extension Frame Endcap Pulley I-Plate Pulley Bracket Wire Harness Butterfly Endcap Lat Bar Cable Clip Chain Cable Extension Cylinder Washer Screw Resistance Cylinder Cylinder Bolt Cylinder Knob Washer Pedal Bushing Cylinder Bracket Pedal Spacer Pedal Cover Right Pedal Assembly Left Pedal Assembly Top Cover 1/4" x 0.75" Bolt Power Cord Hand Control Control Stand L-Bracket Spacer U-Bracket Press Arm Bracket Channel Spacer Axle Bolt Endcap Ankle Strap Hand Control Screw Owner's Manual Note: "#" indicates a non-illustrated part. Description Key No. PART LIST Model No. WLO35O11 Key No.
English Manual
Page 11
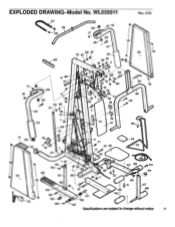
... 61 1 43 48 to_ 44 46 4O. 72 18 66 45 5 47 69 48 48 62--1174:;1 ., 67 49 63 73 65 60-cr 64 Specifications are subject to change without notice. 11 EXPLODED DRAWING Model No.
... 61 1 43 48 to_ 44 46 4O. 72 18 66 45 5 47 69 48 48 62--1174:;1 ., 67 49 63 73 65 60-cr 64 Specifications are subject to change without notice. 11 EXPLODED DRAWING Model No.
English Manual
Page 12
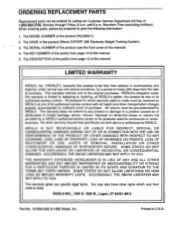
... MODEL NUMBER of the product (Weslo EXPERT 350 Electronic Weight Training System). 3. The SERIAL NUMBER of the product (see the front cover of this manual). 4. The DESCRIPTION of the part(s) from page 10 of this manual. This warranty does not extend to any product or damage to a product caused by or attributable to replacing or repairing, at WESLO's option, the product at one of its authorized service centers...
... MODEL NUMBER of the product (Weslo EXPERT 350 Electronic Weight Training System). 3. The SERIAL NUMBER of the product (see the front cover of this manual). 4. The DESCRIPTION of the part(s) from page 10 of this manual. This warranty does not extend to any product or damage to a product caused by or attributable to replacing or repairing, at WESLO's option, the product at one of its authorized service centers...


