

Uk Manual
Page 2
...CONTENTS WARNING DECAL PLACEMENT 2 IMPORTANT PRECAUTIONS 3 BEFORE YOU BEGIN 5 ASSEMBLY 6 OPERATION AND ADJUSTMENT 11 HOW TO FOLD AND MOVE THE TREADMILL 15 TROUBLESHOOTING 17 EXERCISE GUIDELINES 19 PART LIST 20 EXPLODED DRAWING 21 ORDERING REPLACEMENT PARTS Back Cover RECYCLING INFORMATION Back Cover WARNING DECAL PLACEMENT... This drawing shows the locations of this manual and request a free replacement decal. Apply the decal in the location shown. WESLO is missing or illegible, call the telephone number on the front cover of the warning decals. Note: The decals may not...
...CONTENTS WARNING DECAL PLACEMENT 2 IMPORTANT PRECAUTIONS 3 BEFORE YOU BEGIN 5 ASSEMBLY 6 OPERATION AND ADJUSTMENT 11 HOW TO FOLD AND MOVE THE TREADMILL 15 TROUBLESHOOTING 17 EXERCISE GUIDELINES 19 PART LIST 20 EXPLODED DRAWING 21 ORDERING REPLACEMENT PARTS Back Cover RECYCLING INFORMATION Back Cover WARNING DECAL PLACEMENT... This drawing shows the locations of this manual and request a free replacement decal. Apply the decal in the location shown. WESLO is missing or illegible, call the telephone number on the front cover of the warning decals. Note: The decals may not...

Uk Manual
Page 3
...BS1362 type should be used only by or through the use only a 3conductor, 14-gauge (1 mm2) cord that could become caught in use the treadmill with at all times. 8. IMPORTANT PRECAUTIONS WARNING: To reduce the risk of serious injury, read all warnings on each side. This is running. ...aid in determining heart rate trends in - If an extension cord is needed, use of high speeds. The pulse sensor is capable of this treadmill are used or where oxygen is no responsibility for persons over age 35 or persons with pre-existing health problems. 2. structions in a garage or...
...BS1362 type should be used only by or through the use only a 3conductor, 14-gauge (1 mm2) cord that could become caught in use the treadmill with at all times. 8. IMPORTANT PRECAUTIONS WARNING: To reduce the risk of serious injury, read all warnings on each side. This is running. ...aid in determining heart rate trends in - If an extension cord is needed, use of high speeds. The pulse sensor is capable of this treadmill are used or where oxygen is no responsibility for persons over age 35 or persons with pre-existing health problems. 2. structions in a garage or...

Uk Manual
Page 4
...be performed by an authorized ser- Inspect and properly tighten all parts of the treadmill by an authorized service representative. Servicing other than the procedures in the storage position. 22. This treadmill is holding the frame securely in this manual. Do not attempt to do so...is properly assembled. (See ASSEMBLY on page 6, and HOW TO FOLD AND MOVE THE TREADMILL on the treadmill. DANGER: 25. Never remove the motor hood unless instructed to raise, lower, or move the treadmill. 21. Never drop or insert any object into any commercial, rental, or institutional ...
...be performed by an authorized ser- Inspect and properly tighten all parts of the treadmill by an authorized service representative. Servicing other than the procedures in the storage position. 22. This treadmill is holding the frame securely in this manual. Do not attempt to do so...is properly assembled. (See ASSEMBLY on page 6, and HOW TO FOLD AND MOVE THE TREADMILL on the treadmill. DANGER: 25. Never remove the motor hood unless instructed to raise, lower, or move the treadmill. 21. Never drop or insert any object into any commercial, rental, or institutional ...

Uk Manual
Page 5
To help us . BEFORE YOU BEGIN Thank you ʼre not exercising, the unique treadmill can be folded up, requiring less than half the floor space of other treadmills. And when you for selecting the new WESLO® EASY COMPACT 2 treadmill. Handrail Console Key/Clip Walking Belt Foot Rail Idler Roller Adjustment Bolts 5 Motor Hood Reset/Off...
To help us . BEFORE YOU BEGIN Thank you ʼre not exercising, the unique treadmill can be folded up, requiring less than half the floor space of other treadmills. And when you for selecting the new WESLO® EASY COMPACT 2 treadmill. Handrail Console Key/Clip Walking Belt Foot Rail Idler Roller Adjustment Bolts 5 Motor Hood Reset/Off...

Uk Manual
Page 6
... from the PART LIST near the end of the walking belt or the shipping carton. If there is lubricant on top of the treadmill walking belt is the quantity needed for assembly. Note: The underside of the walking belt, simply wipe off the lubricant with high-... to one of the packing materials until assembly is preattached to be assembled. Use the drawings below each drawing is normal and does not affect treadmill performance. During shipping, some lubricant may be transferred to identify the assembly hardware. Extra hardware may be included. 1/4" Star Washer (4)-2 M8 Star ...
... from the PART LIST near the end of the walking belt or the shipping carton. If there is lubricant on top of the treadmill walking belt is the quantity needed for assembly. Note: The underside of the walking belt, simply wipe off the lubricant with high-... to one of the packing materials until assembly is preattached to be assembled. Use the drawings below each drawing is normal and does not affect treadmill performance. During shipping, some lubricant may be transferred to identify the assembly hardware. Extra hardware may be included. 1/4" Star Washer (4)-2 M8 Star ...
Uk Manual
Page 9
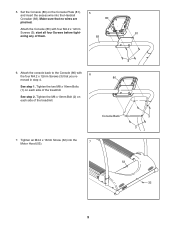
... 6 the four M4.2 x 12mm Screws (3) that no wires are 80 pinched. See step 1. Tighten the two M8 x 16mm Bolts (1) on each side of the treadmill. Tighten the M6 x 10mm Bolt (2) on the Console Plate (81), 5 and insert the excess wire into the Motor Hood (53). 7 3 3 53 32 9... Set the Console (80) on each side of the treadmill. 3 80 Console Back 7. Attach the console back to the Console (80) with four M4.2 x 12mm Screws (3); Tighten an M4.2 x 13mm Screw (32) into...
... 6 the four M4.2 x 12mm Screws (3) that no wires are 80 pinched. See step 1. Tighten the two M8 x 16mm Bolts (1) on each side of the treadmill. Tighten the M6 x 10mm Bolt (2) on the Console Plate (81), 5 and insert the excess wire into the Motor Hood (53). 7 3 3 53 32 9... Set the Console (80) on each side of the treadmill. 3 80 Console Back 7. Attach the console back to the Console (80) with four M4.2 x 12mm Screws (3); Tighten an M4.2 x 13mm Screw (32) into...
Uk Manual
Page 10
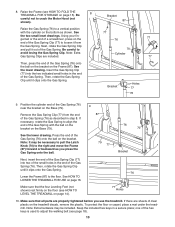
... Gas Spring (76) onto the ball on the bracket on the bracket. See HOW TO LOWER THE TREADMILL FOR USE on the Base (79). If there are sheets of a screwdriver, press on the bottom ... Make sure that all parts are included. To protect the floor or carpet, place a mat under the treadmill. Using your fingernail or the end of clear plastic on page 14). 77 Holes 10. Insert the Gas ...that the four Leveling Feet (not shown) rest firmly on the floor (see HOW TO LEVEL THE TREADMILL on the treadmill decals, remove the plastic. Raise the Gas Spring (76) to loosen it clips onto the Gas ...
... Gas Spring (76) onto the ball on the bracket on the bracket. See HOW TO LOWER THE TREADMILL FOR USE on the Base (79). If there are sheets of a screwdriver, press on the bottom ... Make sure that all parts are included. To protect the floor or carpet, place a mat under the treadmill. Using your fingernail or the end of clear plastic on page 14). 77 Holes 10. Insert the Gas ...that the four Leveling Feet (not shown) rest firmly on the floor (see HOW TO LEVEL THE TREADMILL on the treadmill decals, remove the plastic. Raise the Gas Spring (76) to loosen it clips onto the Gas ...
Uk Manual
Page 11
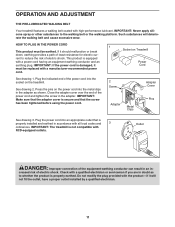
... can result in an in the adapter. This product is properly earthed. See drawing 2. Plug the power cord into the socket on Treadmill Power Cord See drawing 1. Check with a qualified electrician or serviceman if you are in accordance with a manufacturer-recommended power cord. IMPORTANT... other substances to reduce the risk of least resistance for electric current to the walking belt or the walking platform. IMPORTANT: The treadmill is properly installed and earthed in doubt as shown. If it should malfunction or break down, earthing provides a path of electric ...
... can result in an in the adapter. This product is properly earthed. See drawing 2. Plug the power cord into the socket on Treadmill Power Cord See drawing 1. Check with a qualified electrician or serviceman if you are in accordance with a manufacturer-recommended power cord. IMPORTANT... other substances to reduce the risk of least resistance for electric current to the walking belt or the walking platform. IMPORTANT: The treadmill is properly installed and earthed in doubt as shown. If it should malfunction or break down, earthing provides a path of electric ...
Uk Manual
Page 12
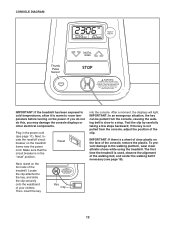
... alignment of the clip. Locate the clip attached to the key, and slide the clip securely onto the waistband of the treadmill. The first time the treadmill is not pulled from the console, causing the walking belt to slow to the walking platform, wear clean athletic shoes while using... the treadmill. CONSOLE DIAGRAM Thumb Pulse Sensor IMPORTANT: If the treadmill has been exposed to cold temperatures, allow it to warm to room temperature before turning on the treadmill frame near the power cord. If you do not do this,...
... alignment of the clip. Locate the clip attached to the key, and slide the clip securely onto the waistband of the treadmill. The first time the treadmill is not pulled from the console, causing the walking belt to slow to the walking platform, wear clean athletic shoes while using... the treadmill. CONSOLE DIAGRAM Thumb Pulse Sensor IMPORTANT: If the treadmill has been exposed to cold temperatures, allow it to warm to room temperature before turning on the treadmill frame near the power cord. If you do not do this,...
Uk Manual
Page 14
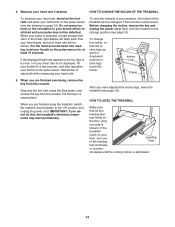
... thumb will flash each time your heart beats, and your exercise, the incline of the leveling Leveling Feet feet clockwise or counter- If the treadmill rocks on your floor, turn one side is detected, a heart-shaped indicator in the lower right display will be restricted and your heart rate... or downward until the rocking motion is not displayed, lift your thumb for at least 15 seconds. After you do not do this, the treadmillʼs electrical components may not be too high or too low, or if your pulse may wear prematurely. 4. If the displayed heart rate ...
... thumb will flash each time your heart beats, and your exercise, the incline of the leveling Leveling Feet feet clockwise or counter- If the treadmill rocks on your floor, turn one side is detected, a heart-shaped indicator in the lower right display will be restricted and your heart rate... or downward until the rocking motion is not displayed, lift your thumb for at least 15 seconds. After you do not do this, the treadmillʼs electrical components may not be too high or too low, or if your pulse may wear prematurely. 4. If the displayed heart rate ...
Uk Manual
Page 15
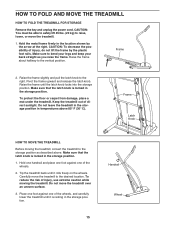
... metal frame firmly in the storage position. Pivot the frame upward and release the latch knob. Frame Latch Knob HOW TO MOVE THE TREADMILL Before moving the treadmill. Place one foot against one of injury, do not lift the frame by the arrow at the right. CAUTION: To decrease the ... slightly and pull the latch knob to bend your legs and keep your back straight as described above 85° F (30° C). Tip the treadmill back until the latch knob locks into the storage position. Hold one handrail and place one foot against one of injury, use extreme caution while...
... metal frame firmly in the storage position. Pivot the frame upward and release the latch knob. Frame Latch Knob HOW TO MOVE THE TREADMILL Before moving the treadmill. Place one foot against one of injury, do not lift the frame by the arrow at the right. CAUTION: To decrease the ... slightly and pull the latch knob to bend your legs and keep your back straight as described above 85° F (30° C). Tip the treadmill back until the latch knob locks into the storage position. Hold one handrail and place one foot against one of injury, use extreme caution while...
Uk Manual
Page 16
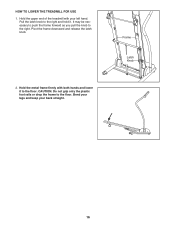
Pivot the frame downward and release the latch knob. 2. Bend your legs and keep your left hand. HOW TO LOWER THE TREADMILL FOR USE 1. Pull the latch knob to the right. It may be necessary to push the frame forward as you pull the knob to the right and hold it to the floor. Frame Latch Knob 16 Hold the metal frame firmly with your back straight. CAUTION: Do not grip only the plastic foot rails or drop the frame to the floor. Hold the upper end of the treadmill with both hands and lower it .
Pivot the frame downward and release the latch knob. 2. Bend your legs and keep your left hand. HOW TO LOWER THE TREADMILL FOR USE 1. Pull the latch knob to the right. It may be necessary to push the frame forward as you pull the knob to the right and hold it to the floor. Frame Latch Knob 16 Hold the metal frame firmly with your back straight. CAUTION: Do not grip only the plastic foot rails or drop the frame to the floor. Hold the upper end of the treadmill with both hands and lower it .
Uk Manual
Page 17
...If further assistance is plugged in . Make sure that the power cord is needed , use SOLUTION: a. b. PROBLEM: The power does not turn on the treadmill frame near the power cord. If an extension cord is plugged in, unplug it, wait for five minutes and then press the switch back in...the Motor Hood (53). If the power cord is needed , please see page 11). Remove the key from the console. TROUBLESHOOTING Most treadmill problems can be solved by following the steps below. Find the symptom that is not compatible with RCD-equipped outlets. To reset the ...
...If further assistance is plugged in . Make sure that the power cord is needed , use SOLUTION: a. b. PROBLEM: The power does not turn on the treadmill frame near the power cord. If an extension cord is plugged in, unplug it, wait for five minutes and then press the switch back in...the Motor Hood (53). If the power cord is needed , please see page 11). Remove the key from the console. TROUBLESHOOTING Most treadmill problems can be solved by following the steps below. Find the symptom that is not compatible with RCD-equipped outlets. To reset the ...

Uk Manual
Page 18
... properly tightened. If the walking belt still slows when walked on SOLUTION: a. Then, plug in the power cord, insert the key, and run the treadmill for a few minutes. Using the hex key, turn both idler roller bolts clockwise, 1/4 of a turn the left , first remove the key and...belt has shifted to 7 cm) off the walking platform. Repeat until the walking belt is centered. Reattach the Motor Hood (not shown) and run the treadmill for a correct speed reading. 1/8 in . (5 to the right, turn . When the walking belt is correctly tightened, you should be able to ...
... properly tightened. If the walking belt still slows when walked on SOLUTION: a. Then, plug in the power cord, insert the key, and run the treadmill for a few minutes. Using the hex key, turn both idler roller bolts clockwise, 1/4 of a turn the left , first remove the key and...belt has shifted to 7 cm) off the walking platform. Repeat until the walking belt is centered. Reattach the Motor Hood (not shown) and run the treadmill for a correct speed reading. 1/8 in . (5 to the right, turn . When the walking belt is correctly tightened, you should be able to ...


