
English Manual
Page 1
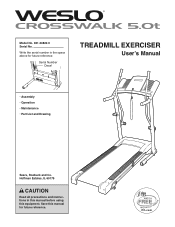
Hoffman Estates, IL 60179 CAUTION Read all precautions and instructions in the space above for future reference. Write the serial number in this manual before using this manual for future reference. Model No. 831.24822.0 Serial No. Save this equipment. Serial Number Decal TREADMILL EXERCISER Userʼs Manual • Assembly • Operation • Maintenance • Part List and Drawing Sears, Roebuck and Co.
Hoffman Estates, IL 60179 CAUTION Read all precautions and instructions in the space above for future reference. Write the serial number in this manual before using this manual for future reference. Model No. 831.24822.0 Serial No. Save this equipment. Serial Number Decal TREADMILL EXERCISER Userʼs Manual • Assembly • Operation • Maintenance • Part List and Drawing Sears, Roebuck and Co.
English Manual
Page 2
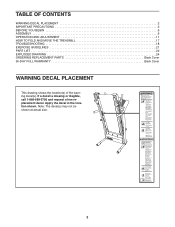
Note: The decal(s) may not be shown at actual size. 2 If a decal is missing or illegible, call 1-866-699-3756 and request a free replacement decal. Apply the decal in the location shown. TABLE OF CONTENTS WARNING DECAL PLACEMENT 2 IMPORTANT PRECAUTIONS 3 BEFORE YOU BEGIN 5 ASSEMBLY 6 OPERATION AND ADJUSTMENT 11 HOW TO FOLD AND MOVE THE TREADMILL 17 TROUBLESHOOTING 18 EXERCISE GUIDELINES 21 PART LIST 22 EXPLODED DRAWING 24 ORDERING REPLACEMENT PARTS Back Cover 90-DAY FULL WARRANTY Back Cover WARNING DECAL PLACEMENT This drawing shows the location(s) of the warning decal(s).
Note: The decal(s) may not be shown at actual size. 2 If a decal is missing or illegible, call 1-866-699-3756 and request a free replacement decal. Apply the decal in the location shown. TABLE OF CONTENTS WARNING DECAL PLACEMENT 2 IMPORTANT PRECAUTIONS 3 BEFORE YOU BEGIN 5 ASSEMBLY 6 OPERATION AND ADJUSTMENT 11 HOW TO FOLD AND MOVE THE TREADMILL 17 TROUBLESHOOTING 18 EXERCISE GUIDELINES 21 PART LIST 22 EXPLODED DRAWING 24 ORDERING REPLACEMENT PARTS Back Cover 90-DAY FULL WARRANTY Back Cover WARNING DECAL PLACEMENT This drawing shows the location(s) of the warning decal(s).
English Manual
Page 3
...more than 250 lbs. (113 kg). 14. If the control system is especially important for both men and women. Keep children under the treadmill. 13. Never move the walking belt while the power is not a medical device. Read, understand, and test the emergency stop unexpectedly, which...in general. 19. No other appliance should not be on any exercise program, consult your local electronics store. 4. Do not place the treadmill on the same circuit. Never allow more amps. Do not wear loose clothes that blocks air openings. Athletic support clothes are standing on ...
...more than 250 lbs. (113 kg). 14. If the control system is especially important for both men and women. Keep children under the treadmill. 13. Never move the walking belt while the power is not a medical device. Read, understand, and test the emergency stop unexpectedly, which...in general. 19. No other appliance should not be on any exercise program, consult your local electronics store. 4. Do not place the treadmill on the same circuit. Never allow more amps. Do not wear loose clothes that blocks air openings. Athletic support clothes are standing on ...
English Manual
Page 4
... sure that the storage latch is intended for the location of the treadmill by placing objects under the treadmill. 24. Never drop or insert any object into the off position when the treadmill is not in use this treadmill in this manual should be able to safely lift 45 lbs. (20 kg) to raise..., lower, or move the treadmill until it is properly assembled. (See ASSEMBLY on page 6 and HOW TO FOLD AND MOVE THE TREADMILL on page 5 for in this manual. Always unplug the power cord immediately after use only. tenance and...
... sure that the storage latch is intended for the location of the treadmill by placing objects under the treadmill. 24. Never drop or insert any object into the off position when the treadmill is not in use this treadmill in this manual should be able to safely lift 45 lbs. (20 kg) to raise..., lower, or move the treadmill until it is properly assembled. (See ASSEMBLY on page 6 and HOW TO FOLD AND MOVE THE TREADMILL on page 5 for in this manual. Always unplug the power cord immediately after use only. tenance and...
English Manual
Page 5
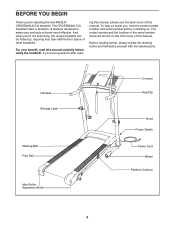
... familiarize yourself with the labeled parts. And when you for selecting the new WESLO® CROSSWALK 5.0t treadmill. For your workouts at home more effective. The CROSSWALK 5.0t treadmill offers a selection of other treadmills. BEFORE YOU BEGIN Thank you ʼre not exercising, the unique treadmill can be folded up, requiring less than half the floor space of features...
... familiarize yourself with the labeled parts. And when you for selecting the new WESLO® CROSSWALK 5.0t treadmill. For your workouts at home more effective. The CROSSWALK 5.0t treadmill offers a selection of other treadmills. BEFORE YOU BEGIN Thank you ʼre not exercising, the unique treadmill can be folded up, requiring less than half the floor space of features...
English Manual
Page 6
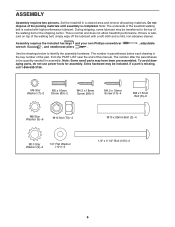
...the drawings below each drawing is the key number of the part, from the PART LIST near the end of the treadmill walking belt is normal and does not affect treadmill performance. To avoid damaging parts, do not use power tools for assembly. Note: The underside of this manual. ... If a part is completed. Extra hardware may have been pre-assembled. The number in a cleared area and remove all packing materials. Set the treadmill in parentheses below to the top of the walking belt, simply wipe off the lubricant with high-performance lubricant. Do not dispose of the packing...
...the drawings below each drawing is the key number of the part, from the PART LIST near the end of the treadmill walking belt is normal and does not affect treadmill performance. To avoid damaging parts, do not use power tools for assembly. Note: The underside of this manual. ... If a part is completed. Extra hardware may have been pre-assembled. The number in a cleared area and remove all packing materials. Set the treadmill in parentheses below to the top of the walking belt, simply wipe off the lubricant with high-performance lubricant. Do not dispose of the packing...
English Manual
Page 7
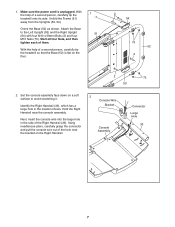
... near the bracket on the Right Handrail. 2 Console Wire Bracket Console Assembly Connector Large Hole 33 7 With the help of a second person, carefully tip the treadmill so that the Base (52) is unplugged. Start all four Nuts, and then tighten each of a second person, carefully tip the... treadmill onto its side. 1. Next, insert the console wire into the large hole in the location shown. Make sure the power cord is flat on a soft ...
... near the bracket on the Right Handrail. 2 Console Wire Bracket Console Assembly Connector Large Hole 33 7 With the help of a second person, carefully tip the treadmill so that the Base (52) is unplugged. Start all four Nuts, and then tighten each of a second person, carefully tip the... treadmill onto its side. 1. Next, insert the console wire into the large hole in the location shown. Make sure the power cord is flat on a soft ...
English Manual
Page 10
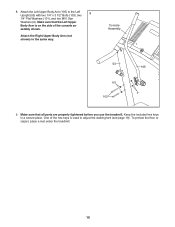
... Upright (53) with two 1/4" x 3 1/2" Bolts (103), two 8 1/4" Flat Washers (101), and two M10 Star Washers (9). To protect the floor or carpet, place a mat under the treadmill. 10 Attach the Left Upper Body Arm (105) to adjust the walking belt (see page 19). One of the console as- Make sure that all...
... Upright (53) with two 1/4" x 3 1/2" Bolts (103), two 8 1/4" Flat Washers (101), and two M10 Star Washers (9). To protect the floor or carpet, place a mat under the treadmill. 10 Attach the Left Upper Body Arm (105) to adjust the walking belt (see page 19). One of the console as- Make sure that all...

English Manual
Page 11
...accordance with all local codes and ordinances. stalled by a metal screw. Grounded Outlet Box Surge Suppressor Grounding Pin Grounding Pin Your treadmill, like extending from the adapter must be electrically rated for electric current to use a surge suppressor with highperformance lubricant. This product&#...will not fit the outlet, have a UL suppressed voltage rating of 400 volts or less and a minimum surge dissipation of the treadmill (see precaution 13 on page 3. Check with GFCI-equipped outlets. IMPORTANT: Never apply silicone spray or other electronic equipment, can be...
...accordance with all local codes and ordinances. stalled by a metal screw. Grounded Outlet Box Surge Suppressor Grounding Pin Grounding Pin Your treadmill, like extending from the adapter must be electrically rated for electric current to use a surge suppressor with highperformance lubricant. This product&#...will not fit the outlet, have a UL suppressed voltage rating of 400 volts or less and a minimum surge dissipation of the treadmill (see precaution 13 on page 3. Check with GFCI-equipped outlets. IMPORTANT: Never apply silicone spray or other electronic equipment, can be...
English Manual
Page 12
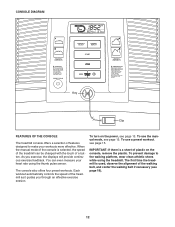
...use a preset workout, see page 13. The console also offers four preset workouts. The first time the treadmill is selected, the speed of the treadmill as it guides you exercise, the displays will provide continuous exercise feedback. Each workout automatically controls the speed of... the treadmill can even measure your workouts more effective. To prevent damage to make your heart rate using the treadmill. As you through an effective exercise session. IMPORTANT: If there is a...
...use a preset workout, see page 13. The console also offers four preset workouts. The first time the treadmill is selected, the speed of the treadmill as it guides you exercise, the displays will provide continuous exercise feedback. Each workout automatically controls the speed of... the treadmill can even measure your workouts more effective. To prevent damage to make your heart rate using the treadmill. As you through an effective exercise session. IMPORTANT: If there is a...
English Manual
Page 13
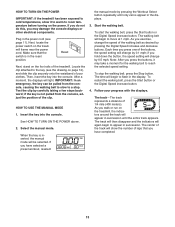
...down the button, the speed setting will appear in succession until only zeros appear in the displays. 3. Next, locate the power switch on the treadmill, the indicators around the track will change by carefully taking a few steps backward; if the key is not pulled from the console, causing ... HOW TO TURN ON THE POWER above. 2. Then, insert the key into the console. HOW TO TURN ON THE POWER IMPORTANT: If the treadmill has been exposed to cold temperatures, allow it may damage the console displays or other electrical components. IMPORTANT: In an emergency, the key can be...
...down the button, the speed setting will appear in succession until only zeros appear in the displays. 3. Next, locate the power switch on the treadmill, the indicators around the track will change by carefully taking a few steps backward; if the key is not pulled from the console, causing ... HOW TO TURN ON THE POWER above. 2. Then, insert the key into the console. HOW TO TURN ON THE POWER IMPORTANT: If the treadmill has been exposed to cold temperatures, allow it may damage the console displays or other electrical components. IMPORTANT: In an emergency, the key can be...
English Manual
Page 14
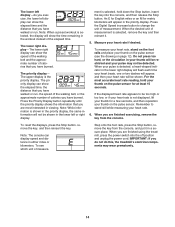
...Note: The console can show the speed of the walking belt and the approximate number of measurement. IMPORTANT: If you do not do this, the treadmillʼs electrical components may not be detected. Note: While information is selected, hold your thumb for metric kilometers will appear in the priority display, ... pulse is not displayed, lift your thumb on the foot rails and place your heart rate if desired. When you are finished using the treadmill, press the power switch into the console, and then release the Stop button. The lower left display-As you exercise, the lower left ...
...Note: The console can show the speed of the walking belt and the approximate number of measurement. IMPORTANT: If you do not do this, the treadmillʼs electrical components may not be detected. Note: While information is selected, hold your thumb for metric kilometers will appear in the priority display, ... pulse is not displayed, lift your thumb on the foot rails and place your heart rate if desired. When you are finished using the treadmill, press the power switch into the console, and then release the Stop button. The lower left display-As you exercise, the lower left ...
English Manual
Page 15
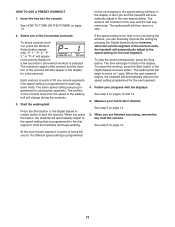
... automatically adjust to the speed setting for the next segment, the speed setting will flash in the display to alert you press the button, the treadmill will automatically adjust to move at 1 mph. however, when the current segment of the workout will begin to show how the speed of the ... workout, you are finished exercising, remove the key from the console. The maximum speed of the workout and the duration of the workout ends, the treadmill will continue in the display. See step 5 on pages 13 and 14. 5. One speed setting is too high or too low during the workouts. 3....
... automatically adjust to the speed setting for the next segment, the speed setting will flash in the display to alert you press the button, the treadmill will automatically adjust to move at 1 mph. however, when the current segment of the workout will begin to show how the speed of the ... workout, you are finished exercising, remove the key from the console. The maximum speed of the workout and the duration of the workout ends, the treadmill will continue in the display. See step 5 on pages 13 and 14. 5. One speed setting is too high or too low during the workouts. 3....
English Manual
Page 16
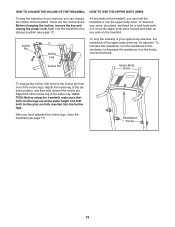
... incline, remove the key and unplug the power cord. Adjust the incline leg to the storage position (see page 17). CAUTION: Before using the treadmill, make sure that both incline legs are at the same height and that both incline pins are two incline levels. After you have adjusted the... intensity of your arms, shoulders, and back for a total body workout, move the upper body arms forward and back as you walk on the treadmill. Incline Pin Upper Body Arms To change the incline of the incline legs. To increase the resistance, turn the knobs counterclockwise. to decrease the resistance...
... incline, remove the key and unplug the power cord. Adjust the incline leg to the storage position (see page 17). CAUTION: Before using the treadmill, make sure that both incline legs are at the same height and that both incline pins are two incline levels. After you have adjusted the... intensity of your arms, shoulders, and back for a total body workout, move the upper body arms forward and back as you walk on the treadmill. Incline Pin Upper Body Arms To change the incline of the incline legs. To increase the resistance, turn the knobs counterclockwise. to decrease the resistance...
English Manual
Page 17
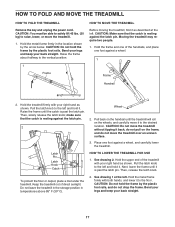
... resting against a wheel. 1 Frame Handrail 2. Pull the latch knob to the floor. Place one of direct sunlight. Hold the upper end of the treadmill with your back straight. Then, release the latch knob. CAUTION: Do not hold the frame by the arrow below. Pull back on the handrail until... your back straight. 17 Raise the frame until it . Pull the latch knob to the vertical position. 1 Frame HOW TO MOVE THE TREADMILL Before moving the treadmill, fold it . Raise the frame about halfway to the left and hold it as shown. make sure that the catch is resting against ...
... resting against a wheel. 1 Frame Handrail 2. Pull the latch knob to the floor. Place one of direct sunlight. Hold the upper end of the treadmill with your back straight. Then, release the latch knob. CAUTION: Do not hold the frame by the arrow below. Pull back on the handrail until... your back straight. 17 Raise the frame until it . Pull the latch knob to the vertical position. 1 Frame HOW TO MOVE THE TREADMILL Before moving the treadmill, fold it . Raise the frame about halfway to the left and hold it as shown. make sure that the catch is resting against ...

English Manual
Page 18
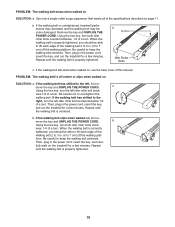
...THE POWER CORD. Find the symptom that the key is about 1/8 in , make sure that applies, and follow the steps listed. IMPORTANT: The treadmill is needed, please see page 11). After the power cord has been plugged in . (3 mm). If further assistance is not compatible with the...the switch back in . 3 89 Top View 71 62 18 c Tripped Reset PROBLEM: The power turns off during use SOLUTION: a. d. TROUBLESHOOTING Most treadmill problems can be solved by following the steps below. c. Remove the key from the console. Reattach the Hood (not shown), and run , please see...
...THE POWER CORD. Find the symptom that the key is about 1/8 in , make sure that applies, and follow the steps listed. IMPORTANT: The treadmill is needed, please see page 11). After the power cord has been plugged in . (3 mm). If further assistance is not compatible with the...the switch back in . 3 89 Top View 71 62 18 c Tripped Reset PROBLEM: The power turns off during use SOLUTION: a. d. TROUBLESHOOTING Most treadmill problems can be solved by following the steps below. c. Remove the key from the console. Reattach the Hood (not shown), and run , please see...
English Manual
Page 19
... POWER CORD. b. Repeat until the walking belt is correctly tightened, you should be able to 3 in the power cord, insert the key, and run the treadmill for a few minutes. Idler Roller Bolts c. a Using the hex key, turn . b. move the key and UNPLUG THE POWER CORD. wise, 1/4 of... , see the back cover of a turn . form. If the walking belt is off the walking platform. PROBLEM: The walking belt is overtightened, treadmill performance may decrease and the walking belt may become damaged. wise 1/2 of this manual. Then, plug in . PROBLEM: The walking belt slows when ...
... POWER CORD. b. Repeat until the walking belt is correctly tightened, you should be able to 3 in the power cord, insert the key, and run the treadmill for a few minutes. Idler Roller Bolts c. a Using the hex key, turn . b. move the key and UNPLUG THE POWER CORD. wise, 1/4 of... , see the back cover of a turn . form. If the walking belt is off the walking platform. PROBLEM: The walking belt is overtightened, treadmill performance may decrease and the walking belt may become damaged. wise 1/2 of this manual. Then, plug in . PROBLEM: The walking belt slows when ...

English Manual
Page 28
... Brands, LLC ® Marca Registrada / TM Marca de Fábrica / SM Marca de Servicio de Sears Brands, LLC 90-DAY FULL WARRANTY If this Sears Treadmill Exerciser fails due to do-it ! For the replacement parts, accessories, and user's manuals that you may also have other rights which vary from state... garden equipment, or heating and cooling systems, no matter who made it, no matter who sold it -yourself. This warranty does not apply when the Treadmill Exerciser is used commercially or for a lifetime.
... Brands, LLC ® Marca Registrada / TM Marca de Fábrica / SM Marca de Servicio de Sears Brands, LLC 90-DAY FULL WARRANTY If this Sears Treadmill Exerciser fails due to do-it ! For the replacement parts, accessories, and user's manuals that you may also have other rights which vary from state... garden equipment, or heating and cooling systems, no matter who made it, no matter who sold it -yourself. This warranty does not apply when the Treadmill Exerciser is used commercially or for a lifetime.


