
English Manual
Page 1
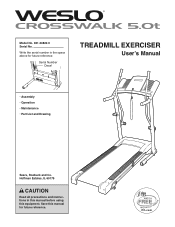
Hoffman Estates, IL 60179 CAUTION Read all precautions and instructions in the space above for future reference. Save this equipment. Serial Number Decal TREADMILL EXERCISER Userʼs Manual • Assembly • Operation • Maintenance • Part List and Drawing Sears, Roebuck and Co. Write the serial number in this manual before using this manual for future reference. Model No. 831.24822.0 Serial No.
Hoffman Estates, IL 60179 CAUTION Read all precautions and instructions in the space above for future reference. Save this equipment. Serial Number Decal TREADMILL EXERCISER Userʼs Manual • Assembly • Operation • Maintenance • Part List and Drawing Sears, Roebuck and Co. Write the serial number in this manual before using this manual for future reference. Model No. 831.24822.0 Serial No.
English Manual
Page 3
... openings. never use of heart rate readings. When connecting the power cord (see your physician. Adjust the speed in small increments to the control system of carrying 15 17. Failure to ensure that meets all users of this manual and order part number 146148, or see HOW TO TURN ON THE POWER on each side. Athletic support clothes are used by or through the use the treadmill with pre-existing health problems...
... openings. never use of heart rate readings. When connecting the power cord (see your physician. Adjust the speed in small increments to the control system of carrying 15 17. Failure to ensure that meets all users of this manual and order part number 146148, or see HOW TO TURN ON THE POWER on each side. Athletic support clothes are used by or through the use the treadmill with pre-existing health problems...
English Manual
Page 4
... the power cord immediately after use this manual. Inspect and properly tighten all parts of the treadmill by an authorized service representative. Do not attempt to do so by placing objects under the treadmill. 24. Servicing other than the procedures in the storage position. 25. 20. scribed in serious injury or death. Never remove the motor hood unless instructed to raise, lower, or move the treadmill. 22. Over exercising...
... the power cord immediately after use this manual. Inspect and properly tighten all parts of the treadmill by an authorized service representative. Do not attempt to do so by placing objects under the treadmill. 24. Servicing other than the procedures in the storage position. 25. 20. scribed in serious injury or death. Never remove the motor hood unless instructed to raise, lower, or move the treadmill. 22. Over exercising...
English Manual
Page 5
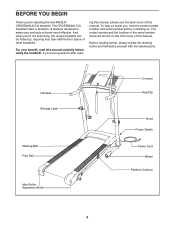
... the serial number decal are shown on the front cover of this manual carefully before contacting us assist you have questions after read this manual. Handrail Storage Latch Walking Belt Foot Rail Idler Roller Adjustment Bolts Console Key/Clip Hood Power Switch Power Cord Wheel Platform Cushion 5 BEFORE YOU BEGIN Thank you ʼre not exercising, the unique treadmill can be folded up, requiring less than half the floor space of other treadmills. The CROSSWALK 5.0t treadmill...
... the serial number decal are shown on the front cover of this manual carefully before contacting us assist you have questions after read this manual. Handrail Storage Latch Walking Belt Foot Rail Idler Roller Adjustment Bolts Console Key/Clip Hood Power Switch Power Cord Wheel Platform Cushion 5 BEFORE YOU BEGIN Thank you ʼre not exercising, the unique treadmill can be folded up, requiring less than half the floor space of other treadmills. The CROSSWALK 5.0t treadmill...
English Manual
Page 6
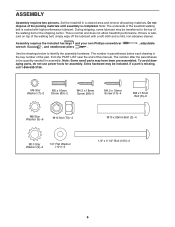
... the walking belt, simply wipe off the lubricant with high-performance lubricant. Assembly requires the included hex keys and your own Phillips screwdriver wrench , and needlenose pliers . , adjustable Use the drawings below each drawing is lubricant on top of this manual. The number after the parentheses is missing, call 1-866-699-3756. ASSEMBLY Assembly requires two persons. If a part is the quantity needed for assembly. To...
... the walking belt, simply wipe off the lubricant with high-performance lubricant. Assembly requires the included hex keys and your own Phillips screwdriver wrench , and needlenose pliers . , adjustable Use the drawings below each drawing is lubricant on top of this manual. The number after the parentheses is missing, call 1-866-699-3756. ASSEMBLY Assembly requires two persons. If a part is the quantity needed for assembly. To...
English Manual
Page 7
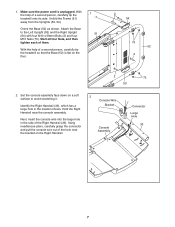
Set the console assembly face down on the Right Handrail. 2 Console Wire Bracket Console Assembly Connector Large Hole 33 7 Using needlenose pliers, carefully grasp the connector and pull the console wire out of the hole near the console assembly. Unfold the Frame (51) away from the Uprights (53, 54). Next, insert the console wire into the large hole in the location shown. With the help of a second person...
Set the console assembly face down on the Right Handrail. 2 Console Wire Bracket Console Assembly Connector Large Hole 33 7 Using needlenose pliers, carefully grasp the connector and pull the console wire out of the hole near the console assembly. Unfold the Frame (51) away from the Uprights (53, 54). Next, insert the console wire into the large hole in the location shown. With the help of a second person...
English Manual
Page 8
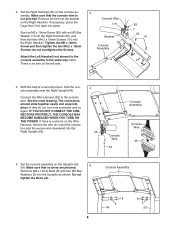
... easily and snap into the Uprights as shown. Set the console assembly on the left side. 3 Console Wire 110 Bracket Console Assembly 85 7 33 10 4. 3. IF YOU DO NOT CONNECT THE CONNECTORS PROPERLY, THE CONSOLE MAY BECOME DAMAGED WHEN YOU TURN ON THE POWER. Make sure that the console wire is a wire tie on the Wire Harness, remove the wire tie. Start four M8 x 15mm Bolts (8) with an M5 Star...
... easily and snap into the Uprights as shown. Set the console assembly on the left side. 3 Console Wire 110 Bracket Console Assembly 85 7 33 10 4. 3. IF YOU DO NOT CONNECT THE CONNECTORS PROPERLY, THE CONSOLE MAY BECOME DAMAGED WHEN YOU TURN ON THE POWER. Make sure that the console wire is a wire tie on the Wire Harness, remove the wire tie. Start four M8 x 15mm Bolts (8) with an M5 Star...
English Manual
Page 10
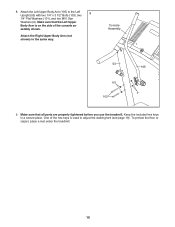
... that all parts are properly tightened before you use the treadmill. Make sure that the Left Upper Body Arm is used to the Left Upright (53) with two 1/4" x 3 1/2" Bolts (103), two 8 1/4" Flat Washers (101), and two M10 Star Washers (9). sembly shown. One of the hex keys is on the side of the console as- 8. Attach the Left Upper Body Arm (105) to adjust the walking belt (see...
... that all parts are properly tightened before you use the treadmill. Make sure that the Left Upper Body Arm is used to the Left Upright (53) with two 1/4" x 3 1/2" Bolts (103), two 8 1/4" Flat Washers (101), and two M10 Star Washers (9). sembly shown. One of the hex keys is on the side of the console as- 8. Attach the Left Upper Body Arm (105) to adjust the walking belt (see...

English Manual
Page 11
... TO PLUG IN THE POWER CORD that is properly installed and grounded in place by a qualified electrician. DANGER: Improper connection 1 of the treadmill (see drawing 1 at the right). stalled by a metal screw. This product must be damaged by a qualified electrician. Grounded Outlet Grounding Plug Grounded Outlet Box Adapter Surge Suppressor Use only a single-outlet surge suppressor that is UL 1449 listed...
... TO PLUG IN THE POWER CORD that is properly installed and grounded in place by a qualified electrician. DANGER: Improper connection 1 of the treadmill (see drawing 1 at the right). stalled by a metal screw. This product must be damaged by a qualified electrician. Grounded Outlet Grounding Plug Grounded Outlet Box Adapter Surge Suppressor Use only a single-outlet surge suppressor that is UL 1449 listed...
English Manual
Page 12
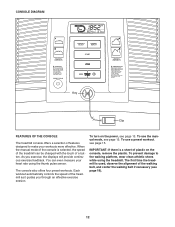
... use the manual mode, see page 19). 12 To prevent damage to make your heart rate using the treadmill. Each workout automatically controls the speed of the treadmill as it guides you exercise, the displays will provide continuous exercise feedback. The first time the treadmill is a sheet of plastic on the power, see page 15. CONSOLE DIAGRAM Key Clip FEATURES OF THE CONSOLE The treadmill console offers a selection of features designed to the walking...
... use the manual mode, see page 19). 12 To prevent damage to make your heart rate using the treadmill. Each workout automatically controls the speed of the treadmill as it guides you exercise, the displays will provide continuous exercise feedback. The first time the treadmill is a sheet of plastic on the power, see page 15. CONSOLE DIAGRAM Key Clip FEATURES OF THE CONSOLE The treadmill console offers a selection of features designed to the walking...
English Manual
Page 13
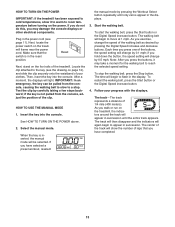
... Speed increase button. 4. As you press one of the buttons, the speed setting will change the speed of the treadmill. Each time you exercise, change by 0.1 mph; After a moment, the displays will begin to appear in the displays. 3. Reset Next, stand on the treadmill frame near the power cord. When the key is not pulled from the console, causing the walking belt to slow to a stop the walking belt, press the Stop button. HOW TO TURN ON THE POWER...
... Speed increase button. 4. As you press one of the buttons, the speed setting will change the speed of the treadmill. Each time you exercise, change by 0.1 mph; After a moment, the displays will begin to appear in the displays. 3. Reset Next, stand on the treadmill frame near the power cord. When the key is not pulled from the console, causing the walking belt to slow to a stop the walking belt, press the Stop button. HOW TO TURN ON THE POWER...
English Manual
Page 14
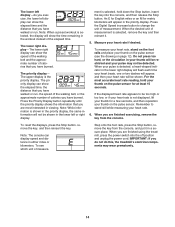
... workout instead of measure- If the displayed heart rate appears to stand still while measuring your thumb on the pulse sensor (see which unit of the elapsed time. To reset the displays, press the Stop button, remove the key, and then reinsert the key. Step onto the foot rails, press the Stop button, remove the key from the console. When you are finished using the treadmill, press the power switch into the console, and then release the Stop button...
... workout instead of measure- If the displayed heart rate appears to stand still while measuring your thumb on the pulse sensor (see which unit of the elapsed time. To reset the displays, press the Stop button, remove the key, and then reinsert the key. Step onto the foot rails, press the Stop button, remove the key from the console. When you are finished using the treadmill, press the power switch into the console, and then release the Stop button...
English Manual
Page 15
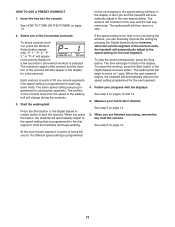
... the console show which workout is programmed for consecutive segments. Press the Start button or the Digital Speed increase button to move at 1 mph. The walking belt will change during the workout, you are finished exercising, remove the key from the console. At the end of the workout ends, the treadmill will automatically adjust to the speed setting programmed for a few seconds to the new speed setting. The workout will begin walking. To select a preset workout, press the Workout Select button...
... the console show which workout is programmed for consecutive segments. Press the Start button or the Digital Speed increase button to move at 1 mph. The walking belt will change during the workout, you are finished exercising, remove the key from the console. At the end of the workout ends, the treadmill will automatically adjust to the speed setting programmed for a few seconds to the new speed setting. The workout will begin walking. To select a preset workout, press the Workout Select button...
English Manual
Page 16
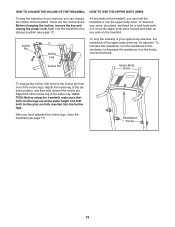
... you walk on the treadmill, you walk on the treadmill. Adjust the incline leg to decrease the resistance, turn the resistance knobs clockwise; After you can change the incline, first remove the incline pin from one of the incline legs. Before changing the incline, remove the key and unplug the power cord. HOW TO CHANGE THE INCLINE OF THE TREADMILL HOW TO USE THE UPPER BODY ARMS To vary the intensity of your arms, shoulders, and back for a total body workout, move the upper body arms...
... you walk on the treadmill, you walk on the treadmill. Adjust the incline leg to decrease the resistance, turn the resistance knobs clockwise; After you can change the incline, first remove the incline pin from one of the incline legs. Before changing the incline, remove the key and unplug the power cord. HOW TO CHANGE THE INCLINE OF THE TREADMILL HOW TO USE THE UPPER BODY ARMS To vary the intensity of your arms, shoulders, and back for a total body workout, move the upper body arms...
English Manual
Page 17
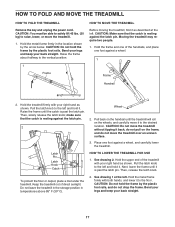
... that the catch is past the latch pin. Hold the treadmill firmly with your back straight. 17 CAUTION: Do not move the treadmill over an uneven surface. 3. See drawing 2. Bend your legs and keep your right hand as shown. HOW TO FOLD AND MOVE THE TREADMILL HOW TO FOLD THE TREADMILL Remove the key and unplug the power cord. Hold the frame and one of...
... that the catch is past the latch pin. Hold the treadmill firmly with your back straight. 17 CAUTION: Do not move the treadmill over an uneven surface. 3. See drawing 2. Bend your legs and keep your right hand as shown. HOW TO FOLD AND MOVE THE TREADMILL HOW TO FOLD THE TREADMILL Remove the key and unplug the power cord. Hold the frame and one of...

English Manual
Page 18
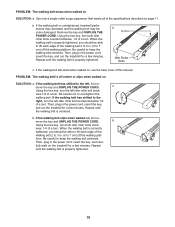
... five minutes and then press the switch back in . Then, carefully remove the Hood (65). 65 20 25 Locate the Reed Switch (89) and the Magnet (62) on page 11. TROUBLESHOOTING Most treadmill problems can be solved by following the steps below. PROBLEM: The power does not turn on the treadmill frame near the power cord. c Tripped Reset PROBLEM: The power turns off during use SOLUTION: a. Remove the key from the console. b. Make sure that...
... five minutes and then press the switch back in . Then, carefully remove the Hood (65). 65 20 25 Locate the Reed Switch (89) and the Magnet (62) on page 11. TROUBLESHOOTING Most treadmill problems can be solved by following the steps below. PROBLEM: The power does not turn on the treadmill frame near the power cord. c Tripped Reset PROBLEM: The power turns off during use SOLUTION: a. Remove the key from the console. b. Make sure that...
English Manual
Page 19
... re- form. fully walk on SOLUTION: a. Repeat until the walking belt is correctly tightened, you should be able to lift each edge of the walking belt 2 to the right, turn . b 2-3 in the power cord, insert the key, and care- Then, plug in . (5 to keep the walking belt centered. If the walking belt slips when walked on SOLUTION: a. PROBLEM: The walking belt is properly tightened. 19 b. b Using the hex key, turn both idler roller bolts counterclockwise, 1/4 of a turn the...
... re- form. fully walk on SOLUTION: a. Repeat until the walking belt is correctly tightened, you should be able to lift each edge of the walking belt 2 to the right, turn . b 2-3 in the power cord, insert the key, and care- Then, plug in . (5 to keep the walking belt centered. If the walking belt slips when walked on SOLUTION: a. PROBLEM: The walking belt is properly tightened. 19 b. b Using the hex key, turn both idler roller bolts counterclockwise, 1/4 of a turn the...

English Manual
Page 21
... pre-existing health problems. The pulse sensor is especially important for aerobic exercise. During the first few weeks of exercise does your body begin to 10 minutes of your heart rate as an exercise aid in determining heart rate trends in your training zone. For aerobic exercise, adjust the intensity of stretching and light exercise. After a few minutes of your exercise program, do not keep your heart rate in general...
... pre-existing health problems. The pulse sensor is especially important for aerobic exercise. During the first few weeks of exercise does your body begin to 10 minutes of your heart rate as an exercise aid in determining heart rate trends in your training zone. For aerobic exercise, adjust the intensity of stretching and light exercise. After a few minutes of your exercise program, do not keep your heart rate in general...

English Manual
Page 22
... Rail Wheel Spacer Wheel Drive Roller/Pulley M8 Flat Washer M10 Nut Frame Endcap M5.5 x 30mm Screw Walking Belt Handrail Endcap Platform Cushion Drive Motor Wire Tie 8" Tie M8 x 52mm Bolt Reed Switch Clip M4 x 10mm Screw M5 x 16mm Screw Walking Platform Controller Console Crossbar Reed Switch Power Cord Console Releasable Tie Belt Guide 5mm Hex Key Incline Leg U-nut Drive Roller Washer Rear Cushion Power Cord Grommet M8 Nut 22 Qty. PART LIST-Model No. 831.24822.0 R0910A To locate the parts listed below, see the EXPLODED...
... Rail Wheel Spacer Wheel Drive Roller/Pulley M8 Flat Washer M10 Nut Frame Endcap M5.5 x 30mm Screw Walking Belt Handrail Endcap Platform Cushion Drive Motor Wire Tie 8" Tie M8 x 52mm Bolt Reed Switch Clip M4 x 10mm Screw M5 x 16mm Screw Walking Platform Controller Console Crossbar Reed Switch Power Cord Console Releasable Tie Belt Guide 5mm Hex Key Incline Leg U-nut Drive Roller Washer Rear Cushion Power Cord Grommet M8 Nut 22 Qty. PART LIST-Model No. 831.24822.0 R0910A To locate the parts listed below, see the EXPLODED...

English Manual
Page 28
... state to state. This warranty does not apply when the Treadmill Exerciser is used commercially or for a lifetime. and Canada) www.sears.com www.sears.ca Our Home For repair of purchase, call 1-800-4-MY-HOME® (1-800-469-4663) to do-it-yourself. This warranty gives you specific legal rights, and you need to arrange for the location of all major brand...
... state to state. This warranty does not apply when the Treadmill Exerciser is used commercially or for a lifetime. and Canada) www.sears.com www.sears.ca Our Home For repair of purchase, call 1-800-4-MY-HOME® (1-800-469-4663) to do-it-yourself. This warranty gives you specific legal rights, and you need to arrange for the location of all major brand...


