
English Manual
Page 1
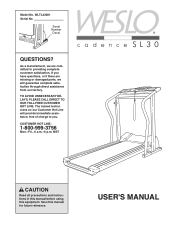
... DIRECT TO OUR TOLL-FREE CUSTOMER HOT LINE. As a manufacturer, we are missing or damaged parts, we will provide immediate assistance, free of charge to you have questions, or if there are committed to providing complete customer satisfaction. WLTL42081 Serial No. Model No. MST CAUTION Read all precautions and instructions in this manual before using this manual for future reference. USER'S MANUAL Serial Number...
... DIRECT TO OUR TOLL-FREE CUSTOMER HOT LINE. As a manufacturer, we are missing or damaged parts, we will provide immediate assistance, free of charge to you have questions, or if there are committed to providing complete customer satisfaction. WLTL42081 Serial No. Model No. MST CAUTION Read all precautions and instructions in this manual before using this manual for future reference. USER'S MANUAL Serial Number...
English Manual
Page 2
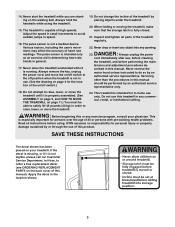
... owner to persons, read the following important precautions and information before operating the treadmill. 1. Wear appropriate exercise clothing when using the treadmill. Use only a UL-listed surge protector, rated at a time. 9. Do not operate the treadmill if the power cord or plug is damaged, or if the treadmill is not working properly.) 2 Do not place the treadmill on any surface that all users of this treadmill are adequately informed...
... owner to persons, read the following important precautions and information before operating the treadmill. 1. Wear appropriate exercise clothing when using the treadmill. Use only a UL-listed surge protector, rated at a time. 9. Do not operate the treadmill if the power cord or plug is damaged, or if the treadmill is not working properly.) 2 Do not place the treadmill on any surface that all users of this treadmill are adequately informed...
English Manual
Page 3
... treadmill. 15. Adjust the speed in this manual). Do not change the incline of the treadmill regularly. 22. Always unplug the power cord immediately after use . (See the drawing on /off switch.) 19. 14. The treadmill is running. When folding or moving the treadmill, make sure that the storage latch is especially important for the location of this manual. scribed in small increments to do so by an authorized service...
... treadmill. 15. Adjust the speed in this manual). Do not change the incline of the treadmill regularly. 22. Always unplug the power cord immediately after use . (See the drawing on /off switch.) 19. 14. The treadmill is running. When folding or moving the treadmill, make sure that the storage latch is especially important for the location of this manual. scribed in small increments to do so by an authorized service...

English Manual
Page 4
... holidays). The model number of your benefit, read this manual for selecting the WESLO¨ CADENCE LS30 treadmill. Water Bottle Holder (Bottle not included) Handrail Storage Latch Book Holder Key/Clip Accessory Tray Console Handrail LEFT SIDE Walking Belt Foot Rails RIGHT SIDE On/Off Switch Circuit Breaker Front Wheel Rear Roller Adjustment Bolts Power Cord 4 For your home. If you have additional questions, Before reading further, please review the drawing...
... holidays). The model number of your benefit, read this manual for selecting the WESLO¨ CADENCE LS30 treadmill. Water Bottle Holder (Bottle not included) Handrail Storage Latch Book Holder Key/Clip Accessory Tray Console Handrail LEFT SIDE Walking Belt Foot Rails RIGHT SIDE On/Off Switch Circuit Breaker Front Wheel Rear Roller Adjustment Bolts Power Cord 4 For your home. If you have additional questions, Before reading further, please review the drawing...

English Manual
Page 5
... the Left Handrail (60) against the left Upright and the Left Handrail. Using the Allen Wrench (102), tighten an Extension Leg Screw (57) into the left Upright (32) as shown. ASSEMBLY Assembly requires two people. While the other Extension Leg in step 2 to the upright position. Set the treadmill in the upper end of the Latch (34) fit together. 3. Cut the plastic tie holding the...
... the Left Handrail (60) against the left Upright and the Left Handrail. Using the Allen Wrench (102), tighten an Extension Leg Screw (57) into the left Upright (32) as shown. ASSEMBLY Assembly requires two people. While the other Extension Leg in step 2 to the upright position. Set the treadmill in the upper end of the Latch (34) fit together. 3. Cut the plastic tie holding the...

English Manual
Page 6
... Upright. Note: Be careful not to the right Extension Leg (59) with four Long Screws (79). 4 90 35 62 46 Plastic Tie Bracket 90 35 Plastic Tie Wire Tie 32 5 46 62 79 90 60 79 6. Route the Console Wire Harness (90) along the Console Base as you use the treadmill. Tighten all parts are tightened before you do not fit together easily, turn the Console...
... Upright. Note: Be careful not to the right Extension Leg (59) with four Long Screws (79). 4 90 35 62 46 Plastic Tie Bracket 90 35 Plastic Tie Wire Tie 32 5 46 62 79 90 60 79 6. Route the Console Wire Harness (90) along the Console Base as you use the treadmill. Tighten all parts are tightened before you do not fit together easily, turn the Console...
English Manual
Page 7
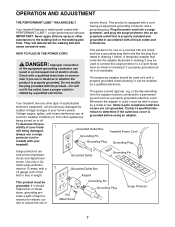
...-grounding conductor and a Your treadmill features a walking belt coated with your tread- 1 mill being turned on a nominal 120-volt circuit, HOW TO PLUG IN THE POWER CORD and has a grounding plug that looks like extending from other propriate outlet that is properly installed and substances to whether the product is used it must be installed by a metal screw. This product is not...
...-grounding conductor and a Your treadmill features a walking belt coated with your tread- 1 mill being turned on a nominal 120-volt circuit, HOW TO PLUG IN THE POWER CORD and has a grounding plug that looks like extending from other propriate outlet that is properly installed and substances to whether the product is used it must be installed by a metal screw. This product is not...
English Manual
Page 8
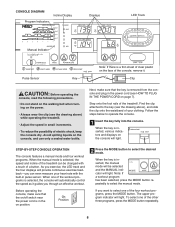
... turning on the power. ¥ Always wear the clip (see HOW TO PLUG IN THE POWER CORD on position. When one of the other three programs, press the MODE button repeatedly. 8 CONSOLE DIAGRAM Program Indicators Incline Display Displays LED Track Manual Indicator Pulse Sensor Note: If there is a thin sheet of clear plastic on the face of the console, remove it guides you through an effective workout. The upper program indicator will automatically control the speed...
... turning on the power. ¥ Always wear the clip (see HOW TO PLUG IN THE POWER CORD on position. When one of the other three programs, press the MODE button repeatedly. 8 CONSOLE DIAGRAM Program Indicators Incline Display Displays LED Track Manual Indicator Pulse Sensor Note: If there is a thin sheet of clear plastic on the face of the console, remove it guides you through an effective workout. The upper program indicator will automatically control the speed...
English Manual
Page 9
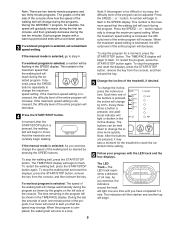
If desired, press the SPEED buttons repeatedly to move. A moment after the START/STOP button is decreased, the difficulty level of the entire program will decrease. To restart the walking belt, press the START/STOP button again. To stop the walking belt and reset the displays, press the START/STOP button, remove the key from the console, and then reinsert the key. 5 Change the incline of the treadmill, if desired. Press the SPEED v or w button repeatedly to alert you exercise, change . Each time one -minute period...
If desired, press the SPEED buttons repeatedly to move. A moment after the START/STOP button is decreased, the difficulty level of the entire program will decrease. To restart the walking belt, press the START/STOP button again. To stop the walking belt and reset the displays, press the START/STOP button, remove the key from the console, and then reinsert the key. 5 Change the incline of the treadmill, if desired. Press the SPEED v or w button repeatedly to alert you exercise, change . Each time one -minute period...
English Manual
Page 10
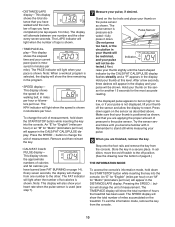
... speed is pressure-acti- Note: When a workout program is shown. ¥ TIME/PACE displayÑThis display shows the elapsed time and your thumb slightly until you become familiar with it down the START/STOP button while inserting the key into the console. The KPH indicator will show the total number of measurement. To change the unit of hours the treadmill has been used...
... speed is pressure-acti- Note: When a workout program is shown. ¥ TIME/PACE displayÑThis display shows the elapsed time and your thumb slightly until you become familiar with it down the START/STOP button while inserting the key into the console. The KPH indicator will show the total number of measurement. To change the unit of hours the treadmill has been used...

English Manual
Page 11
... the power cord. Using your back. Keep the treadmill out of injury, bend your legs and keep your right hand as described above . Tilt the treadmill back until it . Carefully move the treadmill. 1. Using your hands in the storage position. If this is closed over the catch. Hold the treadmill with both hands, and lower the treadmill to the desired location. Raise the treadmill about...
... the power cord. Using your back. Keep the treadmill out of injury, bend your legs and keep your right hand as described above . Tilt the treadmill back until it . Carefully move the treadmill. 1. Using your hands in the storage position. If this is closed over the catch. Hold the treadmill with both hands, and lower the treadmill to the desired location. Raise the treadmill about...
English Manual
Page 12
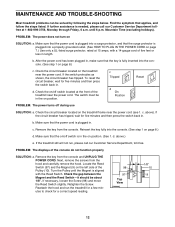
... TO PLUG IN THE POWER CORD on /off switch located at 1-800-999-3756, Monday through Friday, 6 a.m. Make sure that the surge protector is needed, please call our Customer Service Department, toll-free. Check the on page 7.) Use only a UL-listed surge protector, rated at 15 amps, with the Reed Switch. b. d. If necessary, loosen the Screw (98) and move the Reed Switch slightly. PROBLEM: The power does not turn on...
... TO PLUG IN THE POWER CORD on /off switch located at 1-800-999-3756, Monday through Friday, 6 a.m. Make sure that the surge protector is needed, please call our Customer Service Department, toll-free. Check the on page 7.) Use only a UL-listed surge protector, rated at 15 amps, with the Reed Switch. b. d. If necessary, loosen the Screw (98) and move the Reed Switch slightly. PROBLEM: The power does not turn on...
English Manual
Page 13
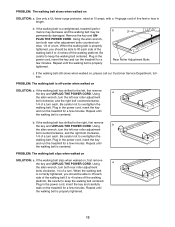
... side of a turn . Plug in the power cord, insert the key and run the treadmill for a few minutes. Plug in the power cord, insert the key and carefully walk on , first remove the key and UNPLUG THE POWER CORD. Using b the allen wrench, turn the left , first remove a the key and UNPLUG THE POWER CORD. Repeat until the walking belt is properly tightened, you should be permanently damaged. Plug in length. b 3ÓÐ4Ó Rear Roller Adjustment Bolts c. Be...
... side of a turn . Plug in the power cord, insert the key and run the treadmill for a few minutes. Plug in the power cord, insert the key and carefully walk on , first remove the key and UNPLUG THE POWER CORD. Using b the allen wrench, turn the left , first remove a the key and UNPLUG THE POWER CORD. Repeat until the walking belt is properly tightened, you should be permanently damaged. Plug in length. b 3ÓÐ4Ó Rear Roller Adjustment Bolts c. Be...
English Manual
Page 14
For more detailed exercise information, obtain a reputable book or consult your exercise program. It may also be helpful to set the speed control on the console to AEROBIC. and the highest number is too high or too low, adjust the speed and incline of the treadmill. If your body begin to use the pulse sensor on the console to set the speed control on the console. Training Zone ExerciseÑAfter warming up, increase the...
For more detailed exercise information, obtain a reputable book or consult your exercise program. It may also be helpful to set the speed control on the console to AEROBIC. and the highest number is too high or too low, adjust the speed and incline of the treadmill. If your body begin to use the pulse sensor on the console to set the speed control on the console. Training Zone ExerciseÑAfter warming up, increase the...
English Manual
Page 15
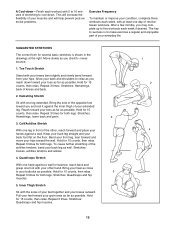
... prevent post-exercise problems. Exercise Frequency To maintain or improve your condition, complete three workouts each week if desired. Stretches: Hamstrings, lower back and groin. 3 3. Move slowly as well. Bend your front leg, lean forward and move your back leg as you and rest it against a wall for both legs. Repeat 3 times. The key to make exercise a regular and enjoyable part of the...
... prevent post-exercise problems. Exercise Frequency To maintain or improve your condition, complete three workouts each week if desired. Stretches: Hamstrings, lower back and groin. 3 3. Move slowly as well. Bend your front leg, lean forward and move your back leg as you and rest it against a wall for both legs. Repeat 3 times. The key to make exercise a regular and enjoyable part of the...
English Manual
Page 16
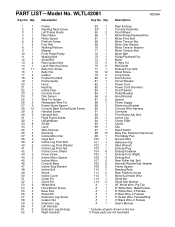
... Roller/Pulley Walking Belt Small Bolt Rear Isolator Bolt Latch Warning Decal Belly Pan Screw Belly Pan Isolator Frame Pivot Bolt Frame Guide Hood Key/Clip Incline Disk Console Cover Disk Sensor Wire Tie Holder Releasable Wire Tie Frame Guide Spacer Console Base Screw/Guide Screw Handrail Screw Handrail Bolt Right Frame Guide Upright/Base Screw Latch Wire Harness Grommet Incline Motor Nut Cage Nut Incline Leg Pivot Bolt Incline Leg Pivot Washer Incline Leg Pivot Nut Incline Cover Shield Cover Screw Incline Motor Spacer Incline Motor Console Base Incline Stop Bracket Incline Bolt Shock Incline...
... Roller/Pulley Walking Belt Small Bolt Rear Isolator Bolt Latch Warning Decal Belly Pan Screw Belly Pan Isolator Frame Pivot Bolt Frame Guide Hood Key/Clip Incline Disk Console Cover Disk Sensor Wire Tie Holder Releasable Wire Tie Frame Guide Spacer Console Base Screw/Guide Screw Handrail Screw Handrail Bolt Right Frame Guide Upright/Base Screw Latch Wire Harness Grommet Incline Motor Nut Cage Nut Incline Leg Pivot Bolt Incline Leg Pivot Washer Incline Leg Pivot Nut Incline Cover Shield Cover Screw Incline Motor Spacer Incline Motor Console Base Incline Stop Bracket Incline Bolt Shock Incline...
English Manual
Page 18
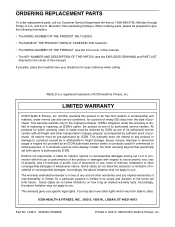
... be prepared to give the following information: ¥ The MODEL NUMBER OF THE PRODUCT (WLTL42081). ¥ The NAME OF THE PRODUCT (WESLO¨ CADENCE LS30 treadmill). ¥ The SERIAL NUMBER OF THE PRODUCT (see the front cover of this manual). ¥ The KEY NUMBER AND DESCRIPTION OF THE PART(S) (see the EXPLODED DRAWING and PART LIST attached to the center of ICON Health & Fitness, Inc. You may not apply...
... be prepared to give the following information: ¥ The MODEL NUMBER OF THE PRODUCT (WLTL42081). ¥ The NAME OF THE PRODUCT (WESLO¨ CADENCE LS30 treadmill). ¥ The SERIAL NUMBER OF THE PRODUCT (see the front cover of this manual). ¥ The KEY NUMBER AND DESCRIPTION OF THE PART(S) (see the EXPLODED DRAWING and PART LIST attached to the center of ICON Health & Fitness, Inc. You may not apply...


