

English Manual
Page 2
...feet or less in length. Do not use an extension cord. 12. Use only a UL-listed surge protector, rated at a time. 9. Use the treadmill only as described in this manual. To protect the floor or carpet from damage, place a mat under the age of 12 and pets away from... from moisture and dust. Never allow more than 250 pounds. 8. Do not wear loose clothing that blocks air openings. Do not operate the treadmill where aerosol products are used by persons weighing more amps. Athletic support clothes are recommended for future reference. Do not use an extension cord. ...
...feet or less in length. Do not use an extension cord. 12. Use only a UL-listed surge protector, rated at a time. 9. Use the treadmill only as described in this manual. To protect the floor or carpet from damage, place a mat under the age of 12 and pets away from... from moisture and dust. Never allow more than 250 pounds. 8. Do not wear loose clothing that blocks air openings. Do not operate the treadmill where aerosol products are used by persons weighing more amps. Athletic support clothes are recommended for future reference. Do not use an extension cord. ...

English Manual
Page 3
... ORDERING REPLACEMENT PARTS on page 10.) You must be performed by placing objects under the treadmill. 20. If the decal is missing, or if it is intended for persons over the age of this treadmill in any commercial, rental, or institutional setting. Adjust the speed in use , before ...trends in the location shown. Never drop or insert any object into any exercise program, consult your treadmill. scribed in this manual should be able to safely lift 45 pounds (20 kg) in -home use this product. ICON assumes no responsibility for personal injury or property damage sustained...
... ORDERING REPLACEMENT PARTS on page 10.) You must be performed by placing objects under the treadmill. 20. If the decal is missing, or if it is intended for persons over the age of this treadmill in any commercial, rental, or institutional setting. Adjust the speed in use , before ...trends in the location shown. Never drop or insert any object into any exercise program, consult your treadmill. scribed in this manual should be able to safely lift 45 pounds (20 kg) in -home use this product. ICON assumes no responsibility for personal injury or property damage sustained...

English Manual
Page 4
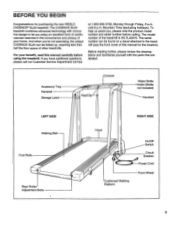
BEFORE YOU BEGIN Thank you Õre not exercising, the unique CADENCE SL20 can be folded up, requiring less than half the floor space of other treadmills. And when you for the location). please call our Customer Service Department toll-free at 1-800-999-3756, Monday through ...enjoy an excellent form of cardiovascular exercise in the convenience and privacy of your benefit, read this manual for selecting the WESLO¨ CADENCE SL20 treadmill. Accessory Tray Handrail Storage Latch Towel Rack Key/Clip Console Reading Rack Water Bottle Holder (Bottle not included) Handrail ...
BEFORE YOU BEGIN Thank you Õre not exercising, the unique CADENCE SL20 can be folded up, requiring less than half the floor space of other treadmills. And when you for the location). please call our Customer Service Department toll-free at 1-800-999-3756, Monday through ...enjoy an excellent form of cardiovascular exercise in the convenience and privacy of your benefit, read this manual for selecting the WESLO¨ CADENCE SL20 treadmill. Accessory Tray Handrail Storage Latch Towel Rack Key/Clip Console Reading Rack Water Bottle Holder (Bottle not included) Handrail ...

English Manual
Page 5
... (59)Ð2 1. With the help of a second person, carefully raise the Uprights (14), the Right Handrail (57), and the Console 1 6 Base (6) until the treadmill is on the bottom of the walking belt or the shipping carton. pleted. Be sure to the inset drawing. Make sure that the Base Pad...Leg Screw while tightening it. This is coated with four Screws (55). Refer to push on top of the Extension Legs (41) into the treadmill as you insert the Extension Leg.) Make sure that the Screws are overtightened, the Latch will not slide smoothly. driver , two adjustable wrenches ...
... (59)Ð2 1. With the help of a second person, carefully raise the Uprights (14), the Right Handrail (57), and the Console 1 6 Base (6) until the treadmill is on the bottom of the walking belt or the shipping carton. pleted. Be sure to the inset drawing. Make sure that the Base Pad...Leg Screw while tightening it. This is coated with four Screws (55). Refer to push on top of the Extension Legs (41) into the treadmill as you insert the Extension Leg.) Make sure that the Screws are overtightened, the Latch will not slide smoothly. driver , two adjustable wrenches ...

English Manual
Page 6
... (2, 57) with the four Reading Rack Screws (47) as shown. Tighten all parts are tightened before you use the treadmill. To protect the floor or carpet, place the included treadmill mat under the treadmill (see page 13). Cut the indicated plastic tie off the right Upright (14). Thread a Handrail Bolt (15) with a 3 1/2Ó...
... (2, 57) with the four Reading Rack Screws (47) as shown. Tighten all parts are tightened before you use the treadmill. To protect the floor or carpet, place the included treadmill mat under the treadmill (see page 13). Cut the indicated plastic tie off the right Upright (14). Thread a Handrail Bolt (15) with a 3 1/2Ó...

English Manual
Page 7
...deteriorate the walking belt and ordinances. The green-colored rigid ear, lug, or the like the plug illus- cause excessive wear. Your treadmill, like the adapter illustrated in drawing 2 may be installed by sudden voltage changes in length. protector, and plug the surge protector into ...seriously damaged by a qualified electrician. Do not modify the plug provided with all local codes and form. Grounded Outlet Box Grounding Pin Treadmill Power Cord cluded) with a qualified electrician or serviceman if you are in drawing 2 if a properly grounded outlet is used to ...
...deteriorate the walking belt and ordinances. The green-colored rigid ear, lug, or the like the plug illus- cause excessive wear. Your treadmill, like the adapter illustrated in drawing 2 may be installed by sudden voltage changes in length. protector, and plug the surge protector into ...seriously damaged by a qualified electrician. Do not modify the plug provided with all local codes and form. Grounded Outlet Box Grounding Pin Treadmill Power Cord cluded) with a qualified electrician or serviceman if you are in drawing 2 if a properly grounded outlet is used to ...

English Manual
Page 8
...will not turn on the console and use only a sealable water bottle. See page 14 or more information. ¥ To reduce the possibility of the treadmill. Press two batteries into place. When the key is started. (If you just installed batteries, the display will already be on the tab, and ... ¥ Do not stand on the walking belt when turning on the power. ¥ Always wear the clip (see the drawing above ) while operating the treadmill. Follow the steps below . Note: Inserting the key will stop. ¥ Adjust the speed in small increments. ¥ The training zones marked around the ...
...will not turn on the console and use only a sealable water bottle. See page 14 or more information. ¥ To reduce the possibility of the treadmill. Press two batteries into place. When the key is started. (If you just installed batteries, the display will already be on the tab, and ... ¥ Do not stand on the walking belt when turning on the power. ¥ Always wear the clip (see the drawing above ) while operating the treadmill. Follow the steps below . Note: Inserting the key will stop. ¥ Adjust the speed in small increments. ¥ The training zones marked around the ...

English Manual
Page 9
... hour. ¥ TimeÑThis mode shows the elapsed time. Press down . 2 Reset the console and start the walking belt. Change the speed of the treadmill as desired. To measure your pulse, stand on Pulse Sensor the foot rails and place your progress with it down again on the pulse sensor...
... hour. ¥ TimeÑThis mode shows the elapsed time. Press down . 2 Reset the console and start the walking belt. Change the speed of the treadmill as desired. To measure your pulse, stand on Pulse Sensor the foot rails and place your progress with it down again on the pulse sensor...

English Manual
Page 10
... that the storage latch is fully engaged over the catch. 1. Keep the treadmill out of injury, use extreme caution while moving the treadmill, convert the treadmill to safely lift 45 pounds (20 kg) in temperatures above . HOW TO MOVE THE TREADMILL Before moving the treadmill. Place one foot on the storage latch. As you raise the...
... that the storage latch is fully engaged over the catch. 1. Keep the treadmill out of injury, use extreme caution while moving the treadmill, convert the treadmill to safely lift 45 pounds (20 kg) in temperatures above . HOW TO MOVE THE TREADMILL Before moving the treadmill. Place one foot on the storage latch. As you raise the...

English Manual
Page 11
Hold the treadmill firmly with your back straight. Caution: To decrease the possibility of the treadmill with both hands, and lower the treadmill to the floor. Pivot the treadmill until the frame and foot rail are past the storage latch. 2. HOW TO LOWER THE TREADMILL FOR USE 1. Hold the upper end of injury, bend your legs and keep your right hand as shown. Using your left thumb, press the storage latch and hold it. Storage Latch Opened 11
Hold the treadmill firmly with your back straight. Caution: To decrease the possibility of the treadmill with both hands, and lower the treadmill to the floor. Pivot the treadmill until the frame and foot rail are past the storage latch. 2. HOW TO LOWER THE TREADMILL FOR USE 1. Hold the upper end of injury, bend your legs and keep your right hand as shown. Using your left thumb, press the storage latch and hold it. Storage Latch Opened 11

English Manual
Page 12
...) and move the Reed Switch slightly. After the power cord has been plugged in . Check the circuit breaker located on page 8. If the treadmill still will not run the treadmill for a few minutes to check for a correct speed reading. 1/8Ó 86 13 Top View 85 87 12 Check the batteries in . b.... steps below. Find the symptom that the gap between the Magnet and the Reed Switch is fully inserted into the console. (See step 1 on the treadmill near the power cord (see 1. until the Magnet is plugged in , make sure that the power cord is aligned with a 14-gauge cord of ...
...) and move the Reed Switch slightly. After the power cord has been plugged in . Check the circuit breaker located on page 8. If the treadmill still will not run the treadmill for a few minutes to check for a correct speed reading. 1/8Ó 86 13 Top View 85 87 12 Check the batteries in . b.... steps below. Find the symptom that the gap between the Magnet and the Reed Switch is fully inserted into the console. (See step 1 on the treadmill near the power cord (see 1. until the Magnet is plugged in , make sure that the power cord is aligned with a 14-gauge cord of ...

English Manual
Page 13
...the walking belt slips when walked on SOLUTION: a. Plug in the power cord, insert the key and run the treadmill for a few minutes. PROBLEM: The walking belt is overtightened, treadmill performance may decrease and the walking belt may be able to 3 inches off -center SOLUTION: a. Using the ...counterclockwise, and the right bolt clockwise, 1/4 of five feet or less in the power cord, insert the key and carefully walk on the treadmill for a few minutes. PROBLEM: The walking belt slips when walked on , first remove the key and UNPLUG THE POWER CORD. Repeat until...
...the walking belt slips when walked on SOLUTION: a. Plug in the power cord, insert the key and run the treadmill for a few minutes. PROBLEM: The walking belt is overtightened, treadmill performance may decrease and the walking belt may be able to 3 inches off -center SOLUTION: a. Using the ...counterclockwise, and the right bolt clockwise, 1/4 of five feet or less in the power cord, insert the key and carefully walk on the treadmill for a few minutes. PROBLEM: The walking belt slips when walked on , first remove the key and UNPLUG THE POWER CORD. Repeat until...
English Manual
Page 14
... for a sustained period of your exercise program, keep your heart in your training zone for longer than 20 minutes.) Breathe regularly and deeply as you exerciseÑnever hold your body temperature, heart rate, and ...too high or too low, adjust the speed and incline of the treadmill until your heart rate is especially important for fat burning; For aerobic exercise, adjust the speed and... incline of the treadmill as an exercise aid in determining heart rate trends in your training zone for 20 to burn fat, adjust the speed and incline of the treadmill until your heart rate is...
... for a sustained period of your exercise program, keep your heart in your training zone for longer than 20 minutes.) Breathe regularly and deeply as you exerciseÑnever hold your body temperature, heart rate, and ...too high or too low, adjust the speed and incline of the treadmill until your heart rate is especially important for fat burning; For aerobic exercise, adjust the speed and... incline of the treadmill as an exercise aid in determining heart rate trends in your training zone for 20 to burn fat, adjust the speed and incline of the treadmill until your heart rate is...

English Manual
Page 16
... # 1 # 1 # 1 Cable Tie Clamp Motor Belly Pan Screw 8Ó Wire Tie Right Handrail Incline Wire Harness 3 1/2Ó Handrail Bolt Incline Extension Incline Leg Nut Rear Isolator Treadmill Mat Incline Wheel Bolt Incline Wheel Incline Leg Nut Incline Pivot Bolt Ground Wire Incline Leg Frame Rear Roller Adj. Qty. 1 1 2 1 3 2 4 1 5 4 6 1 7... 1 8 1 9 2 10 1 11* 1 12 1 13 10 14 1 15 2 16 7 17 1 18 1 19* 1 20 1 21 1 22 4 23 1 24 1 25 1 26 1 27 2 28 1 29 1 30 17 31 1 32 4 33 2 34 2 35 10 36 6 37 2 38 2 39 7...
... # 1 # 1 # 1 Cable Tie Clamp Motor Belly Pan Screw 8Ó Wire Tie Right Handrail Incline Wire Harness 3 1/2Ó Handrail Bolt Incline Extension Incline Leg Nut Rear Isolator Treadmill Mat Incline Wheel Bolt Incline Wheel Incline Leg Nut Incline Pivot Bolt Ground Wire Incline Leg Frame Rear Roller Adj. Qty. 1 1 2 1 3 2 4 1 5 4 6 1 7... 1 8 1 9 2 10 1 11* 1 12 1 13 10 14 1 15 2 16 7 17 1 18 1 19* 1 20 1 21 1 22 4 23 1 24 1 25 1 26 1 27 2 28 1 29 1 30 17 31 1 32 4 33 2 34 2 35 10 36 6 37 2 38 2 39 7...

English Manual
Page 18
...set forth above is not responsible or liable for a period of any and all freight and other warranty beyond that specifically set forth herein. WESLO is limited in USA © 2000 ICON Health & Fitness, Inc. Some states do not allow limitations on how long an implied warranty lasts...to be prepared to give the following information: ¥ The MODEL NUMBER of the product (WLTL33091). ¥ The NAME of the product (WESLO¨ CADENCE SL20 treadmill). ¥ The SERIAL NUMBER of the product (see the front cover of this manual). ¥ The KEY NUMBER and DESCRIPTION of the ...
...set forth above is not responsible or liable for a period of any and all freight and other warranty beyond that specifically set forth herein. WESLO is limited in USA © 2000 ICON Health & Fitness, Inc. Some states do not allow limitations on how long an implied warranty lasts...to be prepared to give the following information: ¥ The MODEL NUMBER of the product (WLTL33091). ¥ The NAME of the product (WESLO¨ CADENCE SL20 treadmill). ¥ The SERIAL NUMBER of the product (see the front cover of this manual). ¥ The KEY NUMBER and DESCRIPTION of the ...

English Manual
Page 2
0 6120 TABLE OF CONTENTS IMPORTANT PRECAUTIONS BEFORE YOU BEGIN ASSEMBLY OPERATION AND ADJUSTMENT HOW TO FOLD AND MOVE THE TREADMILL MAINTENANCE AND TROUBLE-SHOOTING CONDITIONING GUIDELINES ORDERING REPLACEMENT PARTS LIMITED WARRANTY 3 5 6 7 10 12 14 Back Cover Back Cover Note: An EXPLODED DRAWING and a PART LIST are attached to the center of this manual. Please save them for future reference. 2
0 6120 TABLE OF CONTENTS IMPORTANT PRECAUTIONS BEFORE YOU BEGIN ASSEMBLY OPERATION AND ADJUSTMENT HOW TO FOLD AND MOVE THE TREADMILL MAINTENANCE AND TROUBLE-SHOOTING CONDITIONING GUIDELINES ORDERING REPLACEMENT PARTS LIMITED WARRANTY 3 5 6 7 10 12 14 Back Cover Back Cover Note: An EXPLODED DRAWING and a PART LIST are attached to the center of this manual. Please save them for future reference. 2

English Manual
Page 3
... 1 hour,-, 17. Never move the walking belt while the power is turned off " position when the treadmill is not in order to raise, lower, or move the treadmill. 20. Never start the treadmill while you are adequately informed of the on/offswitch.) 18* The pulse sensor is properly assembled. (See... ASSEMBLY on page 6, and HOW TO MOVE THE TREADMILL on the same circuit. 11. The pulse sensor is not...
... 1 hour,-, 17. Never move the walking belt while the power is turned off " position when the treadmill is not in order to raise, lower, or move the treadmill. 20. Never start the treadmill while you are adequately informed of the on/offswitch.) 18* The pulse sensor is properly assembled. (See... ASSEMBLY on page 6, and HOW TO MOVE THE TREADMILL on the same circuit. 11. The pulse sensor is not...

English Manual
Page 4
... other then roc s. wer co. Apply the decal in the location shown. • Never allow children to play on or around treadmill. • Storage latch must be fully engaged before treadmill is not legible, please call our Customer Service Department, toll-free, to order a free replacement decal (see ORDERING REPLACEMENT PARTS on...
... other then roc s. wer co. Apply the decal in the location shown. • Never allow children to play on or around treadmill. • Storage latch must be fully engaged before treadmill is not legible, please call our Customer Service Department, toll-free, to order a free replacement decal (see ORDERING REPLACEMENT PARTS on...
English Manual
Page 5
... review the drawing below and familiarize yourself with innovative design to the treadmill (see the front cover of your benefit, read this manual for purchasing the new WESLO CADENCES SL20 treadmill. The model number of other treadmills. The serial number can be found on a decal attached to let... you 're not exercising, the unique CADENCE SL20 can be folded up, requiring less than half ...
... review the drawing below and familiarize yourself with innovative design to the treadmill (see the front cover of your benefit, read this manual for purchasing the new WESLO CADENCES SL20 treadmill. The model number of other treadmills. The serial number can be found on a decal attached to let... you 're not exercising, the unique CADENCE SL20 can be folded up, requiring less than half ...

English Manual
Page 6
... left Upright (14) with an Extension Leg Screw. 41 36 ... 34 • With the help of a second person, carefully raise the treadmill to overtighten the Screws. 14 12 3. Press the Adhesive Clip onto the base of the packing materials until assembly is completed. Refer to lower ...the 2 treadmill. ASSEMBLY Assembly requires two people. Assembly requires the included alien wrench1 and your own phillips screwdriver 1. Do not dispose of the Uprights (14...
... left Upright (14) with an Extension Leg Screw. 41 36 ... 34 • With the help of a second person, carefully raise the treadmill to overtighten the Screws. 14 12 3. Press the Adhesive Clip onto the base of the packing materials until assembly is completed. Refer to lower ...the 2 treadmill. ASSEMBLY Assembly requires two people. Assembly requires the included alien wrench1 and your own phillips screwdriver 1. Do not dispose of the Uprights (14...


