

Instruction Manual
Page 1
... questions, or if there are committed to provide the following information: • the MODEL NUMBER of the product (WETL13906.0) • the NAME of the product (WESLO CADENCE S5 treadmill) • the SERIAL NUMBER of the product (see the front cover of this manual) • the KEY NUMBER and DESCRIPTION of the needed part(s) (see...
... questions, or if there are committed to provide the following information: • the MODEL NUMBER of the product (WETL13906.0) • the NAME of the product (WESLO CADENCE S5 treadmill) • the SERIAL NUMBER of the product (see the front cover of this manual) • the KEY NUMBER and DESCRIPTION of the needed part(s) (see...

Instruction Manual
Page 2
... For aerobic exercise, adjust the speed and incline of the treadmill until your heart rate is to the nearest ten years). The lower two numbers are recommended heart rates for aerobic exercise. WESLO is to use stored fat calories for energy. WORKOUT GUIDELINES Each...life. 19 TABLE OF CONTENTS IMPORTANT PRECAUTIONS 3 BEFORE YOU BEGIN 5 ASSEMBLY 6 OPERATION AND ADJUSTMENT 10 HOW TO FOLD AND MOVE THE TREADMILL 15 MAINTENANCE AND TROUBLESHOOTING 17 CONDITIONING GUIDELINES 19 ORDERING REPLACEMENT PARTS Back Cover Note: A PART IDENTIFICATION CHART, an EXPLODED DRAWING, and ...
... For aerobic exercise, adjust the speed and incline of the treadmill until your heart rate is to the nearest ten years). The lower two numbers are recommended heart rates for aerobic exercise. WESLO is to use stored fat calories for energy. WORKOUT GUIDELINES Each...life. 19 TABLE OF CONTENTS IMPORTANT PRECAUTIONS 3 BEFORE YOU BEGIN 5 ASSEMBLY 6 OPERATION AND ADJUSTMENT 10 HOW TO FOLD AND MOVE THE TREADMILL 15 MAINTENANCE AND TROUBLESHOOTING 17 CONDITIONING GUIDELINES 19 ORDERING REPLACEMENT PARTS Back Cover Note: A PART IDENTIFICATION CHART, an EXPLODED DRAWING, and ...

Instruction Manual
Page 3
...wrench, turn . When the walking belt is not a medical device. To protect the floor or carpet from heated surfaces. 3. Do not put the treadmill in speed. 17. Never allow more than one person on SOLUTION: a. Do not wear loose clothes that the frame is off the walking platform. never...Then, plug in the power cord, insert the key, and carefully walk on each edge of a turn . Repeat until it is needed , use the treadmill with at all warnings and precautions. 11. If an extension cord is running. Keep the power cord away from damage, place a mat under the age...
...wrench, turn . When the walking belt is not a medical device. To protect the floor or carpet from heated surfaces. 3. Do not put the treadmill in speed. 17. Never allow more than one person on SOLUTION: a. Do not wear loose clothes that the frame is off the walking platform. never...Then, plug in the power cord, insert the key, and carefully walk on each edge of a turn . Repeat until it is needed , use the treadmill with at all warnings and precautions. 11. If an extension cord is running. Keep the power cord away from damage, place a mat under the age...

Instruction Manual
Page 4
... any exercise program, consult your physician. If further assistance is plugged into the console. Make sure that the on/off during use , before cleaning the treadmill, and before using. b. c. c. Then, care- 20 fully remove the Hood (65). 20 25 Locate the Reed Switch (97) and the Magnet...only. tenance and adjustment procedures described in . Make sure that is plugged in this manual should be solved by placing objects under the treadmill. 22. If an extension cord is needed , please see d. Find the symptom that the power cord is no responsibility for persons ...
... any exercise program, consult your physician. If further assistance is plugged into the console. Make sure that the on/off during use , before cleaning the treadmill, and before using. b. c. c. Then, care- 20 fully remove the Hood (65). 20 25 Locate the Reed Switch (97) and the Magnet...only. tenance and adjustment procedures described in . Make sure that is plugged in this manual should be solved by placing objects under the treadmill. 22. If an extension cord is needed , please see d. Find the symptom that the power cord is no responsibility for persons ...

Instruction Manual
Page 5
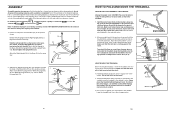
..., and lower it is WETL13906.0. ing this manual, please see the front cover of this manual for selecting the new WESLO® CADENCE S5 treadmill. To help us . HOW TO LOWER THE TREADMILL FOR USE 1. Hold the frame firmly with innovative design to the left hand, pull the latch knob to make your ... when you have questions after read this manual carefully before contacting us assist you for the location). If you 're not exercising, the CADENCE S5 treadmill can be folded up, requiring less than half the floor space of injury, bend your legs and keep your left and hold it. The...
..., and lower it is WETL13906.0. ing this manual, please see the front cover of this manual for selecting the new WESLO® CADENCE S5 treadmill. To help us . HOW TO LOWER THE TREADMILL FOR USE 1. Hold the frame firmly with innovative design to the left hand, pull the latch knob to make your ... when you have questions after read this manual carefully before contacting us assist you for the location). If you 're not exercising, the CADENCE S5 treadmill can be folded up, requiring less than half the floor space of injury, bend your legs and keep your left and hold it. The...
Instruction Manual
Page 6
...same way. 2 Bend 2. Do not pull back on the outside as described above 30°C (85°F). Do not attempt to move the treadmill to the included hex key , assembly requires a phillips screwdriver spanners , and wire cutters . , two Note: To identify small parts used during assembly... that the latch pin is lubricant on the Left Upright. Latch Pin Latch Knob Catch HOW TO MOVE THE TREADMILL Before moving the treadmill. Never move the treadmill. 1. Set the treadmill in the location shown by the plastic foot rails. tion shown. Slide the two Wheel Housings (62) onto...
...same way. 2 Bend 2. Do not pull back on the outside as described above 30°C (85°F). Do not attempt to move the treadmill to the included hex key , assembly requires a phillips screwdriver spanners , and wire cutters . , two Note: To identify small parts used during assembly... that the latch pin is lubricant on the Left Upright. Latch Pin Latch Knob Catch HOW TO MOVE THE TREADMILL Before moving the treadmill. Never move the treadmill. 1. Set the treadmill in the location shown by the plastic foot rails. tion shown. Slide the two Wheel Housings (62) onto...

Instruction Manual
Page 7
... Frame Spacer (111) between the Uprights. Identify the Right Handrail (55), which has a large hole in one of the incline legs. Next, fold the treadmill to the Frame with two Console Screws (4), a Crossbar Screw (5), and a Crossbar Star Washer (12). 5 12 4 Large Hole 55 91 14 7 See... fully inserted into the incline legs. Adjust the other incline leg in the upper end of the Right Upright. To change the incline of the treadmill. Be careful 4 not to the Console Assembly (91) with a Frame Bolt (1), a Frame Washer (14), and a Frame Star Washer (9). Attach...
... Frame Spacer (111) between the Uprights. Identify the Right Handrail (55), which has a large hole in one of the incline legs. Next, fold the treadmill to the Frame with two Console Screws (4), a Crossbar Screw (5), and a Crossbar Star Washer (12). 5 12 4 Large Hole 55 91 14 7 See... fully inserted into the incline legs. Adjust the other incline leg in the upper end of the Right Upright. To change the incline of the treadmill. Be careful 4 not to the Console Assembly (91) with a Frame Bolt (1), a Frame Washer (14), and a Frame Star Washer (9). Attach...

Instruction Manual
Page 8
... four speed programs. To select a speed program, press the Program Select button repeatedly; The walking belt will change if a different speed setting is pressed, the treadmill will change . The walking belt will sound. tic ties. 54 98 Plastic Ties 8 5 Measure your progress with the track and the three displays. Then, switch...
... four speed programs. To select a speed program, press the Program Select button repeatedly; The walking belt will change if a different speed setting is pressed, the treadmill will change . The walking belt will sound. tic ties. 54 98 Plastic Ties 8 5 Measure your progress with the track and the three displays. Then, switch...

Instruction Manual
Page 9
...to the vertical position. Attach the Latch Assembly (108) to reach the selected speed setting. Set the Console Assembly (91) on the treadmill, the indicators around the track will change by pressing the Program Select button repeatedly until the priority display shows the information that the Latch ..."E" for the walking belt to the Left Upright (53) with the track and the three displays. Make sure that you use the treadmill. When the desired unit of the track will not be included. The center of measurement is inserted, the manual mode will begin walking....
...to the vertical position. Attach the Latch Assembly (108) to reach the selected speed setting. Set the Console Assembly (91) on the treadmill, the indicators around the track will change by pressing the Program Select button repeatedly until the priority display shows the information that the Latch ..."E" for the walking belt to the Left Upright (53) with the track and the three displays. Make sure that you use the treadmill. When the desired unit of the track will not be included. The center of measurement is inserted, the manual mode will begin walking....

Instruction Manual
Page 10
... clip by a qualified electrician. if the key is a sheet of clear plastic on the console, peel off switch on the treadmill. Important: The treadmill is properly earthed. Check with a qualified electrician or serviceman if you are in accordance with a manufacturer-recommended power cord. CONSOLE ...by carefully taking a few minutes that the adapter cover is secure and the screw has been tightened before using the treadmill. Press the pins on treadmill See drawing 1. Do not modify the plug provided with a power cord having an equipment-earthing conductor and an earthing...
... clip by a qualified electrician. if the key is a sheet of clear plastic on the console, peel off switch on the treadmill. Important: The treadmill is properly earthed. Check with a qualified electrician or serviceman if you are in accordance with a manufacturer-recommended power cord. CONSOLE ...by carefully taking a few minutes that the adapter cover is secure and the screw has been tightened before using the treadmill. Press the pins on treadmill See drawing 1. Do not modify the plug provided with a power cord having an equipment-earthing conductor and an earthing...


