

Instruction Manual
Page 1
... product (WESLO CADENCE S5 treadmill) • the SERIAL NUMBER of the product (see the front cover of this manual) • the KEY NUMBER and DESCRIPTION of the needed part(s) (see the PART LIST and the EXPLODED DRAWING in the centre of this manual for future reference. Serial Number Decal QUESTIONS? Save this manual) Part No. 237158 R0306A Printed in this manual before using this equipment. office, or write: ICON Health & Fitness, Ltd. USER'S MANUAL Customer Service Department...
... product (WESLO CADENCE S5 treadmill) • the SERIAL NUMBER of the product (see the front cover of this manual) • the KEY NUMBER and DESCRIPTION of the needed part(s) (see the PART LIST and the EXPLODED DRAWING in the centre of this manual for future reference. Serial Number Decal QUESTIONS? Save this manual) Part No. 237158 R0306A Printed in this manual before using this equipment. office, or write: ICON Health & Fitness, Ltd. USER'S MANUAL Customer Service Department...

Instruction Manual
Page 2
... CONTENTS IMPORTANT PRECAUTIONS 3 BEFORE YOU BEGIN 5 ASSEMBLY 6 OPERATION AND ADJUSTMENT 10 HOW TO FOLD AND MOVE THE TREADMILL 15 MAINTENANCE AND TROUBLESHOOTING 17 CONDITIONING GUIDELINES 19 ORDERING REPLACEMENT PARTS Back Cover Note: A PART IDENTIFICATION CHART, an EXPLODED DRAWING, and a PART LIST are attached in the center of the chart (ages are recommended heart rates for fat burning; Next, find your exercise program. The sensor is not a medical device. The proper intensity...
... CONTENTS IMPORTANT PRECAUTIONS 3 BEFORE YOU BEGIN 5 ASSEMBLY 6 OPERATION AND ADJUSTMENT 10 HOW TO FOLD AND MOVE THE TREADMILL 15 MAINTENANCE AND TROUBLESHOOTING 17 CONDITIONING GUIDELINES 19 ORDERING REPLACEMENT PARTS Back Cover Note: A PART IDENTIFICATION CHART, an EXPLODED DRAWING, and a PART LIST are attached in the center of the chart (ages are recommended heart rates for fat burning; Next, find your exercise program. The sensor is not a medical device. The proper intensity...

Instruction Manual
Page 3
... the lock pin. 3 Always wear athletic shoes; The treadmill is not in a garage or covered patio, or near water. 14. Always remove the key and unplug the power cord when the treadmill is capable of heart rate readings. The pulse sensor is overtightened, treadmill performance may decrease and the walking belt may affect the accuracy of high speeds. Remove the key and UNPLUG THE POWER CORD. Using the allen wrench, turn both...
... the lock pin. 3 Always wear athletic shoes; The treadmill is not in a garage or covered patio, or near water. 14. Always remove the key and unplug the power cord when the treadmill is capable of heart rate readings. The pulse sensor is overtightened, treadmill performance may decrease and the walking belt may affect the accuracy of high speeds. Remove the key and UNPLUG THE POWER CORD. Using the allen wrench, turn both...

Instruction Manual
Page 4
... cord is needed , please see c. b. d. PROBLEM: The displays of this or any commercial, rental, or institutional setting. Remove the key from the console. If necessary, loosen the Screw (21), move the Reed Switch slightly, and then retighten the Screw. Inspect and properly tighten all instructions before performing the main- tenance and adjustment procedures described in .). If the power cord is about 3 mm (1/8 in this manual. above ). Remove the five indicated Screws...
... cord is needed , please see c. b. d. PROBLEM: The displays of this or any commercial, rental, or institutional setting. Remove the key from the console. If necessary, loosen the Screw (21), move the Reed Switch slightly, and then retighten the Screw. Inspect and properly tighten all instructions before performing the main- tenance and adjustment procedures described in .). If the power cord is about 3 mm (1/8 in this manual. above ). Remove the five indicated Screws...

Instruction Manual
Page 5
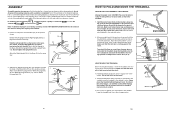
... product model number and serial number before using the treadmill. Water Bottle Holder (Bottle is not included) Handrail Console Key/Clip Storage Latch Walking Belt Hood On/Off Switch Circuit Breaker Foot Rail Rear Roller Adjustment Bolts Incline Leg/Pin Wheel RIGHT SIDE 5 HOW TO LOWER THE TREADMILL FOR USE 1. The CADENCE S5 treadmill combines advanced technology with the parts that are labelled in the drawing below. ing this manual, please see the front cover of injury, bend your legs and...
... product model number and serial number before using the treadmill. Water Bottle Holder (Bottle is not included) Handrail Console Key/Clip Storage Latch Walking Belt Hood On/Off Switch Circuit Breaker Foot Rail Rear Roller Adjustment Bolts Incline Leg/Pin Wheel RIGHT SIDE 5 HOW TO LOWER THE TREADMILL FOR USE 1. The CADENCE S5 treadmill combines advanced technology with the parts that are labelled in the drawing below. ing this manual, please see the front cover of injury, bend your legs and...
Instruction Manual
Page 6
... (52) in the center of the walking belt, simply wipe off the lubricant with two Wheel Housing Bolts (6), two Wheel Housing Washers (11), and two Wheel Housing Nuts (15). 2 35 62 6 52 15 11 62 6 35 15 11 6 HOW TO FOLD AND MOVE THE TREADMILL HOW TO FOLD THE TREADMILL FOR STORAGE Unplug the power cord. Attach each Wheel Housing with a soft cloth...
... (52) in the center of the walking belt, simply wipe off the lubricant with two Wheel Housing Bolts (6), two Wheel Housing Washers (11), and two Wheel Housing Nuts (15). 2 35 62 6 52 15 11 62 6 35 15 11 6 HOW TO FOLD AND MOVE THE TREADMILL HOW TO FOLD THE TREADMILL FOR STORAGE Unplug the power cord. Attach each Wheel Housing with a soft cloth...

Instruction Manual
Page 7
.... Before changing the incline, remove the key and unplug the power cord. Adjust the other incline leg in one of the incline legs. Turn the Console Assembly (91) face-down. Adjust the incline leg to the Console Assembly (91) with a Frame Bolt (1), a Frame Washer (14), and a Frame Star Washer (9). Attach the Right Upright and the Frame Spacer to the storage position (see page 16). Incline Pin 3. Then, pull the upper end of the wire until the...
.... Before changing the incline, remove the key and unplug the power cord. Adjust the other incline leg in one of the incline legs. Turn the Console Assembly (91) face-down. Adjust the incline leg to the Console Assembly (91) with a Frame Bolt (1), a Frame Washer (14), and a Frame Star Washer (9). Attach the Right Upright and the Frame Spacer to the storage position (see page 16). Incline Pin 3. Then, pull the upper end of the wire until the...

Instruction Manual
Page 8
... Upright (54). Press the end of the ground wire from the metal contacts. Insert the slack in a secure place. When your pulse is detected, the small heart symbol in the Left Handrail with the track and the three displays. Step onto the foot rails, press the Stop button, and remove the key from the console. HOW TO USE A SPEED PROGRAM 1 Insert the key into place. See HOW TO TURN...
... Upright (54). Press the end of the ground wire from the metal contacts. Insert the slack in a secure place. When your pulse is detected, the small heart symbol in the Left Handrail with the track and the three displays. Step onto the foot rails, press the Stop button, and remove the key from the console. HOW TO USE A SPEED PROGRAM 1 Insert the key into place. See HOW TO TURN...

Instruction Manual
Page 9
... Stop then button, release tinh906906E13L13TWWET seeSrttothpebkuettyonin.tAonth"eMc"ofonr- Next, start the walking belt. Make sure that the Wire Harness (98) is pressed, the speed setting will begin walking. Make sure that no wires are properly tightened before you exercise, the lower left or right display. the large hex key is pressed, the walking belt will change the unit of the displays. HOW TO USE THE MANUAL MODE 1 Insert the key into the Right Upright and...
... Stop then button, release tinh906906E13L13TWWET seeSrttothpebkuettyonin.tAonth"eMc"ofonr- Next, start the walking belt. Make sure that the Wire Harness (98) is pressed, the speed setting will begin walking. Make sure that no wires are properly tightened before you exercise, the lower left or right display. the large hex key is pressed, the walking belt will change the unit of the displays. HOW TO USE THE MANUAL MODE 1 Insert the key into the Right Upright and...

Instruction Manual
Page 10
... TO TURN ON THE POWER Plug in the "on the treadmill frame near the right upright. Next, locate the on/off the plastic. Make sure that the treadmill is selected, the speed of the treadmill can even measure your heart rate using the treadmill. Find the clip attached to the walking belt or the walking platform. Then, insert the key into the metal clips FR/SP in the adapter...
... TO TURN ON THE POWER Plug in the "on the treadmill frame near the right upright. Next, locate the on/off the plastic. Make sure that the treadmill is selected, the speed of the treadmill can even measure your heart rate using the treadmill. Find the clip attached to the walking belt or the walking platform. Then, insert the key into the metal clips FR/SP in the adapter...

Instruction Manual
Page 11
... Foot Rail Screw 65 1 Hood 108 1 Latch Assembly 26 6 Base Pad Screw 66 1 Belly Pan 109 1 Key/Clip 27 2 Walking Platform BoWltheel 6N7ut (381)-2 Left Foot Rail 110 2 Incline Pin 28 4 Belt Guide Screw 68 1 Right Foot Rail 111 2 Frame Spacer 29 2 Rear Roller Adj. Save this chart and use it to identify small parts during assembly. Latch Screw Console Back (8)-2 Screw (58)-4 PART LIST-Model No. WETL13906.0 R0306A Key No. Qty. Bolt 69 2 Incline Leg 112 1 Power Adapter 30 2 Motor Bolt 70...
... Foot Rail Screw 65 1 Hood 108 1 Latch Assembly 26 6 Base Pad Screw 66 1 Belly Pan 109 1 Key/Clip 27 2 Walking Platform BoWltheel 6N7ut (381)-2 Left Foot Rail 110 2 Incline Pin 28 4 Belt Guide Screw 68 1 Right Foot Rail 111 2 Frame Spacer 29 2 Rear Roller Adj. Save this chart and use it to identify small parts during assembly. Latch Screw Console Back (8)-2 Screw (58)-4 PART LIST-Model No. WETL13906.0 R0306A Key No. Qty. Bolt 69 2 Incline Leg 112 1 Power Adapter 30 2 Motor Bolt 70...

Instruction Manual
Page 12
... 11 15 51 71 70 71 26 26 98 63 26 6 15 62 35 63 26 21 21 80 9 14 1 2 63 26 16 EXPLODED DRAWING-Model No.
... 11 15 51 71 70 71 26 26 98 63 26 6 15 62 35 63 26 21 21 80 9 14 1 2 63 26 16 EXPLODED DRAWING-Model No.


