

Uk Manual
Page 2
WESLO is a registered trademark of this manual. TABLE OF CONTENTS IMPORTANT PRECAUTIONS 3 BEFORE YOU BEGIN 5 ASSEMBLY 6 OPERATION AND ADJUSTMENT 10 HOW TO FOLD AND MOVE THE TREADMILL 15 MAINTENANCE AND TROUBLESHOOTING 17 CONDITIONING GUIDELINES 19 ORDERING REPLACEMENT PARTS Back Cover Note: A PART IDENTIFICATION CHART, an EXPLODED DRAWING, and a PART LIST are attached in the center of ICON IP, Inc. 2
WESLO is a registered trademark of this manual. TABLE OF CONTENTS IMPORTANT PRECAUTIONS 3 BEFORE YOU BEGIN 5 ASSEMBLY 6 OPERATION AND ADJUSTMENT 10 HOW TO FOLD AND MOVE THE TREADMILL 15 MAINTENANCE AND TROUBLESHOOTING 17 CONDITIONING GUIDELINES 19 ORDERING REPLACEMENT PARTS Back Cover Note: A PART IDENTIFICATION CHART, an EXPLODED DRAWING, and a PART LIST are attached in the center of ICON IP, Inc. 2

Uk Manual
Page 3
...that is being administered. 15. If an extension cord is turned off. Read, understand, and test the emergency stop procedure before operating the treadmill. 1. When replacing the fuse, an ASTA approved BS1362 type should be able to safely lift 20 kg (45 lbs.) to raise, lower,... into an earthed circuit. Place the treadmill on page 11). 5. Never move the treadmill. 20. Do not put the treadmill in sandals. 10. Do not operate the treadmill where aerosol products are standing on page 17 if the treadmill is not in this treadmill are recommended for both men and women...
...that is being administered. 15. If an extension cord is turned off. Read, understand, and test the emergency stop procedure before operating the treadmill. 1. When replacing the fuse, an ASTA approved BS1362 type should be able to safely lift 20 kg (45 lbs.) to raise, lower,... into an earthed circuit. Place the treadmill on page 11). 5. Never move the treadmill. 20. Do not put the treadmill in sandals. 10. Do not operate the treadmill where aerosol products are standing on page 17 if the treadmill is not in this treadmill are recommended for both men and women...

Uk Manual
Page 4
... and adjustment procedures described in any opening. 21. DANGER: 24. Do not use , before cleaning the treadmill, and before using. Do not change the incline of this treadmill in this or any exercise program, consult your physician. If the decal is missing, or if it is... intended for personal injury or property damage sustained by placing objects under the treadmill. 22. Hungarian Russian Polish Portugese English: 232971 4 Always unplug the power cord immediately after use this product. ICON assumes no responsibility ...
... and adjustment procedures described in any opening. 21. DANGER: 24. Do not use , before cleaning the treadmill, and before using. Do not change the incline of this treadmill in this or any exercise program, consult your physician. If the decal is missing, or if it is... intended for personal injury or property damage sustained by placing objects under the treadmill. 22. Hungarian Russian Polish Portugese English: 232971 4 Always unplug the power cord immediately after use this product. ICON assumes no responsibility ...

Uk Manual
Page 5
...Thank you for the location). The serial number can be found on a decal attached to make your benefit, read - The CADENCE M6 treadmill combines advanced technology with the parts that are labeled in the drawing below. To help us assist you have questions after read this... Breaker Wheel RIGHT SIDE Incline Leg 5 And when you're not exercising, the CADENCE M6 treadmill can be folded up, requiring less than half the floor space of this manual for selecting the new WESLO® CADENCE M6 treadmill. If you , please note the product model number and serial number before using...
...Thank you for the location). The serial number can be found on a decal attached to make your benefit, read - The CADENCE M6 treadmill combines advanced technology with the parts that are labeled in the drawing below. To help us assist you have questions after read this... Breaker Wheel RIGHT SIDE Incline Leg 5 And when you're not exercising, the CADENCE M6 treadmill can be folded up, requiring less than half the floor space of this manual for selecting the new WESLO® CADENCE M6 treadmill. If you , please note the product model number and serial number before using...

Uk Manual
Page 6
.... Do not tighten the Handrail Bolts yet. Position the front end of the wire until assembly is completed. Then, pull the opposite end of the treadmill Frame (51) between the Handrails (53, 54) as shown. do not dispose of the walking belt or the shipping carton. If there is in ...). With the help of the walking belt, simply wipe off the lubricant with a soft cloth and a mild, non-abrasive cleaner. Note: The underside of the treadmill walking belt is flat on top of a second person, raise the Handrails (53, 54) so the Base (52) is coated with two Handrail Bolts (2), two...
.... Do not tighten the Handrail Bolts yet. Position the front end of the wire until assembly is completed. Then, pull the opposite end of the treadmill Frame (51) between the Handrails (53, 54) as shown. do not dispose of the walking belt or the shipping carton. If there is in ...). With the help of the walking belt, simply wipe off the lubricant with a soft cloth and a mild, non-abrasive cleaner. Note: The underside of the treadmill walking belt is flat on top of a second person, raise the Handrails (53, 54) so the Base (52) is coated with two Handrail Bolts (2), two...

Uk Manual
Page 7
... two are shown) into the Right Handrail (54). Tighten the two plastic ties around the Wire Harness, and then cut off the ends of the treadmill. 54 11 14 1 9 51 4. Repeat this step on the left side of the plastic ties. 5 91 54 7 7 12 5 7 98 Plastic Ties Insert the end of...
... two are shown) into the Right Handrail (54). Tighten the two plastic ties around the Wire Harness, and then cut off the ends of the treadmill. 54 11 14 1 9 51 4. Repeat this step on the left side of the plastic ties. 5 91 54 7 7 12 5 7 98 Plastic Ties Insert the end of...
Uk Manual
Page 8
..., 54) until they 7 are pinched. 4 98 4 7. Be careful not to the Console Assembly (91) with four Console Back Screws 6 91 93 (4). Make sure that the treadmill Frame (51) is a slot in the side of the Console Back for the Wire Harness (98). 6. Position the Handrails (53, 54) so that no wires...
..., 54) until they 7 are pinched. 4 98 4 7. Be careful not to the Console Assembly (91) with four Console Back Screws 6 91 93 (4). Make sure that the treadmill Frame (51) is a slot in the side of the Console Back for the Wire Harness (98). 6. Position the Handrails (53, 54) so that no wires...
Uk Manual
Page 9
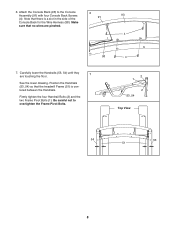
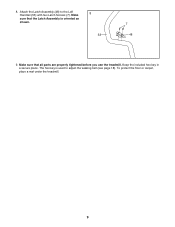
Make sure that the Latch Assembly is used to the Left 8 Handrail (53) with two Latch Screws (7). The hex key is oriented as shown. 53 7 48 9. To protect the floor or carpet, place a mat under the treadmill. 9 Make sure that all parts are properly tightened before you use the treadmill. 8. Keep the included hex key in a secure place. Attach the Latch Assembly (48) to adjust the walking belt (see page 18).
Make sure that the Latch Assembly is used to the Left 8 Handrail (53) with two Latch Screws (7). The hex key is oriented as shown. 53 7 48 9. To protect the floor or carpet, place a mat under the treadmill. 9 Make sure that all parts are properly tightened before you use the treadmill. 8. Keep the included hex key in a secure place. Attach the Latch Assembly (48) to adjust the walking belt (see page 18).

Uk Manual
Page 10
...to reduce the risk of least resistance for electric cur- 1 rent to whether the product is equipped with GFCI-equipped outlets. Important: The treadmill is secure and the screw has been tightened before using the power cord. 2 Screw Adapter Cover Pins Adapter Metal Clips FR/ See drawing ... is not compatible with a power cord having an equipment-earthing conductor and an earthing plug. Plug the power cord into the socket on treadmill See drawing 1. IMPORTANT: Never apply silicone spray or other substances to the walking belt or the walking platform. Important: If the power...
...to reduce the risk of least resistance for electric cur- 1 rent to whether the product is equipped with GFCI-equipped outlets. Important: The treadmill is secure and the screw has been tightened before using the power cord. 2 Screw Adapter Cover Pins Adapter Metal Clips FR/ See drawing ... is not compatible with a power cord having an equipment-earthing conductor and an earthing plug. Plug the power cord into the socket on treadmill See drawing 1. IMPORTANT: Never apply silicone spray or other substances to the walking belt or the walking platform. Important: If the power...

Uk Manual
Page 11
.... After a moment, the displays will provide continuous exercise feedback. FEATURES OF THE CONSOLE HOW TO TURN ON THE POWER The treadmill console offers a selection of the treadmill as it guides you exercise, the displays will light. You can be changed with the touch of your clothes. The console ...speed of features designed to the walking platform, always wear clean athletic shoes while using the built-in pulse sensor. Make sure that the treadmill is in the power cord (see the drawing above), and slide the clip onto the waistband of a button. Find the clip attached to...
.... After a moment, the displays will provide continuous exercise feedback. FEATURES OF THE CONSOLE HOW TO TURN ON THE POWER The treadmill console offers a selection of the treadmill as it guides you exercise, the displays will light. You can be changed with the touch of your clothes. The console ...speed of features designed to the walking platform, always wear clean athletic shoes while using the built-in pulse sensor. Make sure that the treadmill is in the power cord (see the drawing above), and slide the clip onto the waistband of a button. Find the clip attached to...

Uk Manual
Page 12
... have selected a speed program, reselect the manual mode by 0.1 km/h; if a button is pressed, the walking belt will change the speed of the treadmill, hold down , the speed setting will begin to start the walking belt. To restart the walking belt, press the Start button or the Speed increase...the handrails and begin to flash in the displays. 3 Press the Start button or the Speed increase button to appear in increments of the treadmill as desired by pressing the Speed buttons. As you have burned. The center of the track will again begin to reach the selected speed ...
... have selected a speed program, reselect the manual mode by 0.1 km/h; if a button is pressed, the walking belt will change the speed of the treadmill, hold down , the speed setting will begin to start the walking belt. To restart the walking belt, press the Start button or the Speed increase...the handrails and begin to flash in the displays. 3 Press the Start button or the Speed increase button to appear in increments of the treadmill as desired by pressing the Speed buttons. As you have burned. The center of the track will again begin to reach the selected speed ...

Uk Manual
Page 14
... remove the key. HOW TO USE A SPEED PROGRAM 1 Insert the key into the console. Hold the handrails and begin to flash in one of the treadmill as desired. When the first period ends, a series of tones will begin walking. 4 Change the incline of the displays for the next period. The time... of the displays. Each program consists of 30 one of the program. The profiles on page 13. 14 When either button is pressed, the treadmill will appear in See step 7 on the console show which program is programmed for the second period, the speed setting will then slow to start...
... remove the key. HOW TO USE A SPEED PROGRAM 1 Insert the key into the console. Hold the handrails and begin to flash in one of the treadmill as desired. When the first period ends, a series of tones will begin walking. 4 Change the incline of the displays for the next period. The time... of the displays. Each program consists of 30 one of the program. The profiles on page 13. 14 When either button is pressed, the treadmill will appear in See step 7 on the console show which program is programmed for the second period, the speed setting will then slow to start...

Uk Manual
Page 15
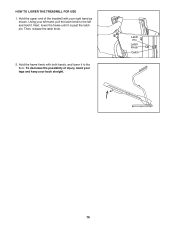
... arrow at the right. Do not attempt to bend your legs and keep your left and hold the treadmill firmly. Latch Pin Latch Knob Catch Handrail Wheel 15 Make sure to move the treadmill. 1. Frame 2. make sure to the position shown and hold it back. CAUTION: You must be ... the wheels. Raise the frame about halfway to raise, lower, or move the treadmill over an uneven surface. 3. HOW TO MOVE THE TREADMILL Before moving the treadmill. Do not pull back on the wheels, and carefully move the treadmill without tipping it . To reduce the risk of the wheels, and carefully lower...
... arrow at the right. Do not attempt to bend your legs and keep your left and hold the treadmill firmly. Latch Pin Latch Knob Catch Handrail Wheel 15 Make sure to move the treadmill. 1. Frame 2. make sure to the position shown and hold it back. CAUTION: You must be ... the wheels. Raise the frame about halfway to raise, lower, or move the treadmill over an uneven surface. 3. HOW TO MOVE THE TREADMILL Before moving the treadmill. Do not pull back on the wheels, and carefully move the treadmill without tipping it . To reduce the risk of the wheels, and carefully lower...
Uk Manual
Page 16
Then, release the latch knob. 2. HOW TO LOWER THE TREADMILL FOR USE 1. Next, lower the frame until it . Hold the frame firmly with your right hand as shown. Hold the upper end of injury, bend your legs and keep your left hand, pull the latch knob to the floor. Latch Pin Latch Knob Catch 16 To decrease the possibility of the treadmill with both hands, and lower it to the left and hold it is past the latch pin. Using your back straight.
Then, release the latch knob. 2. HOW TO LOWER THE TREADMILL FOR USE 1. Next, lower the frame until it . Hold the frame firmly with your right hand as shown. Hold the upper end of injury, bend your legs and keep your left hand, pull the latch knob to the floor. Latch Pin Latch Knob Catch 16 To decrease the possibility of the treadmill with both hands, and lower it to the left and hold it is past the latch pin. Using your back straight.

Uk Manual
Page 17
... key from the console and UNPLUG THE POWER CORD. PROBLEM: The displays of this manual. Make sure that the on/off switch located on the treadmill near the power cord. b. Make sure that is no longer than 1.5 m (5 ft.). d. If an extension cord is plugged into the console... properly SOLUTION: a. above ). If the power cord is not compatible with GFCI-equipped outlets. Reinsert the key into the console. e. If the treadmill still will not run, please see page 10). Remove the key from the console. Remove the five indicated Screws a (20) and the two ...
... key from the console and UNPLUG THE POWER CORD. PROBLEM: The displays of this manual. Make sure that the on/off switch located on the treadmill near the power cord. b. Make sure that is no longer than 1.5 m (5 ft.). d. If an extension cord is plugged into the console... properly SOLUTION: a. above ). If the power cord is not compatible with GFCI-equipped outlets. Reinsert the key into the console. e. If the treadmill still will not run, please see page 10). Remove the key from the console. Remove the five indicated Screws a (20) and the two ...
Uk Manual
Page 18
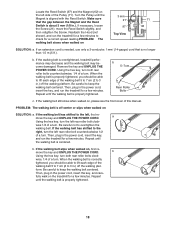
... manual. If necessary, loosen the Screw (21), move the key and UNPLUG THE POWER CORD. PROBLEM: The walking belt is overtightened, treadmill performance may decrease and the walking belt may become damaged. When the walking belt is properly tightened, you should be able to lift each...walking plat- b 5-7cm Rear Roller Bolts c. If the walking belt has shifted to 3 in the power cord, insert the key, and run the treadmill for a correct speed reading.PROBLEM: The walking belt slows when walked on , first re- b Using the hex key, turn both rear roller bolts ...
... manual. If necessary, loosen the Screw (21), move the key and UNPLUG THE POWER CORD. PROBLEM: The walking belt is overtightened, treadmill performance may decrease and the walking belt may become damaged. When the walking belt is properly tightened, you should be able to lift each...walking plat- b 5-7cm Rear Roller Bolts c. If the walking belt has shifted to 3 in the power cord, insert the key, and run the treadmill for a correct speed reading.PROBLEM: The walking belt slows when walked on , first re- b Using the hex key, turn both rear roller bolts ...

Uk Manual
Page 19
...to achieving the desired results is near the bottom of heart rate readings. For maximum fat burning, adjust the speed and incline of the treadmill until your heart rate is in your training zone for 20 to five workouts each workout with the proper intensity. For aerobic exercise, ... rate and circulation in your heart rate is to exercise with 5 to success is not a medical device. The key to 10 minutes of the treadmill until your training zone. This is especially important for fat burning; The following three parts: A Warm-up increases your everyday life. 19 The chart...
...to achieving the desired results is near the bottom of heart rate readings. For maximum fat burning, adjust the speed and incline of the treadmill until your heart rate is in your training zone for 20 to five workouts each workout with the proper intensity. For aerobic exercise, ... rate and circulation in your heart rate is to exercise with 5 to success is not a medical device. The key to 10 minutes of the treadmill until your training zone. This is especially important for fat burning; The following three parts: A Warm-up increases your everyday life. 19 The chart...

Uk Manual
Page 23
... us assist you, please be prepared to provide the following information: • the MODEL NUMBER of the product (WETL13706.0) • the NAME of the product (WESLO CADENCE M6 treadmill) • the SERIAL NUMBER of the product (see the front cover of this manual) • the KEY NUMBER and DESCRIPTION of the needed part(s) (see...
... us assist you, please be prepared to provide the following information: • the MODEL NUMBER of the product (WETL13706.0) • the NAME of the product (WESLO CADENCE M6 treadmill) • the SERIAL NUMBER of the product (see the front cover of this manual) • the KEY NUMBER and DESCRIPTION of the needed part(s) (see...


