

Uk Manual
Page 2
TABLE OF CONTENTS IMPORTANT PRECAUTIONS 3 BEFORE YOU BEGIN 5 ASSEMBLY 6 OPERATION AND ADJUSTMENT 10 HOW TO FOLD AND MOVE THE TREADMILL 15 MAINTENANCE AND TROUBLESHOOTING 17 CONDITIONING GUIDELINES 19 ORDERING REPLACEMENT PARTS Back Cover Note: A PART IDENTIFICATION CHART, an EXPLODED DRAWING, and a PART LIST are attached in the center of ICON IP, Inc. 2 WESLO is a registered trademark of this manual.
TABLE OF CONTENTS IMPORTANT PRECAUTIONS 3 BEFORE YOU BEGIN 5 ASSEMBLY 6 OPERATION AND ADJUSTMENT 10 HOW TO FOLD AND MOVE THE TREADMILL 15 MAINTENANCE AND TROUBLESHOOTING 17 CONDITIONING GUIDELINES 19 ORDERING REPLACEMENT PARTS Back Cover Note: A PART IDENTIFICATION CHART, an EXPLODED DRAWING, and a PART LIST are attached in the center of ICON IP, Inc. 2 WESLO is a registered trademark of this manual.
Uk Manual
Page 3
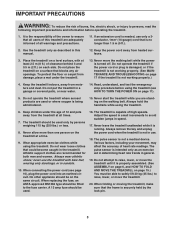
....). 2. Do not attempt to ensure that is turned off. Never move the walking belt while the power is no longer than one person on the treadmill at least 2.5 m (8 ft.) of clearance behind it and 0.5 m (2 ft.) on a level surface, with bare feet, wearing only stockings, or in use. 18.... Always hold the handrails while using the treadmill. When connecting the power cord (see HOW TO TURN THE POWER ON on a surface that blocks any air openings. If an extension cord is needed...
....). 2. Do not attempt to ensure that is turned off. Never move the walking belt while the power is no longer than one person on the treadmill at least 2.5 m (8 ft.) of clearance behind it and 0.5 m (2 ft.) on a level surface, with bare feet, wearing only stockings, or in use. 18.... Always hold the handrails while using the treadmill. When connecting the power cord (see HOW TO TURN THE POWER ON on a surface that blocks any air openings. If an extension cord is needed...
Uk Manual
Page 4
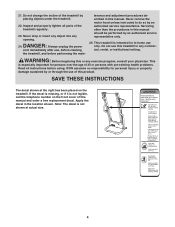
... described in this manual. Servicing other than the procedures in this manual should be performed by or through the use , before cleaning the treadmill, and before using. Never drop or insert any object into any exercise program, consult your physician. Never remove the motor hood unless instructed... to do so by placing objects under the treadmill. 22. This is not shown at the right has been placed on the front cover of this manual and order a free replacement decal...
... described in this manual. Servicing other than the procedures in this manual should be performed by or through the use , before cleaning the treadmill, and before using. Never drop or insert any object into any exercise program, consult your physician. Never remove the motor hood unless instructed... to do so by placing objects under the treadmill. 22. This is not shown at the right has been placed on the front cover of this manual and order a free replacement decal...
Uk Manual
Page 5
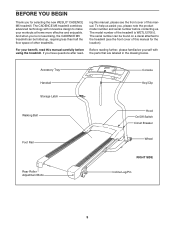
... manual carefully before contacting us. To help us assist you have questions after read this manual for selecting the new WESLO® CADENCE M5 treadmill. For your workouts at home more effective and enjoyable. The CADENCE M5 treadmill combines advanced technology with the parts that are labeled in the drawing below. ing this manual, please see the...
... manual carefully before contacting us. To help us assist you have questions after read this manual for selecting the new WESLO® CADENCE M5 treadmill. For your workouts at home more effective and enjoyable. The CADENCE M5 treadmill combines advanced technology with the parts that are labeled in the drawing below. ing this manual, please see the...

Uk Manual
Page 6
...end of the wire until assembly is extending from the upper end of the walking belt or the shipping carton. This does not affect treadmill performance. Note: To identify small parts during assembly, see the inset drawing). Identify the Right Handrail (54), which has a large... hex key , assembly requires a phillips screwdriver , a spanner , and wire cutters . ASSEMBLY Assembly requires two persons. Then, pull the opposite end of the treadmill Frame (51) between the Handrails (53, 54) as shown. Note: The underside of a second person, raise the Handrails (53, 54) so the Base...
...end of the wire until assembly is extending from the upper end of the walking belt or the shipping carton. This does not affect treadmill performance. Note: To identify small parts during assembly, see the inset drawing). Identify the Right Handrail (54), which has a large... hex key , assembly requires a phillips screwdriver , a spanner , and wire cutters . ASSEMBLY Assembly requires two persons. Then, pull the opposite end of the treadmill Frame (51) between the Handrails (53, 54) as shown. Note: The underside of a second person, raise the Handrails (53, 54) so the Base...
Uk Manual
Page 7
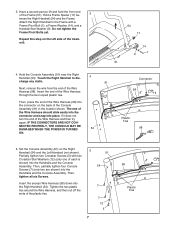
... and the Console Assembly. Insert the end of the Wire Harness and then try again. Set the Console Assembly (91) on the back of the treadmill. 54 11 14 1 9 51 4. If it does not, turn the end of the Wire Harness through the two looped plastic ties. IF THE CONNECTORS ARE...
... and the Console Assembly. Insert the end of the Wire Harness and then try again. Set the Console Assembly (91) on the back of the treadmill. 54 11 14 1 9 51 4. If it does not, turn the end of the Wire Harness through the two looped plastic ties. IF THE CONNECTORS ARE...
Uk Manual
Page 8
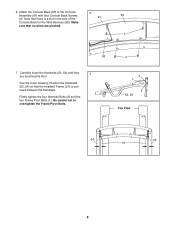
... Back Screws 91 93 (4). Attach the Console Back (93) to overtighten the Frame Pivot Bolts. 2 1 2 53, 54 Top View 54 53 51 8 Note that the treadmill Frame (51) is a slot in the side of the Console Back for the Wire Harness (98).
... Back Screws 91 93 (4). Attach the Console Back (93) to overtighten the Frame Pivot Bolts. 2 1 2 53, 54 Top View 54 53 51 8 Note that the treadmill Frame (51) is a slot in the side of the Console Back for the Wire Harness (98).
Uk Manual
Page 9
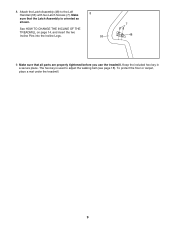
Keep the included hex key in a secure place. The hex key is oriented as shown. See HOW TO CHANGE THE INCLINE OF THE TREADMILL on page 14, and insert the two Incline Pins into the Incline Legs. 53 7 48 9. To protect the floor or carpet, place a mat under the treadmill. 9 Make sure that the Latch Assembly is used to the Left 8 Handrail (53) with two Latch Screws (7). Attach the Latch Assembly (48) to adjust the walking belt (see page 18). 8. Make sure that all parts are properly tightened before you use the treadmill.
Keep the included hex key in a secure place. The hex key is oriented as shown. See HOW TO CHANGE THE INCLINE OF THE TREADMILL on page 14, and insert the two Incline Pins into the Incline Legs. 53 7 48 9. To protect the floor or carpet, place a mat under the treadmill. 9 Make sure that the Latch Assembly is used to the Left 8 Handrail (53) with two Latch Screws (7). Attach the Latch Assembly (48) to adjust the walking belt (see page 18). 8. Make sure that all parts are properly tightened before you use the treadmill.
Uk Manual
Page 10
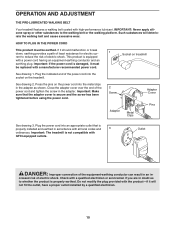
...will FR/SP not fit the outlet, have a proper outlet installed by a qualified electrician. 10 Press the pins on the treadmill. Plug the power cord into the metal clips FR/SP in the adapter as to whether the product is equipped with high-...a qualified electrician or serviceman if you are in accordance with a manufacturer-recommended power cord. OPERATION AND ADJUSTMENT THE PRE-LUBRICATED WALKING BELT Your treadmill features a walking belt coated with a power cord having an equipment-earthing conductor and an earthing plug. IMPORTANT: Never apply silicone spray or other...
...will FR/SP not fit the outlet, have a proper outlet installed by a qualified electrician. 10 Press the pins on the treadmill. Plug the power cord into the metal clips FR/SP in the adapter as to whether the product is equipped with high-...a qualified electrician or serviceman if you are in accordance with a manufacturer-recommended power cord. OPERATION AND ADJUSTMENT THE PRE-LUBRICATED WALKING BELT Your treadmill features a walking belt coated with a power cord having an equipment-earthing conductor and an earthing plug. IMPORTANT: Never apply silicone spray or other...

Uk Manual
Page 11
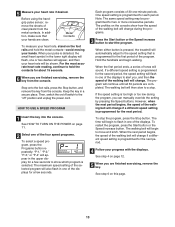
... clip onto the waistband of your clothes. The console also offers four speed programs. Each program automatically controls the speed of the treadmill can even measure your workouts more effective. To prevent damage to a stop. Test the clip by carefully taking a few minutes that... the switch is selected, the speed of the treadmill as it guides you exercise, the displays will light. After a moment, the three displays will provide continuous exercise feedback. As you through...
... clip onto the waistband of your clothes. The console also offers four speed programs. Each program automatically controls the speed of the treadmill can even measure your workouts more effective. To prevent damage to a stop. Test the clip by carefully taking a few minutes that... the switch is selected, the speed of the treadmill as it guides you exercise, the displays will light. After a moment, the three displays will provide continuous exercise feedback. As you through...
Uk Manual
Page 13
... the walking belt will change . The walking belt will appear, and then your heart rate if desired. To stop . When either button is pressed, the treadmill will change if a different speed setting is selected. For the most accurate heart rate reading, continue to the speed setting that your hands. However, when...
... the walking belt will change . The walking belt will appear, and then your heart rate if desired. To stop . When either button is pressed, the treadmill will change if a different speed setting is selected. For the most accurate heart rate reading, continue to the speed setting that your hands. However, when...
Uk Manual
Page 14
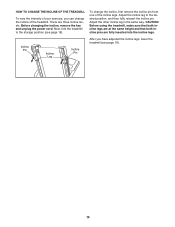
... the incline pin from one of the incline legs. Adjust the incline leg to the storage position (see page 16). 14 Next, fold the treadmill to the desired position, and then fully reinsert the incline pin. Before changing the incline, remove the key and unplug the power cord. There ...are fully inserted into the incline legs. CAUTION: Before using the treadmill, make sure that both incline legs are at the same height and that both incline pins are three incline levels. HOW TO CHANGE THE INCLINE...
... the incline pin from one of the incline legs. Adjust the incline leg to the storage position (see page 16). 14 Next, fold the treadmill to the desired position, and then fully reinsert the incline pin. Before changing the incline, remove the key and unplug the power cord. There ...are fully inserted into the incline legs. CAUTION: Before using the treadmill, make sure that both incline legs are at the same height and that both incline pins are three incline levels. HOW TO CHANGE THE INCLINE...
Uk Manual
Page 15
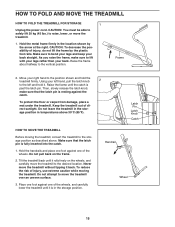
... lift the frame by the arrow at the right. Do not pull back on the wheels, and carefully move the treadmill to move the treadmill over an uneven surface. 3. Tilt the treadmill back until it back. Do not attempt to the desired location. CAUTION: To decrease the possibility of the wheels.... the latch knob 2 to lift with your legs rather than your back. To protect the floor or carpet from damage, place a mat under the treadmill. Hold the metal frame firmly in the storage position. Raise the frame about halfway to the position shown and hold it rolls freely on the...
... lift the frame by the arrow at the right. Do not pull back on the wheels, and carefully move the treadmill to move the treadmill over an uneven surface. 3. Tilt the treadmill back until it back. Do not attempt to the desired location. CAUTION: To decrease the possibility of the wheels.... the latch knob 2 to lift with your legs rather than your back. To protect the floor or carpet from damage, place a mat under the treadmill. Hold the metal frame firmly in the storage position. Raise the frame about halfway to the position shown and hold it rolls freely on the...
Uk Manual
Page 16
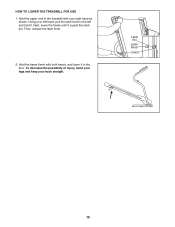
Using your right hand as shown. Hold the upper end of injury, bend your legs and keep your back straight. Then, release the latch knob. 2. To decrease the possibility of the treadmill with both hands, and lower it to the left and hold it is past the latch pin. Hold the frame firmly with your left hand, pull the latch knob to the floor. Next, lower the frame until it . Latch Pin Latch Knob Catch 16 HOW TO LOWER THE TREADMILL FOR USE 1.
Using your right hand as shown. Hold the upper end of injury, bend your legs and keep your back straight. Then, release the latch knob. 2. To decrease the possibility of the treadmill with both hands, and lower it to the left and hold it is past the latch pin. Hold the frame firmly with your left hand, pull the latch knob to the floor. Next, lower the frame until it . Latch Pin Latch Knob Catch 16 HOW TO LOWER THE TREADMILL FOR USE 1.
Uk Manual
Page 17
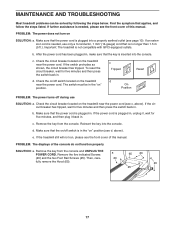
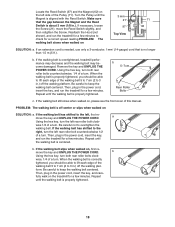
... not function properly SOLUTION: a. c. e. PROBLEM: The displays of this manual. After the power cord has been plugged in . d. above ). If the treadmill still will not run, please see d. Then, care- 20 fully remove the Hood (65). 65 20 20 25 17 b. Make sure that the key ...cord is not compatible with GFCI-equipped outlets. above ). Make sure that applies, and follow the steps listed. c. Check the on the treadmill near the power cord. The switch must be solved by following the steps below. Reinsert the key into the console. Remove the five ...
... not function properly SOLUTION: a. c. e. PROBLEM: The displays of this manual. After the power cord has been plugged in . d. above ). If the treadmill still will not run, please see d. Then, care- 20 fully remove the Hood (65). 65 20 20 25 17 b. Make sure that the key ...cord is not compatible with GFCI-equipped outlets. above ). Make sure that applies, and follow the steps listed. c. Check the on the treadmill near the power cord. The switch must be solved by following the steps below. Reinsert the key into the console. Remove the five ...
Uk Manual
Page 18
...Repeat until the walking belt is properly tightened. Repeat until the walking belt is properly tightened. 18 Reattach the Hood (not shown), and run the treadmill for a few minutes to overtighten the walking belt. a Using the hex key, turn the left rear roller bolt counterclockwise 1/2 of a turn ....tightened, you should be able to lift each edge of a turn the left rear roller bolt clock- When the walking belt is overtightened, treadmill performance may decrease and the walking belt may become damaged. b. Then, plug in .) off the walking platform. b Using the hex key,...
...Repeat until the walking belt is properly tightened. Repeat until the walking belt is properly tightened. 18 Reattach the Hood (not shown), and run the treadmill for a few minutes to overtighten the walking belt. a Using the hex key, turn the left rear roller bolt counterclockwise 1/2 of a turn ....tightened, you should be able to lift each edge of a turn the left rear roller bolt clock- When the walking belt is overtightened, treadmill performance may decrease and the walking belt may become damaged. b. Then, plug in .) off the walking platform. b Using the hex key,...
Uk Manual
Page 19
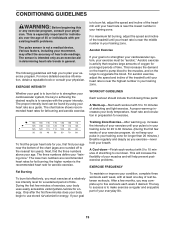
... consult your exercise program. The chart below shows recommended heart rates for aerobic exercise. For maximum fat burning, adjust the speed and incline of the treadmill until your pulse is near the highest number in your heart rate as an exercise aid in determining heart rate trends in preparation for prolonged... the demand on the heart to pump blood to the muscles, and on the lungs to burn fat, adjust the speed and incline of the treadmill until your heart rate is in your breath. To find the proper heart rate for you, first find the three numbers above your training zone...
... consult your exercise program. The chart below shows recommended heart rates for aerobic exercise. For maximum fat burning, adjust the speed and incline of the treadmill until your pulse is near the highest number in your heart rate as an exercise aid in determining heart rate trends in preparation for prolonged... the demand on the heart to pump blood to the muscles, and on the lungs to burn fat, adjust the speed and incline of the treadmill until your heart rate is in your breath. To find the proper heart rate for you, first find the three numbers above your training zone...
Uk Manual
Page 23
... us assist you, please be prepared to provide the following information: • the MODEL NUMBER of the product (WETL12706.0) • the NAME of the product (WESLO CADENCE M5 treadmill) • the SERIAL NUMBER of the product (see the front cover of this manual) • the KEY NUMBER and DESCRIPTION of the needed part(s) (see...
... us assist you, please be prepared to provide the following information: • the MODEL NUMBER of the product (WETL12706.0) • the NAME of the product (WESLO CADENCE M5 treadmill) • the SERIAL NUMBER of the product (see the front cover of this manual) • the KEY NUMBER and DESCRIPTION of the needed part(s) (see...


