
English Manual
Page 2
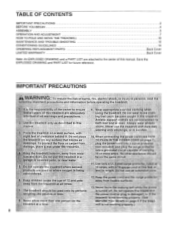
...TO PLUG IN THE POWER cpF3Ryoilpage 7 openings: To protect the flOOr:or carpet from mois- 15. persons isturried'OfkDOnOti::Operateltho treadmill if weighing 250 pounds or less the p0Weri.Cord::Pr-:Plti0 is deniagekbr if the treadinill-lS'nOt working Properly.).: 2 -...a [Orel surface, with bare feet, wearing,only stockings or ;n sandals ... coo jpt9,a surge: protector damage, place a mat litidef the treadmill, (not included) and plug the surge protector into a grounded::circuitcapable of this manual. oducts are recommended for future reference. M• •...
...TO PLUG IN THE POWER cpF3Ryoilpage 7 openings: To protect the flOOr:or carpet from mois- 15. persons isturried'OfkDOnOti::Operateltho treadmill if weighing 250 pounds or less the p0Weri.Cord::Pr-:Plti0 is deniagekbr if the treadinill-lS'nOt working Properly.).: 2 -...a [Orel surface, with bare feet, wearing,only stockings or ;n sandals ... coo jpt9,a surge: protector damage, place a mat litidef the treadmill, (not included) and plug the surge protector into a grounded::circuitcapable of this manual. oducts are recommended for future reference. M• •...

English Manual
Page 3
... is intended only as an exercise aid in determining heart rate trends in the location shown. • Never allow children to do not operate the treadmill continuously for in speed. 6 To reduce the possibility of thfe!io: reCiutt• SAV.E •T• HESEINSTRU..CTI:Q11 The decal shown below... safely lift 45 pounds (20 kg) to avoid sudden jumps, in -hOme use only. forming the maintenance and adjustment pro cedures described in this treadmill in this manual). Never remove the motor hood unless instructed to play on page 11.) You must be p.erformed by or through the use ;...
... is intended only as an exercise aid in determining heart rate trends in the location shown. • Never allow children to do not operate the treadmill continuously for in speed. 6 To reduce the possibility of thfe!io: reCiutt• SAV.E •T• HESEINSTRU..CTI:Q11 The decal shown below... safely lift 45 pounds (20 kg) to avoid sudden jumps, in -hOme use only. forming the maintenance and adjustment pro cedures described in this treadmill in this manual). Never remove the motor hood unless instructed to play on page 11.) You must be p.erformed by or through the use ;...
English Manual
Page 4
...at 1-800-999-3756, Monday through Friday, 6 a.m. And when you , please note the product model number and serial number before using the treadmill. The serial number can be found on a decal attached to let you enjoy an excellent form of cardiovascular exercise in the convenience and privacy of... other treadmills. The model number of this manual carefully before calling. To help us assist you 're not exercising, the unique PROFORM 525 can ...
...at 1-800-999-3756, Monday through Friday, 6 a.m. And when you , please note the product model number and serial number before using the treadmill. The serial number can be found on a decal attached to let you enjoy an excellent form of cardiovascular exercise in the convenience and privacy of... other treadmills. The model number of this manual carefully before calling. To help us assist you 're not exercising, the unique PROFORM 525 can ...
English Manual
Page 5
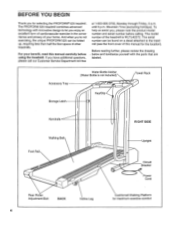
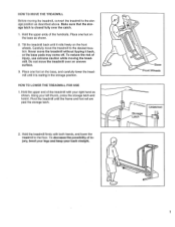
... its right side. (See the drawing on page 4 to HOW TO LOWER THE TREADMILL FOR USE on page 11. With the help of the Console with an Extension Leg Screw (34...are on the floor. 1 34 41 36 2. Follow the instructions in assembly. Set the treadmill in the bottom of a second person, carefully raise the treadmill to lower the treadmill. Make sure that the Extension Legs are turned so the Base Pads (36) are resting flat... 36 2 2 89 2 34 11 cb 89 5 With the help of a second person, insert a Handrail (2) into the treadmill as shown. With the help of the Console (11) as shown.
... its right side. (See the drawing on page 4 to HOW TO LOWER THE TREADMILL FOR USE on page 11. With the help of the Console with an Extension Leg Screw (34...are on the floor. 1 34 41 36 2. Follow the instructions in assembly. Set the treadmill in the bottom of a second person, carefully raise the treadmill to lower the treadmill. Make sure that the Extension Legs are turned so the Base Pads (36) are resting flat... 36 2 2 89 2 34 11 cb 89 5 With the help of a second person, insert a Handrail (2) into the treadmill as shown. With the help of the Console (11) as shown.

English Manual
Page 6
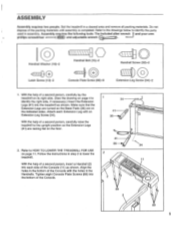
... 5. Make sure that the Wire Harness is not pinched. 4. To protect the floor or carpet, place a 6 mat under the treadmill. 32 N7 Make sure that all parts are tightened before you use the treadmill. Press the Allen Wrench (73) into the right Upright (14). Insert the bracket into the Adhesive Clip. 7. Thread...
... 5. Make sure that the Wire Harness is not pinched. 4. To protect the floor or carpet, place a 6 mat under the treadmill. 32 N7 Make sure that all parts are tightened before you use the treadmill. Press the Allen Wrench (73) into the right Upright (14). Insert the bracket into the Adhesive Clip. 7. Thread...
English Manual
Page 7
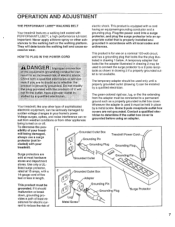
...- Plug the power cord into an ap- grounded in your home's power. To decrease the pos- Grounded Outlet Box Grounding Pin Treadmill Power Cord cluded) with grounding plug. Grounded Outlet Grounded Outlet Box Adapter Grounding Pin This product must be seriously damaged by sudden voltage...-colored rigid ear, lug, or the like any other sub- Important: Never apply silicone spray or other type of your treadmill. Contact a qualified electrician to .1Arhether the product is not available. listed surge protector, rated at most hardware stores and department stores.
...- Plug the power cord into an ap- grounded in your home's power. To decrease the pos- Grounded Outlet Box Grounding Pin Treadmill Power Cord cluded) with grounding plug. Grounded Outlet Grounded Outlet Box Adapter Grounding Pin This product must be seriously damaged by sudden voltage...-colored rigid ear, lug, or the like any other sub- Important: Never apply silicone spray or other type of your treadmill. Contact a qualified electrician to .1Arhether the product is not available. listed surge protector, rated at most hardware stores and department stores.
English Manual
Page 9
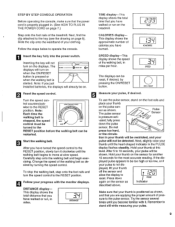
... RESET position, slowly turn on the sensor for another 15 seconds for the most accurate reading. This display shows the approximate number of the treadmill. played, lift your thumb on 0 IMSIV REV when the ON/RESET button is pressed or when the walking belt is started. El Inserting... raise your thumb until the walking belt begins to reset. played pulse appears to the RESET position before the walking belt can be on the treadmill. Note: Each time the :ft walking belt is NJ : stopped, the speed SLOW FAST control must be RESET turned to be restarted. ...
... RESET position, slowly turn on the sensor for another 15 seconds for the most accurate reading. This display shows the approximate number of the treadmill. played, lift your thumb on 0 IMSIV REV when the ON/RESET button is pressed or when the walking belt is started. El Inserting... raise your thumb until the walking belt begins to reset. played pulse appears to the RESET position before the walking belt can be on the treadmill. Note: Each time the :ft walking belt is NJ : stopped, the speed SLOW FAST control must be RESET turned to be restarted. ...
English Manual
Page 10
...Catch Engaged As you are pressed for five minutes, the displays will remain on for about halfway to lift with your back straight. Raise the treadmill about five minutes. .:PATION OIMIIITKIT i1\ Note: Any time that the storage latch is fully engaged over the catch. Make sure that the ... your hands in order to the position shown and hold down the top or bottom of the incline button. 6 Change the incline of the treadmill by placing ob- After the key is stopped and no console buttons are finished exercising, stop the walking belt, and remove the key from...
...Catch Engaged As you are pressed for five minutes, the displays will remain on for about halfway to lift with your back straight. Raise the treadmill about five minutes. .:PATION OIMIIITKIT i1\ Note: Any time that the storage latch is fully engaged over the catch. Make sure that the ... your hands in order to the position shown and hold down the top or bottom of the incline button. 6 Change the incline of the treadmill by placing ob- After the key is stopped and no console buttons are finished exercising, stop the walking belt, and remove the key from...
English Manual
Page 11
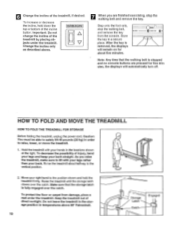
... base pads may come off. Hold the upper end of injury, use extreme caution while moving the treadmill, convert the treadmill to the storage position as shown. 2. Hold the treadmill firmly with your right hand as shown. To decrease the possibility of the handrails. Base Front Wheels Storage... frame and foot rail are past the storage latch. 2. Place one foot on the front wheels. Never move the treadmill to the floor. Carefully move the treadmill without tipping it is closed fully over an uneven surface. 3. Using your back straight. Hold the upper ends of injury...
... base pads may come off. Hold the upper end of injury, use extreme caution while moving the treadmill, convert the treadmill to the storage position as shown. 2. Hold the treadmill firmly with your right hand as shown. To decrease the possibility of the handrails. Base Front Wheels Storage... frame and foot rail are past the storage latch. 2. Place one foot on the front wheels. Never move the treadmill to the floor. Carefully move the treadmill without tipping it is closed fully over an uneven surface. 3. Using your back straight. Hold the upper ends of injury...
English Manual
Page 12
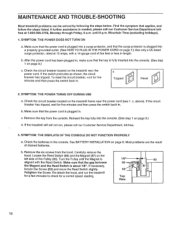
...drained batteries. Carefully remove the hood. If necessary, loosen the Screw (63) and move the Reed Switch slightly. MAINTENANCE AND TROUBLE-SHOOTING Most treadmill problems can be solved by following the steps below. If further assistance is about 1/8". c Tripped Reset 2. b. Make sure that the power ...Customer Service Department tollfree at 15 amps, with the Reed Switch. Reinsert the key fully into the console. (See step 1 on the treadmill frame near the power cord. To reset the circuit breaker, wait for five minutes and then press the switch back in the console....
...drained batteries. Carefully remove the hood. If necessary, loosen the Screw (63) and move the Reed Switch slightly. MAINTENANCE AND TROUBLE-SHOOTING Most treadmill problems can be solved by following the steps below. If further assistance is about 1/8". c Tripped Reset 2. b. Make sure that the power ...Customer Service Department tollfree at 15 amps, with the Reed Switch. Reinsert the key fully into the console. (See step 1 on the treadmill frame near the power cord. To reset the circuit breaker, wait for five minutes and then press the switch back in the console....
English Manual
Page 13
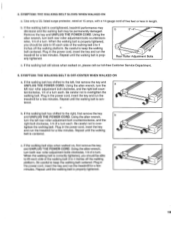
... If the walking belt has shifted to 4 inches off the walking platform. Plug in the power cord, insert the key and run the treadmill for a few minutes. tighten the walking belt. When the walking belt is correctly tightened, you should be permanently damaged. If the walking ... Repeat until the walking belt is properly tightened. 13 SYMPTOM: THE WALKING BELT SLOWS WHEN WALKED ON a. When the walking belt is overtightened, treadmill performance may decrease and the walking belt may be able to lift each side of the walking belt 3 to keep the walking belt centered....
... If the walking belt has shifted to 4 inches off the walking platform. Plug in the power cord, insert the key and run the treadmill for a few minutes. tighten the walking belt. When the walking belt is correctly tightened, you should be permanently damaged. If the walking ... Repeat until the walking belt is properly tightened. 13 SYMPTOM: THE WALKING BELT SLOWS WHEN WALKED ON a. When the walking belt is overtightened, treadmill performance may decrease and the walking belt may be able to lift each side of the walking belt 3 to keep the walking belt centered....
English Manual
Page 14
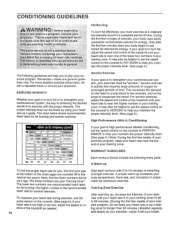
...too low, adjust the speed or in your train- your physician. After warming up increases your exercise must exercise at the bottom of the treadmill as you , first find your exer- cline of the chart (ages are recommended heart rates for energy. It may also be "aerobic."...the speed control on the console to AEROBIC to 10 minutes of stretching at a relatively low intensity level for a sustained period of the treadmill until your breath. If your goal is to oxygenate the blood. Remember-these are your physician. The chart below shows recommended heart rates for...
...too low, adjust the speed or in your train- your physician. After warming up increases your exercise must exercise at the bottom of the treadmill as you , first find your exer- cline of the chart (ages are recommended heart rates for energy. It may also be "aerobic."...the speed control on the console to AEROBIC to 10 minutes of stretching at a relatively low intensity level for a sustained period of the treadmill until your breath. If your goal is to oxygenate the blood. Remember-these are your physician. The chart below shows recommended heart rates for...

English Manual
Page 16
...its scope and duration to the terms set forth above limitation may not apply to the original purchaser. until 6 p.m. If possible, place the treadmill near your telephone for commercial or rental purposes, or to products used as store display models. PROFORM is limited to replacing or repairing, at ...be prepared to give the following information: • The MODEL NUMBER OF THE PRODUCT (WLTL42572). • The NAME OF THE PRODUCT (PROFORM® 525 treadmill). • The SERIAL NUMBER OF THE PRODUCT (see the front cover of this manual). • The KEY NUMBER OF THE PART(S) (see the ...
...its scope and duration to the terms set forth above limitation may not apply to the original purchaser. until 6 p.m. If possible, place the treadmill near your telephone for commercial or rental purposes, or to products used as store display models. PROFORM is limited to replacing or repairing, at ...be prepared to give the following information: • The MODEL NUMBER OF THE PRODUCT (WLTL42572). • The NAME OF THE PRODUCT (PROFORM® 525 treadmill). • The SERIAL NUMBER OF THE PRODUCT (see the front cover of this manual). • The KEY NUMBER OF THE PART(S) (see the ...


