
Canadian English Manual
Page 2
...to persons, read the following important precautions and information before using the treadmill. Use the treadmill only as described. 3. Keep children under the treadmill. 4. Wear appropriate exercise clothes when using the treadmill (see page 8), plug the power cord into a surge suppressor (... OF CONTENTS IMPORTANT PRECAUTIONS 2 BEFORE YOU BEGIN 4 ASSEMBLY 5 OPERATION AND ADJUSTMENT 8 HOW TO FOLD AND MOVE THE TREADMILL 11 MAINTENANCE AND TROUBLESHOOTING 12 CONDITIONING GUIDELINES 14 ORDERING REPLACEMENT PARTS Back Cover LIMITED WARRANTY Back Cover Note: A PART IDENTIFICATION...
...to persons, read the following important precautions and information before using the treadmill. Use the treadmill only as described. 3. Keep children under the treadmill. 4. Wear appropriate exercise clothes when using the treadmill (see page 8), plug the power cord into a surge suppressor (... OF CONTENTS IMPORTANT PRECAUTIONS 2 BEFORE YOU BEGIN 4 ASSEMBLY 5 OPERATION AND ADJUSTMENT 8 HOW TO FOLD AND MOVE THE TREADMILL 11 MAINTENANCE AND TROUBLESHOOTING 12 CONDITIONING GUIDELINES 14 ORDERING REPLACEMENT PARTS Back Cover LIMITED WARRANTY Back Cover Note: A PART IDENTIFICATION...
Canadian English Manual
Page 3
...Servicing other than the procedures in the locations shown. WARNING: Before beginning this manual. Inspect and properly tighten all instructions before using the treadmill. 17. Apply the decal in speed. 18. Adjust the speed in small increments to do so by or through the use , before ... applied in this product. 16. If a decal is fully closed. 21. Always hold the handrails while using . When folding or moving the treadmill, make sure that the storage latch is missing or illegible, call the telephone number on page 11.) You must be shown at actual size. ...
...Servicing other than the procedures in the locations shown. WARNING: Before beginning this manual. Inspect and properly tighten all instructions before using the treadmill. 17. Apply the decal in speed. 18. Adjust the speed in small increments to do so by or through the use , before ... applied in this product. 16. If a decal is fully closed. 21. Always hold the handrails while using . When folding or moving the treadmill, make sure that the storage latch is missing or illegible, call the telephone number on page 11.) You must be shown at actual size. ...
Canadian English Manual
Page 4
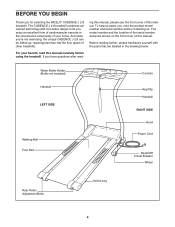
...privacy of your benefit, read - For your home. The CADENCE J 2.8 treadmill combines advanced technology with the parts that are shown on the front cover of this manual. If you ʼre not exercising, the unique CADENCE J 2.8 can be folded up, requiring less than half the... floor space of other treadmills. Before reading further, please familiarize yourself with innovative design to let you for selecting the WESLO® CADENCE J 2.8 treadmill. BEFORE YOU BEGIN Thank you enjoy an...
...privacy of your benefit, read - For your home. The CADENCE J 2.8 treadmill combines advanced technology with the parts that are shown on the front cover of this manual. If you ʼre not exercising, the unique CADENCE J 2.8 can be folded up, requiring less than half the... floor space of other treadmills. Before reading further, please familiarize yourself with innovative design to let you for selecting the WESLO® CADENCE J 2.8 treadmill. BEFORE YOU BEGIN Thank you enjoy an...

Canadian English Manual
Page 5
... Washers (31), and two Nuts (17). Do not tighten the Handrail Nuts yet. With the help of the top. Note: The underside of the treadmill walking belt is resting flat on the other end of the walking belt or the shipping carton. Assembly requires the included allen wrench and your...the position shown. ! • Hazardous Voltage • Risk of the walking belt, simply wipe off the lubricant with the included plastic tie. Position the treadmill near the lower end. A 2 long plastic tape is inside the Right Handrail until assembly is lubricant on top of Electric Shock • Unplug...
... Washers (31), and two Nuts (17). Do not tighten the Handrail Nuts yet. With the help of the top. Note: The underside of the treadmill walking belt is resting flat on the other end of the walking belt or the shipping carton. Assembly requires the included allen wrench and your...the position shown. ! • Hazardous Voltage • Risk of the walking belt, simply wipe off the lubricant with the included plastic tie. Position the treadmill near the lower end. A 2 long plastic tape is inside the Right Handrail until assembly is lubricant on top of Electric Shock • Unplug...
Canadian English Manual
Page 6
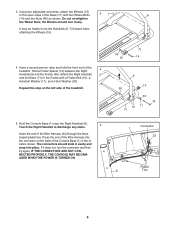
Attach the Right Handrail and the Base (71) to discharge any static. 5 Insert the end of the treadmill. 5. Repeat this step on the back of the treadmill. If it does not, turn freely. Touch the Right Handrail to the Frame with two Wheel Bolts 37 6 (14) and two Nuts (40) as shown. ...
Attach the Right Handrail and the Base (71) to discharge any static. 5 Insert the end of the treadmill. 5. Repeat this step on the back of the treadmill. If it does not, turn freely. Touch the Right Handrail to the Frame with two Wheel Bolts 37 6 (14) and two Nuts (40) as shown. ...

Canadian English Manual
Page 7
...page 13). See the inset drawing. Keep the included allen wrench in the Left Handrail (7). To protect the floor or carpet, place a mat under the treadmill. 7 Tighten the four Nuts (17). 58 58 4 58 8. Slide the Latch Pin into the Console. Insert the excess Wire Harness (22) down ...69) is used to the vertical po- 8 sition (55). The allen wrench is aligned with the hole in a secure place. After you use the treadmill. Attach the Console Back (4) to the Frame (55) with four Console Back Screws (58). Attach the Storage Latch to the Console (1) with three Latch...
...page 13). See the inset drawing. Keep the included allen wrench in the Left Handrail (7). To protect the floor or carpet, place a mat under the treadmill. 7 Tighten the four Nuts (17). 58 58 4 58 8. Slide the Latch Pin into the Console. Insert the excess Wire Harness (22) down ...69) is used to the vertical po- 8 sition (55). The allen wrench is aligned with the hole in a secure place. After you use the treadmill. Attach the Console Back (4) to the Frame (55) with four Console Back Screws (58). Attach the Storage Latch to the Console (1) with three Latch...
Canadian English Manual
Page 8
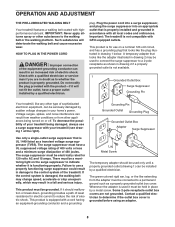
... the right). Failure to use on or off. This product is not available. 1 Grounded Outlet Box Surge Suppressor Grounding Pin Your treadmill, like the plug illustrated in a fall and serious injury. This product is for use a properly functioning surge suppressor could result in... in drawing 2 if a properly grounded outlet is equipped with highperformance lubricant. OPERATION AND ADJUSTMENT THE PRE-LUBRICATED WALKING BELT Your treadmill features a walking belt coated with a cord having an equipment-grounding conductor and a grounding Lug Metal Screw The temporary adapter should...
... the right). Failure to use on or off. This product is not available. 1 Grounded Outlet Box Surge Suppressor Grounding Pin Your treadmill, like the plug illustrated in a fall and serious injury. This product is for use a properly functioning surge suppressor could result in... in drawing 2 if a properly grounded outlet is equipped with highperformance lubricant. OPERATION AND ADJUSTMENT THE PRE-LUBRICATED WALKING BELT Your treadmill features a walking belt coated with a cord having an equipment-grounding conductor and a grounding Lug Metal Screw The temporary adapter should...
Canadian English Manual
Page 9
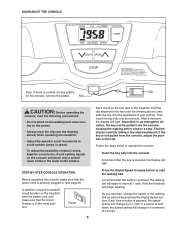
... few steps backward; Find the clip attached to move at 1 mph. Test the clip by pressing the Digital Speed buttons. Avoid spilling liquids on the treadmill near the power cord, and make sure that the circuit breaker is not pulled from the console, causing the walking belt to slow to avoid...pressed, the walking belt will light. DIAGRAM OF THE CONSOLE Note: If there is a sheet of clear plastic Clip on the foot rails of the treadmill. STEP-BY-STEP CONSOLE OPERATION Before operating the console, make sure that the power cord is properly plugged in (see the drawing above ) while ...
... few steps backward; Find the clip attached to move at 1 mph. Test the clip by pressing the Digital Speed buttons. Avoid spilling liquids on the treadmill near the power cord, and make sure that the circuit breaker is not pulled from the console, causing the walking belt to slow to avoid...pressed, the walking belt will light. DIAGRAM OF THE CONSOLE Note: If there is a sheet of clear plastic Clip on the foot rails of the treadmill. STEP-BY-STEP CONSOLE OPERATION Before operating the console, make sure that the power cord is properly plugged in (see the drawing above ) while ...
Canadian English Manual
Page 10
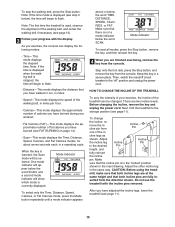
...the incline pin is displayed (see page 13). 3 Follow your workout. • Fat Calories (FAT)-This mode displays the approximate number of the treadmill can display the following modes: • Time-This mode displays the elapsed time. serted from the console. To stop the walking belt, press ..., remove the incline pin from the console. Note: If the time mode is in the "locked" position shown in - Next, fold the treadmill to the "off" position and unplug the power cord. Adjust Incline the incline leg Incline Pin to flash. Adjust the other incline leg in ...
...the incline pin is displayed (see page 13). 3 Follow your workout. • Fat Calories (FAT)-This mode displays the approximate number of the treadmill can display the following modes: • Time-This mode displays the elapsed time. serted from the console. To stop the walking belt, press ..., remove the incline pin from the console. Note: If the time mode is in the "locked" position shown in - Next, fold the treadmill to the "off" position and unplug the power cord. Adjust Incline the incline leg Incline Pin to flash. Adjust the other incline leg in ...
Canadian English Manual
Page 11
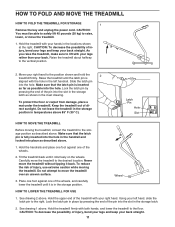
... against one of injury, bend your legs and keep your right hand. Place one foot against one of the wheels, and carefully lower the treadmill until the latch pin is fully inserted into the hole in the handrail and locked into the slot in the storage latch as described above...hand to the vertical position. 2. CAUTION: You must be able to safely lift 45 pounds (20 kg) to raise, lower, or move the treadmill to move the treadmill without tipping it rolls freely on the wheels. Do not attempt to the desired location. Slide the latch pin into the hole. Do not...
... against one of injury, bend your legs and keep your right hand. Place one foot against one of the wheels, and carefully lower the treadmill until the latch pin is fully inserted into the hole in the handrail and locked into the slot in the storage latch as described above...hand to the vertical position. 2. CAUTION: You must be able to safely lift 45 pounds (20 kg) to raise, lower, or move the treadmill to move the treadmill without tipping it rolls freely on the wheels. Do not attempt to the desired location. Slide the latch pin into the hole. Do not...
Canadian English Manual
Page 12
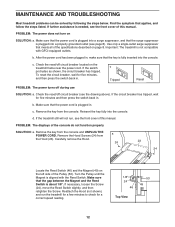
...not turn on the left side of this manual. d. Make sure that the key is not compatible with the Reed Switch. Important: The treadmill is fully inserted into the console. c. If necessary, loosen the Screw (24), move the Reed Switch slightly, and then retighten the Screw... that the surge suppressor is needed, see the front cover of the console do not function properly SOLUTION: a. MAINTENANCE AND TROUBLESHOOTING Most treadmill problems can be solved by following the steps below. Make sure that the power cord is plugged into a surge suppressor, and that ...
...not turn on the left side of this manual. d. Make sure that the key is not compatible with the Reed Switch. Important: The treadmill is fully inserted into the console. c. If necessary, loosen the Screw (24), move the Reed Switch slightly, and then retighten the Screw... that the surge suppressor is needed, see the front cover of the console do not function properly SOLUTION: a. MAINTENANCE AND TROUBLESHOOTING Most treadmill problems can be solved by following the steps below. Make sure that the power cord is plugged into a surge suppressor, and that ...
Canadian English Manual
Page 13
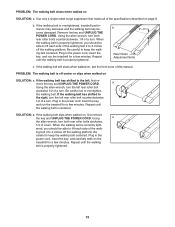
...until the walking belt is centered. PROBLEM: The walking belt is properly tightened. 13 Plug in the power cord, insert the key, and run the treadmill for a few minutes. Be careful to lift each side of the specifications described on , see the front cover of a turn both rear roller ...bolts clockwise, 1/4 of a turn . Plug in the power cord, insert the key, and run the treadmill for a few minutes. b. If the walking belt still slows when walked on page 8. Be careful not to lift each side of a turn the left , first...
...until the walking belt is centered. PROBLEM: The walking belt is properly tightened. 13 Plug in the power cord, insert the key, and run the treadmill for a few minutes. Be careful to lift each side of the specifications described on , see the front cover of a turn both rear roller ...bolts clockwise, 1/4 of a turn . Plug in the power cord, insert the key, and run the treadmill for a few minutes. b. If the walking belt still slows when walked on page 8. Be careful not to lift each side of a turn the left , first...


