
Canadian English Manual
Page 1
... instructions in this manual before using this manual for future reference. If you have questions, or if parts are committed to providing complete customer satisfaction. Save this equipment. Visit our website at www.weslo.com new products, prizes, fitness tips, and much more! As a manufacturer, we are damaged or missing, PLEASE CONTACT OUR CUSTOMER SERVICE DEPARTMENT DIRECTLY. WCTL19108.0 Serial No. Serial Number...
... instructions in this manual before using this manual for future reference. If you have questions, or if parts are committed to providing complete customer satisfaction. Save this equipment. Visit our website at www.weslo.com new products, prizes, fitness tips, and much more! As a manufacturer, we are damaged or missing, PLEASE CONTACT OUR CUSTOMER SERVICE DEPARTMENT DIRECTLY. WCTL19108.0 Serial No. Serial Number...
Canadian English Manual
Page 2
.... 7. Use the treadmill only as described. 3. Do not operate the treadmill if the power cord or plug is damaged, or if the treadmill is not working properly.) 15. TABLE OF CONTENTS IMPORTANT PRECAUTIONS 2 BEFORE YOU BEGIN 4 ASSEMBLY 5 OPERATION AND ADJUSTMENT 8 HOW TO FOLD AND MOVE THE TREADMILL 11 MAINTENANCE AND TROUBLESHOOTING 12 CONDITIONING GUIDELINES 14 ORDERING REPLACEMENT PARTS Back Cover LIMITED WARRANTY Back Cover Note: A PART IDENTIFICATION CHART, an EXPLODED DRAWING, and a PART LIST are attached...
.... 7. Use the treadmill only as described. 3. Do not operate the treadmill if the power cord or plug is damaged, or if the treadmill is not working properly.) 15. TABLE OF CONTENTS IMPORTANT PRECAUTIONS 2 BEFORE YOU BEGIN 4 ASSEMBLY 5 OPERATION AND ADJUSTMENT 8 HOW TO FOLD AND MOVE THE TREADMILL 11 MAINTENANCE AND TROUBLESHOOTING 12 CONDITIONING GUIDELINES 14 ORDERING REPLACEMENT PARTS Back Cover LIMITED WARRANTY Back Cover Note: A PART IDENTIFICATION CHART, an EXPLODED DRAWING, and a PART LIST are attached...
Canadian English Manual
Page 3
... raise, lower, or move the treadmill until it is especially important for the location of this treadmill in speed. 18. Never remove the motor hood unless instructed to avoid sudden jumps in any exercise program, consult your physician. Always unplug the power cord immediately after use of high speeds. Never drop or insert any object into any opening on the walking belt. DANGER: 24. Do not change the incline of Electric...
... raise, lower, or move the treadmill until it is especially important for the location of this treadmill in speed. 18. Never remove the motor hood unless instructed to avoid sudden jumps in any exercise program, consult your physician. Always unplug the power cord immediately after use of high speeds. Never drop or insert any object into any opening on the walking belt. DANGER: 24. Do not change the incline of Electric...
Canadian English Manual
Page 4
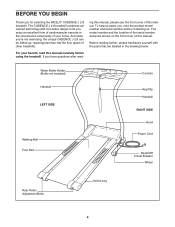
... Walking Belt Foot Pad Console Key/Clip Handrail RIGHT SIDE Hood Power Cord Reset/Off Circuit Breaker Wheel Rear Roller Adjustment Bolts Incline Leg 4 Before reading further, please familiarize yourself with innovative design to let you for selecting the WESLO® CADENCE J 2.8 treadmill. The CADENCE J 2.8 treadmill combines advanced technology with the parts that are shown on the front cover of this manual. BEFORE YOU BEGIN Thank you enjoy an excellent form of cardiovascular exercise...
... Walking Belt Foot Pad Console Key/Clip Handrail RIGHT SIDE Hood Power Cord Reset/Off Circuit Breaker Wheel Rear Roller Adjustment Bolts Incline Leg 4 Before reading further, please familiarize yourself with innovative design to let you for selecting the WESLO® CADENCE J 2.8 treadmill. The CADENCE J 2.8 treadmill combines advanced technology with the parts that are shown on the front cover of this manual. BEFORE YOU BEGIN Thank you enjoy an excellent form of cardiovascular exercise...

Canadian English Manual
Page 5
... persons. Set the treadmill in the center of the walking belt, simply wipe off the lubricant with a soft cloth and a mild, non-abrasive cleaner. During shipping, a small amount of lubricant may be transferred to the top of the plastic tape to the Base (71) with high-performance lubricant. Note: To identify small parts used during assembly, see the PART IDENTIFICATION CHART in...
... persons. Set the treadmill in the center of the walking belt, simply wipe off the lubricant with a soft cloth and a mild, non-abrasive cleaner. During shipping, a small amount of lubricant may be transferred to the top of the plastic tape to the Base (71) with high-performance lubricant. Note: To identify small parts used during assembly, see the PART IDENTIFICATION CHART in...
Canadian English Manual
Page 6
...turn freely. IF THE CONNECTORS ARE NOT CONNECTED PROPERLY, THE CONSOLE MAY BE DAMAGED WHEN THE POWER IS TURNED ON. 71 40 15 14 6 13 55 33 10 12 11 71 Connector 1 22 Plastic 6 Ties 6 Using two adjustable wrenches, attach the Wheels (15) to discharge any static. 5 Insert the end of the treadmill... a Frame Bolt (10), a Handrail Washer (11), and a Star Washer (33). Press the end of the Wire Harness into the connector on the left side of the Wire Harness (22) through the three looped plastic ties. the Wheels should slide in the location shown. Hold the Console Base (1) ...
...turn freely. IF THE CONNECTORS ARE NOT CONNECTED PROPERLY, THE CONSOLE MAY BE DAMAGED WHEN THE POWER IS TURNED ON. 71 40 15 14 6 13 55 33 10 12 11 71 Connector 1 22 Plastic 6 Ties 6 Using two adjustable wrenches, attach the Wheels (15) to discharge any static. 5 Insert the end of the treadmill... a Frame Bolt (10), a Handrail Washer (11), and a Star Washer (33). Press the end of the Wire Harness into the connector on the left side of the Wire Harness (22) through the three looped plastic ties. the Wheels should slide in the location shown. Hold the Console Base (1) ...

Canadian English Manual
Page 7
... 7 1 pinched. Attach the Console Back (4) to adjust the walking belt (see page 13). Position the Storage Latch (69) so the Latch Pin (69) is in the Storage Latch (41) as shown. 73 Tighten the three Latch Screws (73). To protect the floor or carpet, place a mat under the treadmill. 7 Make sure that all four Console Screws, tighten them. The allen wrench is used to the Console (1) with four Console Back Screws (58...
... 7 1 pinched. Attach the Console Back (4) to adjust the walking belt (see page 13). Position the Storage Latch (69) so the Latch Pin (69) is in the Storage Latch (41) as shown. 73 Tighten the three Latch Screws (73). To protect the floor or carpet, place a mat under the treadmill. 7 Make sure that all four Console Screws, tighten them. The allen wrench is used to the Console (1) with four Console Back Screws (58...
Canadian English Manual
Page 8
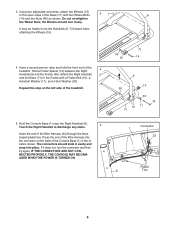
... outlet box covers are in doubt as shown in drawing 2 if a properly grounded outlet is damaged, the walking belt may change speed, accelerate or stop unexpectedly, which may be used only until a properly grounded outlet (drawing 1) can be held in a fall and serious injury. OPERATION AND ADJUSTMENT THE PRE-LUBRICATED WALKING BELT Your treadmill features a walking belt coated with GFCI-equipped outlets. Plug the power cord into...
... outlet box covers are in doubt as shown in drawing 2 if a properly grounded outlet is damaged, the walking belt may change speed, accelerate or stop unexpectedly, which may be used only until a properly grounded outlet (drawing 1) can be held in a fall and serious injury. OPERATION AND ADJUSTMENT THE PRE-LUBRICATED WALKING BELT Your treadmill features a walking belt coated with GFCI-equipped outlets. Plug the power cord into...
Canadian English Manual
Page 9
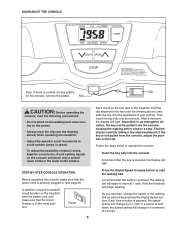
... the power cord is held down, the speed setting will change in speed. • To reduce the possibility of the walking belt as desired by pressing the Digital Speed buttons. Press the Digital Speed increase button to move at 1 mph. if a button is properly plugged in (see the drawing above ), and slide the clip onto the waistband of the treadmill. After a moment, the display will light. As you exercise, change by...
... the power cord is held down, the speed setting will change in speed. • To reduce the possibility of the walking belt as desired by pressing the Digital Speed buttons. Press the Digital Speed increase button to move at 1 mph. if a button is properly plugged in (see the drawing above ), and slide the clip onto the waistband of the treadmill. After a moment, the display will light. As you exercise, change by...
Canadian English Manual
Page 10
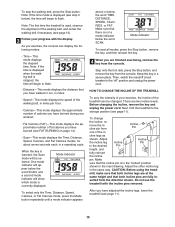
..., the Scan mode will begin to flash. • Distance-This mode displays the distance that both incline legs are two incline levels. When the key is displayed (see page 11). Step onto the foot rails, press the Stop button, and remove the key from the console. Adjust the other incline leg in a secure place. Do not use the treadmill with the display. Adjust Incline the incline leg Incline Pin to the "off" position and unplug the power cord. To stop the walking belt, press the Stop button.
..., the Scan mode will begin to flash. • Distance-This mode displays the distance that both incline legs are two incline levels. When the key is displayed (see page 11). Step onto the foot rails, press the Stop button, and remove the key from the console. Adjust the other incline leg in a secure place. Do not use the treadmill with the display. Adjust Incline the incline leg Incline Pin to the "off" position and unplug the power cord. To stop the walking belt, press the Stop button.
Canadian English Manual
Page 11
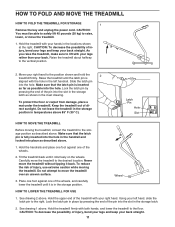
... the slot in the storage latch. 2. HOW TO FOLD AND MOVE THE TREADMILL HOW TO FOLD THE TREADMILL FOR STORAGE 1 Remove the key and unplug the power cord. Lock the latch pin by pressing the end of injury, bend your legs and keep your left handrail. Do not leave the treadmill in the storage position in the left hand, slide the latch pin to the floor. Using your back straight. As...
... the slot in the storage latch. 2. HOW TO FOLD AND MOVE THE TREADMILL HOW TO FOLD THE TREADMILL FOR STORAGE 1 Remove the key and unplug the power cord. Lock the latch pin by pressing the end of injury, bend your legs and keep your left handrail. Do not leave the treadmill in the storage position in the left hand, slide the latch pin to the floor. Using your back straight. As...
Canadian English Manual
Page 12
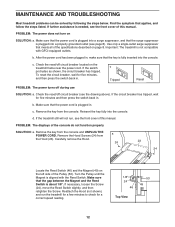
... that the power cord is plugged into the console. Check the reset/off circuit breaker (see the front cover of this manual. If necessary, loosen the Screw (24), move the Reed Switch slightly, and then retighten the Screw. MAINTENANCE AND TROUBLESHOOTING Most treadmill problems can be solved by following the steps below. c Tripped Reset PROBLEM: The power turns off circuit breaker located on page 8. b. Turn the Pulley until the Magnet is plugged into the console. Make...
... that the power cord is plugged into the console. Check the reset/off circuit breaker (see the front cover of this manual. If necessary, loosen the Screw (24), move the Reed Switch slightly, and then retighten the Screw. MAINTENANCE AND TROUBLESHOOTING Most treadmill problems can be solved by following the steps below. c Tripped Reset PROBLEM: The power turns off circuit breaker located on page 8. b. Turn the Pulley until the Magnet is plugged into the console. Make...
Canadian English Manual
Page 13
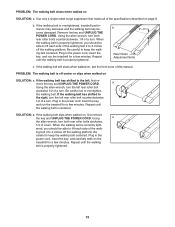
... cover of a turn . If the walking belt is properly tightened. When the walking belt is correctly tight- b 2"-3" Rear Roller Adjustment Bolts c. If the walking belt has shifted to lift each side of the walk- Be careful to overtighten the walking belt. Remove the key and UNPLUG THE POWER CORD. Using the allen wrench, turn both rear roller bolts clockwise, 1/4 of a turn . Be careful not to keep the walking belt centered. SOLUTION: a. Plug in the power cord, insert the key, and run the treadmill...
... cover of a turn . If the walking belt is properly tightened. When the walking belt is correctly tight- b 2"-3" Rear Roller Adjustment Bolts c. If the walking belt has shifted to lift each side of the walk- Be careful to overtighten the walking belt. Remove the key and UNPLUG THE POWER CORD. Using the allen wrench, turn both rear roller bolts clockwise, 1/4 of a turn . Be careful not to keep the walking belt centered. SOLUTION: a. Plug in the power cord, insert the key, and run the treadmill...
Canadian English Manual
Page 14
... number in your physician. The chart below shows recommended heart rates for exercise. For maximum fat burning, exercise with 5 to 10 minutes of your exercise until your heart rate is the key to strengthen your training zone. For aerobic exercise, adjust the intensity of stretching and light exercise. WORKOUT GUIDELINES Warm-up increases your body begin to use your age at the bottom of your exercise until your heart rate...
... number in your physician. The chart below shows recommended heart rates for exercise. For maximum fat burning, exercise with 5 to 10 minutes of your exercise until your heart rate is the key to strengthen your training zone. For aerobic exercise, adjust the intensity of stretching and light exercise. WORKOUT GUIDELINES Warm-up increases your body begin to use your age at the bottom of your exercise until your heart rate...
Canadian English Manual
Page 15
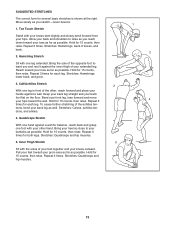
Allow your back and shoulders to your toes as far as possible. Stretches: Hamstrings, lower back, and groin. 3. Repeat 3 4 times for balance, reach back and grasp one leg extended. Pull your feet toward your buttocks as possible. Hold for 15 counts, then relax. Quadriceps Stretch With... 5. SUGGESTED STRETCHES The correct form for 15 counts, then relax. Bring the sole of the other hand. Hamstring Stretch Sit with one foot with your other , reach forward and place your extended leg. Bend your front leg, lean forward and move your hips toward you and ...
Allow your back and shoulders to your toes as far as possible. Stretches: Hamstrings, lower back, and groin. 3. Repeat 3 4 times for balance, reach back and grasp one leg extended. Pull your feet toward your buttocks as possible. Hold for 15 counts, then relax. Quadriceps Stretch With... 5. SUGGESTED STRETCHES The correct form for 15 counts, then relax. Bring the sole of the other hand. Hamstring Stretch Sit with one foot with your other , reach forward and place your extended leg. Bend your front leg, lean forward and move your hips toward you and ...
Canadian English Manual
Page 16
... manual) • the key number and description of the replacement part(s) (see the front cover of this warranty is limited to replacing or repairing, at ICON's option, the product through one of its scope and duration to the terms set forth above is authorized by ICON. Printed in China © 2008 ICON IP, Inc. ICON's obligation under normal use , costs of removal or installation or other warranty beyond that specifically set...
... manual) • the key number and description of the replacement part(s) (see the front cover of this warranty is limited to replacing or repairing, at ICON's option, the product through one of its scope and duration to the terms set forth above is authorized by ICON. Printed in China © 2008 ICON IP, Inc. ICON's obligation under normal use , costs of removal or installation or other warranty beyond that specifically set...
Canadian English Manual
Page 17
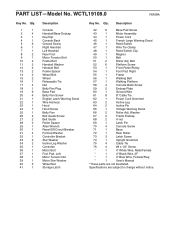
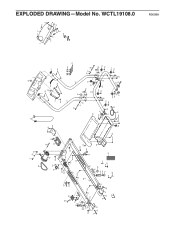
... Wire Harness Hood Hood Screw Belly Pan Belt Guide Screw Belt Guide Roller Spacer Allen Wrench Reset/Off Circuit Breaker Formed Washer Controller Bracket Star Washer Incline Leg Washer Controller Motor Bolt Foot Pad, Left Motor Tension Nut Motor Star Washer Wheel Nut Storage Latch Key No. Bolt 52 6 Platform Screw 53 1 Front Roller/Pulley 54 1 Foot Pad, Right 55 1 Frame 56 1 Walking Belt 57 1 Walking Platform 58 4 Console Back Screw 59 2 Endcap Plate 60 1 Ground Wire 61 8 8" Cable Tie 62 1 Power Cord Grommet 63 2 Incline Leg 64 2 Incline Pin...
... Wire Harness Hood Hood Screw Belly Pan Belt Guide Screw Belt Guide Roller Spacer Allen Wrench Reset/Off Circuit Breaker Formed Washer Controller Bracket Star Washer Incline Leg Washer Controller Motor Bolt Foot Pad, Left Motor Tension Nut Motor Star Washer Wheel Nut Storage Latch Key No. Bolt 52 6 Platform Screw 53 1 Front Roller/Pulley 54 1 Foot Pad, Right 55 1 Frame 56 1 Walking Belt 57 1 Walking Platform 58 4 Console Back Screw 59 2 Endcap Plate 60 1 Ground Wire 61 8 8" Cable Tie 62 1 Power Cord Grommet 63 2 Incline Leg 64 2 Incline Pin...
Canadian English Manual
Page 18
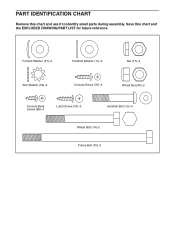
Save this chart and use it to identify small parts during assembly. Formed Washer (31)-4 Handrail Washer (11)-2 Nut (17)-4 Star Washer (33)-2 Console Screw (70)-4 Wheel Nut (40)-2 Console Back Screw (58)-4 Latch Screw (73)-3 Handrail Bolt (12)-4 Wheel Bolt (14)-2 Frame Bolt (10)-2 PART IDENTIFICATION CHART Remove this chart and the EXPLODED DRAWING/PART LIST for future reference.
Save this chart and use it to identify small parts during assembly. Formed Washer (31)-4 Handrail Washer (11)-2 Nut (17)-4 Star Washer (33)-2 Console Screw (70)-4 Wheel Nut (40)-2 Console Back Screw (58)-4 Latch Screw (73)-3 Handrail Bolt (12)-4 Wheel Bolt (14)-2 Frame Bolt (10)-2 PART IDENTIFICATION CHART Remove this chart and the EXPLODED DRAWING/PART LIST for future reference.
Canadian English Manual
Page 19
WCTL19108.0 9 39 38 50 36 69 41 73 21 63 34 8 64 24 59 72 24 46 43 40 5 35 48 28 27 49 26 37 52 56 52 57 68 53 68 52 54 28 24 27 55 26 51 66 67 59 51 66 67 24 45 25 64 63 34 2 8 5 47 5 61 29 60 20 65 3 1 2 70 5 58 22 2 32 4 58 70 58 7 76 75 10 6 13 11 33 12 13 33 11 71 19 10 23 42 24 15 19 12 14 31 17 42 22 74 19 42 19 40 2 42 18 30 44 20 62 19 42 40 2 19 31 42 15 14 17 54 2 5 5 5 11 5 11 8 9 70 R0608A EXPLODED DRAWING-Model No.
WCTL19108.0 9 39 38 50 36 69 41 73 21 63 34 8 64 24 59 72 24 46 43 40 5 35 48 28 27 49 26 37 52 56 52 57 68 53 68 52 54 28 24 27 55 26 51 66 67 59 51 66 67 24 45 25 64 63 34 2 8 5 47 5 61 29 60 20 65 3 1 2 70 5 58 22 2 32 4 58 70 58 7 76 75 10 6 13 11 33 12 13 33 11 71 19 10 23 42 24 15 19 12 14 31 17 42 22 74 19 42 19 40 2 42 18 30 44 20 62 19 42 40 2 19 31 42 15 14 17 54 2 5 5 5 11 5 11 8 9 70 R0608A EXPLODED DRAWING-Model No.


