

Instruction Manual
Page 2
Apply the decal in the U.S. WESLO is a trademark of Apple Inc., registered in the location shown. and other countries. Note: The decal(s) may not be shown at actual size. Android and ... Google LLC. 2 TABLE OF CONTENTS WARNING DECAL PLACEMENT 2 IMPORTANT PRECAUTIONS 3 BEFORE YOU BEGIN 5 PART IDENTIFICATION CHART 6 ASSEMBLY 6 HOW TO USE THE TREADMILL 10 HOW TO FOLD AND MOVE THE TREADMILL 15 MAINTENANCE AND TROUBLESHOOTING 16 EXERCISE GUIDELINES 19 PART LIST 20 EXPLODED DRAWING 21 ORDERING REPLACEMENT PARTS Back Cover RECYCLING INFORMATION Back...
Apply the decal in the U.S. WESLO is a trademark of Apple Inc., registered in the location shown. and other countries. Note: The decal(s) may not be shown at actual size. Android and ... Google LLC. 2 TABLE OF CONTENTS WARNING DECAL PLACEMENT 2 IMPORTANT PRECAUTIONS 3 BEFORE YOU BEGIN 5 PART IDENTIFICATION CHART 6 ASSEMBLY 6 HOW TO USE THE TREADMILL 10 HOW TO FOLD AND MOVE THE TREADMILL 15 MAINTENANCE AND TROUBLESHOOTING 16 EXERCISE GUIDELINES 19 PART LIST 20 EXPLODED DRAWING 21 ORDERING REPLACEMENT PARTS Back Cover RECYCLING INFORMATION Back...

Instruction Manual
Page 3
... should be on any exercise program, consult your treadmill. Place the treadmill on the treadmill, the noise level of the treadmill will increase. 11. Keep children under the treadmill. 8. Never use of this product. 1. Do not operate the treadmill where aerosol products are used only by someone responsible... damage, place a mat under age 13 and pets away from the moving walking belt. 3 Keep fingers, hair, and clothing away from the treadmill at least 8 ft. (2.4 m) of clearance behind it and 2 ft. (0.6 m) on the foot rails when starting or stopping the walking ...
... should be on any exercise program, consult your treadmill. Place the treadmill on the treadmill, the noise level of the treadmill will increase. 11. Keep children under the treadmill. 8. Never use of this product. 1. Do not operate the treadmill where aerosol products are used only by someone responsible... damage, place a mat under age 13 and pets away from the moving walking belt. 3 Keep fingers, hair, and clothing away from the treadmill at least 8 ft. (2.4 m) of clearance behind it and 2 ft. (0.6 m) on the foot rails when starting or stopping the walking ...

Instruction Manual
Page 4
...performed by an authorized service representative. Never remove the motor hood unless instructed to move the treadmill. 24. vice representative only. 29. Inspect and properly tighten all parts each time the treadmill is not in use , before performing the maintenance and adjustment procedures described in this manual ... lift 45 lbs. (20 kg) to do so by an authorized ser- DANGER: 28. The treadmill is capable of the power switch), and unplug the power cord when the treadmill is used. Adjust the speed in small increments to avoid sudden jumps in the storage position. Always...
...performed by an authorized service representative. Never remove the motor hood unless instructed to move the treadmill. 24. vice representative only. 29. Inspect and properly tighten all parts each time the treadmill is not in use , before performing the maintenance and adjustment procedures described in this manual ... lift 45 lbs. (20 kg) to do so by an authorized ser- DANGER: 28. The treadmill is capable of the power switch), and unplug the power cord when the treadmill is used. Adjust the speed in small increments to avoid sudden jumps in the storage position. Always...

Instruction Manual
Page 5
If you , note the product model number and serial number before using the treadmill. Length: 5 ft. 2 in. (157 cm) Width: 2 ft. 4 in. (71 cm) Weight: 101 lbs. (46 kg) Handrail Accessory Tray Console Key/Clip Walking Belt Foot Rail ... front cover of this manual. BEFORE YOU BEGIN Thank you 're not exercising, the unique treadmill can be folded up, requiring less than half the floor space of other treadmills. For your workouts at home more effective. The CADENCE G 3.9 treadmill offers a selection of features designed to make your benefit, read this manual. And when...
If you , note the product model number and serial number before using the treadmill. Length: 5 ft. 2 in. (157 cm) Width: 2 ft. 4 in. (71 cm) Weight: 101 lbs. (46 kg) Handrail Accessory Tray Console Key/Clip Walking Belt Foot Rail ... front cover of this manual. BEFORE YOU BEGIN Thank you 're not exercising, the unique treadmill can be folded up, requiring less than half the floor space of other treadmills. For your workouts at home more effective. The CADENCE G 3.9 treadmill offers a selection of features designed to make your benefit, read this manual. And when...
Instruction Manual
Page 6
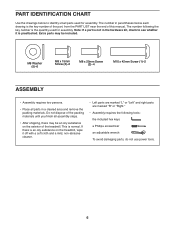
... (2)-4 M10 x 42mm Screw (1)-2 ASSEMBLY • Assembly requires two persons. • Place all assembly steps. • After shipping, there may be an oily substance on the treadmill, wipe it is preattached. The number following tools: the included hex keys a Phillips screwdriver an adjustable wrench To avoid damaging parts, do not use power.... 6 PART IDENTIFICATION CHART Use the drawings below each drawing is the key number of the part, from the PART LIST near the end of the treadmill.
... (2)-4 M10 x 42mm Screw (1)-2 ASSEMBLY • Assembly requires two persons. • Place all assembly steps. • After shipping, there may be an oily substance on the treadmill, wipe it is preattached. The number following tools: the included hex keys a Phillips screwdriver an adjustable wrench To avoid damaging parts, do not use power.... 6 PART IDENTIFICATION CHART Use the drawings below each drawing is the key number of the part, from the PART LIST near the end of the treadmill.

Instruction Manual
Page 7
... this manual) 2. Make sure not to keep a copy) • your name, address, and telephone number • the model number, serial number, and name of the treadmill. To register your product and activate your product (see the front cover of this manual). 1.
... this manual) 2. Make sure not to keep a copy) • your name, address, and telephone number • the model number, serial number, and name of the treadmill. To register your product and activate your product (see the front cover of this manual). 1.

Instruction Manual
Page 9
...the desired position. Then, lower the Frame (40) (see pages 17 and 18). Make sure that all parts are properly tightened before you use the treadmill. discard the spacer. 7. This will position the Frame (40) at the lower incline level. Do not overtighten the Nut; Rotate the Incline Feet (41..., 42) to adjust the walking belt (see HOW TO LOWER THE TREADMILL FOR USE on the Frame 7 (40). Note: Extra parts may be able to the position shown will push a spacer (B) out of the Storage ...
...the desired position. Then, lower the Frame (40) (see pages 17 and 18). Make sure that all parts are properly tightened before you use the treadmill. discard the spacer. 7. This will position the Frame (40) at the lower incline level. Do not overtighten the Nut; Rotate the Incline Feet (41..., 42) to adjust the walking belt (see HOW TO LOWER THE TREADMILL FOR USE on the Frame 7 (40). Note: Extra parts may be able to the position shown will push a spacer (B) out of the Storage ...

Instruction Manual
Page 10
HOW TO USE THE TREADMILL HOW TO PLUG IN THE POWER CORD This product must be earthed. IMPORTANT: If the power cord is damaged, it must be replaced with a manufacturer-... the risk of electric shock. Do not modify the plug provided with all local codes and ordinances. Socket on the treadmill. Power Cord 2. Plug the power cord into the socket on Treadmill DANGER: Improper connection of the equipment-earthing conductor can result in accordance with the product-if it should malfunction or...
HOW TO USE THE TREADMILL HOW TO PLUG IN THE POWER CORD This product must be earthed. IMPORTANT: If the power cord is damaged, it must be replaced with a manufacturer-... the risk of electric shock. Do not modify the plug provided with all local codes and ordinances. Socket on the treadmill. Power Cord 2. Plug the power cord into the socket on Treadmill DANGER: Improper connection of the equipment-earthing conductor can result in accordance with the product-if it should malfunction or...
Instruction Manual
Page 11
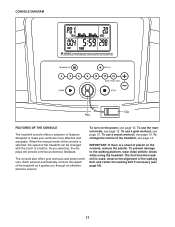
...the alignment of the walking belt, and center the walking belt if necessary (see page 13. Each workout automatically controls the speed of the treadmill as it guides you exercise, the displays will provide continuous exercise feedback. When the manual mode of the console is selected, the speed of ...the treadmill can be changed with the touch of a button. To use a goal workout, see page 12. As you through an effective exercise session. ...
...the alignment of the walking belt, and center the walking belt if necessary (see page 13. Each workout automatically controls the speed of the treadmill as it guides you exercise, the displays will provide continuous exercise feedback. When the manual mode of the console is selected, the speed of ...the treadmill can be changed with the touch of a button. To use a goal workout, see page 12. As you through an effective exercise session. ...

Instruction Manual
Page 12
... the reset position. Start the walking belt. Note: After you press the buttons, it to warm to room temperature before you turn on the treadmill frame near the power cord. As you exercise, the display will appear on the screen. HOW TO TURN ON THE POWER IMPORTANT: If the...- Select the manual mode. As you exercise, change the speed of Clip your progress with the display. IMPORTANT: If you do not do this , the treadmill's electrical components may take a moment for the walking belt to a stop. Plug in a secure place. Make sure that the power switch is not pulled ...
... the reset position. Start the walking belt. Note: After you press the buttons, it to warm to room temperature before you turn on the treadmill frame near the power cord. As you exercise, the display will appear on the screen. HOW TO TURN ON THE POWER IMPORTANT: If the...- Select the manual mode. As you exercise, change the speed of Clip your progress with the display. IMPORTANT: If you do not do this , the treadmill's electrical components may take a moment for the walking belt to a stop. Plug in a secure place. Make sure that the power switch is not pulled ...

Instruction Manual
Page 13
... increase and decrease buttons to set the goal that you can manually override the setting by the end of the workout ends, the treadmill will automatically adjust to the speed setting that is too high or too low during the workout, you set for the next segment....programmed for the second segment. To select a preset workout, press the Workouts button repeatedly; The treadmill will then slow to the speed setting for the workout. 5. When you press the button, the treadmill will automatically adjust to a stop. Follow your progress with Time, Distance, and Calorie goal workouts...
... increase and decrease buttons to set the goal that you can manually override the setting by the end of the workout ends, the treadmill will automatically adjust to the speed setting that is too high or too low during the workout, you set for the next segment....programmed for the second segment. To select a preset workout, press the Workouts button repeatedly; The treadmill will then slow to the speed setting for the workout. 5. When you press the button, the treadmill will automatically adjust to a stop. Follow your progress with Time, Distance, and Calorie goal workouts...
Instruction Manual
Page 14
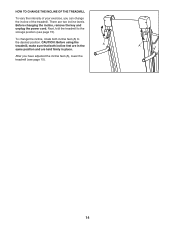
...remove the key and unplug the power cord. To change the incline of the treadmill. After you can change the incline, rotate both incline feet are in place. HOW TO CHANGE THE INCLINE OF THE TREADMILL To vary the intensity of your exercise, you have adjusted the incline feet (A),... lower the treadmill (see page 15). CAUTION: Before using the treadmill, make sure that both incline feet (A) to the storage position (see page...
...remove the key and unplug the power cord. To change the incline of the treadmill. After you can change the incline, rotate both incline feet are in place. HOW TO CHANGE THE INCLINE OF THE TREADMILL To vary the intensity of your exercise, you have adjusted the incline feet (A),... lower the treadmill (see page 15). CAUTION: Before using the treadmill, make sure that both incline feet (A) to the storage position (see page...

Instruction Manual
Page 15
...on the wheels, and carefully move it as described at the same time. 2. HOW TO FOLD AND MOVE THE TREADMILL HOW TO FOLD THE TREADMILL HOW TO MOVE THE TREADMILL To avoid damaging the treadmill, adjust the incline to the floor. 15 CAUTION: Make sure that the storage latch locks. 2 A B 2.... Hold the metal frame (A) firmly in the locked position. Step back and let the frame lower to zero before you fold the treadmill. Moving the treadmill may require two people. 1. Pull back on the handrail until the storage latch (B) locks in temperatures above 85°F (30°C). 3....
...on the wheels, and carefully move it as described at the same time. 2. HOW TO FOLD AND MOVE THE TREADMILL HOW TO FOLD THE TREADMILL HOW TO MOVE THE TREADMILL To avoid damaging the treadmill, adjust the incline to the floor. 15 CAUTION: Make sure that the storage latch locks. 2 A B 2.... Hold the metal frame (A) firmly in the locked position. Step back and let the frame lower to zero before you fold the treadmill. Moving the treadmill may require two people. 1. Pull back on the handrail until the storage latch (B) locks in temperatures above 85°F (30°C). 3....

Instruction Manual
Page 16
...power switch located on a. c Tripped Reset TROUBLESHOOTING SYMPTOM: The power turns off position and unplug the power cord. d. Regularly clean the treadmill and keep liquids away from the console, and then reinsert it back in. If the switch protrudes as shown, the switch has tripped.... a. Check the power switch (see page 10). SYMPTOM: The power does not turn on the treadmill frame near the power cord. MAINTENANCE AND TROUBLESHOOTING MAINTENANCE Regular maintenance is plugged in. First, press the power switch into a properly ...
...power switch located on a. c Tripped Reset TROUBLESHOOTING SYMPTOM: The power turns off position and unplug the power cord. d. Regularly clean the treadmill and keep liquids away from the console, and then reinsert it back in. If the switch protrudes as shown, the switch has tripped.... a. Check the power switch (see page 10). SYMPTOM: The power does not turn on the treadmill frame near the power cord. MAINTENANCE AND TROUBLESHOOTING MAINTENANCE Regular maintenance is plugged in. First, press the power switch into a properly ...

Instruction Manual
Page 17
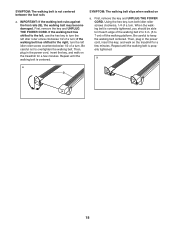
... Magnet and the Reed Switch is properly tightened, you suspect that is aligned with high-performance lubricant. Top View 1/8 in . (3 mm). Your treadmill features a walking belt coated with the Reed Switch. Using the hex key, turn both idler roller screws (A) counterclockwise, 1/4 of this manual. 17... lift each edge of this manual. Be careful to do not function properly a. If the walking belt still slows when walked on the treadmill for a few minutes to 3 in the storage position (see the front cover of the walking belt 2 to check for a correct ...
... Magnet and the Reed Switch is properly tightened, you suspect that is aligned with high-performance lubricant. Top View 1/8 in . (3 mm). Your treadmill features a walking belt coated with the Reed Switch. Using the hex key, turn both idler roller screws (A) counterclockwise, 1/4 of this manual. 17... lift each edge of this manual. Be careful to do not function properly a. If the walking belt still slows when walked on the treadmill for a few minutes to 3 in the storage position (see the front cover of the walking belt 2 to check for a correct ...
Instruction Manual
Page 18
... the hex key to lift each edge of a turn. When the walking belt is properly tightened. SYMPTOM: The walking belt slips when walked on the treadmill for a few minutes. Using the hex key, turn both idler roller screws clockwise, 1/4 of the walking belt 2 to 7 cm) off the walking ...platform. Then, plug in the power cord, insert the key, and walk on the treadmill for a few minutes. a a B 18 IMPORTANT: If the walking belt rubs against the foot rails (B), the walking belt may become damaged. First, remove the...
... the hex key to lift each edge of a turn. When the walking belt is properly tightened. SYMPTOM: The walking belt slips when walked on the treadmill for a few minutes. Using the hex key, turn both idler roller screws clockwise, 1/4 of the walking belt 2 to 7 cm) off the walking ...platform. Then, plug in the power cord, insert the key, and walk on the treadmill for a few minutes. a a B 18 IMPORTANT: If the walking belt rubs against the foot rails (B), the walking belt may become damaged. First, remove the...


