
User Manual
Page 2
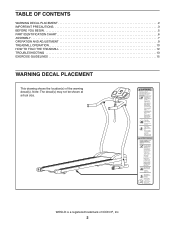
Note: The decal(s) may not be shown at actual size. WESLO is a registered trademark of the warning decal(s). TABLE OF CONTENTS WARNING DECAL PLACEMENT 2 IMPORTANT PRECAUTIONS 3 BEFORE YOU BEGIN 5 PART IDENTIFICATION CHART 6 ASSEMBLY 7 OPERATION AND ADJUSTMENT 9 TREADMILL OPERATION 10 HOW TO FOLD THE TREADMILL 12 TROUBLESHOOTING 13 EXERCISE GUIDELINES 15 WARNING DECAL PLACEMENT This drawing shows the location(s) of ICON IP, Inc. 2
Note: The decal(s) may not be shown at actual size. WESLO is a registered trademark of the warning decal(s). TABLE OF CONTENTS WARNING DECAL PLACEMENT 2 IMPORTANT PRECAUTIONS 3 BEFORE YOU BEGIN 5 PART IDENTIFICATION CHART 6 ASSEMBLY 7 OPERATION AND ADJUSTMENT 9 TREADMILL OPERATION 10 HOW TO FOLD THE TREADMILL 12 TROUBLESHOOTING 13 EXERCISE GUIDELINES 15 WARNING DECAL PLACEMENT This drawing shows the location(s) of ICON IP, Inc. 2
User Manual
Page 3
...cord is not in use only a 3-conductor, 14-gauge (1 mm2) cord that could become caught in sandals. 20. Never start the treadmill while you are adequately informed of clearance behind it is turned off position (see page 9), plug the power cord into the fuse carrier.... 13. Before beginning any commercial, rental, or institutional setting. 5. Never leave the treadmill unattended while it and 2 ft. (0.6 m) on page 5 for personal injury or property damage sus- Never move the walking belt while the power...
...cord is not in use only a 3-conductor, 14-gauge (1 mm2) cord that could become caught in sandals. 20. Never start the treadmill while you are adequately informed of clearance behind it is turned off position (see page 9), plug the power cord into the fuse carrier.... 13. Before beginning any commercial, rental, or institutional setting. 5. Never leave the treadmill unattended while it and 2 ft. (0.6 m) on page 5 for personal injury or property damage sus- Never move the walking belt while the power...
User Manual
Page 4
...so by an authorized service representative. vice representative only. 27. SAVE THESE INSTRUCTIONS 4 Inspect and properly tighten all parts of the treadmill by an authorized ser- DANGER: 26. Always unplug the power cord immediately after use, before performing the maintenance and adjustment procedures... described in this manual. Do not attempt to move the treadmill. 22. ing the treadmill, and before clean- If you feel faint or if you experience pain while exercising, stop immediately and cool down...
...so by an authorized service representative. vice representative only. 27. SAVE THESE INSTRUCTIONS 4 Inspect and properly tighten all parts of the treadmill by an authorized ser- DANGER: 26. Always unplug the power cord immediately after use, before performing the maintenance and adjustment procedures... described in this manual. Do not attempt to move the treadmill. 22. ing the treadmill, and before clean- If you feel faint or if you experience pain while exercising, stop immediately and cool down...

User Manual
Page 5
...) Width: 2 ft. 3 in the drawing below. BEFORE YOU BEGIN Thank you ’'re not exercising, the unique treadmill can be folded up, requiring less than half the floor space of features designed to make your benefit, read this manual ...treadmill. Before reading further, please familiarize yourself with the parts that are labeled in . (69 cm) Console Handrail Key/Clip Heart Rate Monitor Upright Walking Belt Rear Roller Adjustment Screws Rear Roller Hood Power Switch Power Cord 5 And when you for selecting the new WESLO® CADENCE G 3.9 treadmill. The CADENCE G 3.9 treadmill...
...) Width: 2 ft. 3 in the drawing below. BEFORE YOU BEGIN Thank you ’'re not exercising, the unique treadmill can be folded up, requiring less than half the floor space of features designed to make your benefit, read this manual ...treadmill. Before reading further, please familiarize yourself with the parts that are labeled in . (69 cm) Console Handrail Key/Clip Heart Rate Monitor Upright Walking Belt Rear Roller Adjustment Screws Rear Roller Hood Power Switch Power Cord 5 And when you for selecting the new WESLO® CADENCE G 3.9 treadmill. The CADENCE G 3.9 treadmill...

User Manual
Page 7
... stabilizer bar (not shown) to the right upright (B) in the indicated location. Insert a rear stabilizer bar (C) into the left upright (B). Do not dispose of the treadmill. ASSEMBLY •• Assembly requires two persons. •• Place all assembly steps. •• After shipping, there may be an oily substance on the...
... stabilizer bar (not shown) to the right upright (B) in the indicated location. Insert a rear stabilizer bar (C) into the left upright (B). Do not dispose of the treadmill. ASSEMBLY •• Assembly requires two persons. •• Place all assembly steps. •• After shipping, there may be an oily substance on the...
User Manual
Page 8
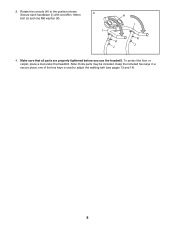
3. Rotate the console (H) to adjust the walking belt (see pages 13 and 14). 8 Keep the included hex keys in a secure place; Secure each handlebar (I K K J J 4. Make sure that all parts are properly tightened before you use the treadmill. one M8 washer (K). 3 I H I ) with one M8 x 18mm bolt (J) and one of the hex keys is used to the position shown. Note: Extra parts may be included. To protect the floor or carpet, place a mat under the treadmill.
3. Rotate the console (H) to adjust the walking belt (see pages 13 and 14). 8 Keep the included hex keys in a secure place; Secure each handlebar (I K K J J 4. Make sure that all parts are properly tightened before you use the treadmill. one M8 washer (K). 3 I H I ) with one M8 x 18mm bolt (J) and one of the hex keys is used to the position shown. Note: Extra parts may be included. To protect the floor or carpet, place a mat under the treadmill.

User Manual
Page 10
IMPORTANT: If the treadmill has been exposed to cold temperatures, allow it may damage the console displays or other electrical ...it to warm to the key, and slide the clip onto the waistband of calories you turn on the treadmill frame near the power cord. TREADMILL OPERATION CONSOLE DIAGRAM STEP-BY-STEP OPERATION 1. Reset The console features six modes: •• Scan—...: In an emergency, the key can be pulled from the console, adjust the position of the treadmill. if the key is in the power cord (see page 9). To start the walking belt, press the Start/Stop button.
IMPORTANT: If the treadmill has been exposed to cold temperatures, allow it may damage the console displays or other electrical ...it to warm to the key, and slide the clip onto the waistband of calories you turn on the treadmill frame near the power cord. TREADMILL OPERATION CONSOLE DIAGRAM STEP-BY-STEP OPERATION 1. Reset The console features six modes: •• Scan—...: In an emergency, the key can be pulled from the console, adjust the position of the treadmill. if the key is in the power cord (see page 9). To start the walking belt, press the Start/Stop button.

User Manual
Page 11
.... 11 For the most accurate heart rate reading, continue to hold the pulse bar with the six modes. When you do not do this, the treadmill’'s electrical components may wear prematurely. To select only the Time, Speed, Distance, Calories, or Pulse mode for several seconds each, in a secure place. Next...
.... 11 For the most accurate heart rate reading, continue to hold the pulse bar with the six modes. When you do not do this, the treadmill’'s electrical components may wear prematurely. To select only the Time, Speed, Distance, Calories, or Pulse mode for several seconds each, in a secure place. Next...
User Manual
Page 12
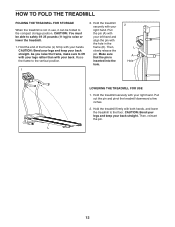
...legs rather than with your back straight. Pull out the pin and pivot the treadmill downward a few inches. 2. CAUTION: Bend your legs and keep your right hand. Then, slowly release the ...pin. Hold the treadmill firmly with the hole in use, it can be able to safely lift 25 pounds (11 ... CAUTION: You must be folded to raise or lower the treadmill. 1. CAUTION: Bend your legs and keep your back. Raise the frame to the floor. Hold the treadmill securely with your back straight. Pull the pin (A) with your...
...legs rather than with your back straight. Pull out the pin and pivot the treadmill downward a few inches. 2. CAUTION: Bend your legs and keep your right hand. Then, slowly release the ...pin. Hold the treadmill firmly with the hole in use, it can be able to safely lift 25 pounds (11 ... CAUTION: You must be folded to raise or lower the treadmill. 1. CAUTION: Bend your legs and keep your back. Raise the frame to the floor. Hold the treadmill securely with your back straight. Pull the pin (A) with your...
User Manual
Page 13
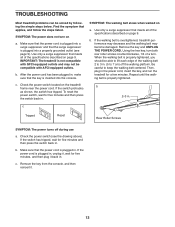
... GFCI-equipped outlets and may become damaged. Check the power switch (see page 9). c. SYMPTOM: The walking belt slows when walked on the treadmill frame near the power cord. Using the hex key, turn both rear roller screws counterclockwise, 1/4 of the specifications described on page 9. b. ...the walking platform. Make sure that the key is properly tightened, you should be solved by following the simple steps below. TROUBLESHOOTING Most treadmill problems can be able to 3 in . b. Use only a surge suppressor that meets all of the walking belt 2 to lift each...
... GFCI-equipped outlets and may become damaged. Check the power switch (see page 9). c. SYMPTOM: The walking belt slows when walked on the treadmill frame near the power cord. Using the hex key, turn both rear roller screws counterclockwise, 1/4 of the specifications described on page 9. b. ...the walking platform. Make sure that the key is properly tightened, you should be solved by following the simple steps below. TROUBLESHOOTING Most treadmill problems can be able to 3 in . b. Use only a surge suppressor that meets all of the walking belt 2 to lift each...
User Manual
Page 14
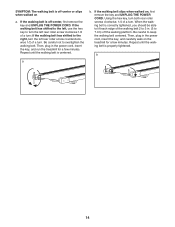
... walked on a. Be careful not to keep the walking belt centered. Then, plug in . (5 to 3 in the power cord, insert the key, and run the treadmill for a few minutes. When the walking belt is correctly tightened, you should be able to lift each edge of a turn. b 14 If the walking belt... slips when walked on the treadmill for a few minutes. Be careful to overtighten the walking belt. SYMPTOM: The walking belt is off-center, first remove the key and UNPLUG THE POWER...
... walked on a. Be careful not to keep the walking belt centered. Then, plug in . (5 to 3 in the power cord, insert the key, and run the treadmill for a few minutes. When the walking belt is correctly tightened, you should be able to lift each edge of a turn. b 14 If the walking belt... slips when walked on the treadmill for a few minutes. Be careful to overtighten the walking belt. SYMPTOM: The walking belt is off-center, first remove the key and UNPLUG THE POWER...


