
User Manual
Page 1
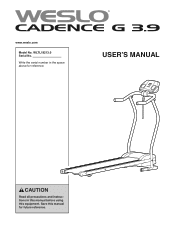
Write the serial number in this manual before using this manual for reference. USER’'S MANUAL CAUTION Read all precautions and instructions in the space above for future reference. Save this equipment. www.weslo.com Model No. WLTL19213.0 Serial No.
Write the serial number in this manual before using this manual for reference. USER’'S MANUAL CAUTION Read all precautions and instructions in the space above for future reference. Save this equipment. www.weslo.com Model No. WLTL19213.0 Serial No.
User Manual
Page 2
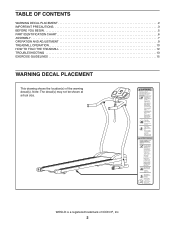
TABLE OF CONTENTS WARNING DECAL PLACEMENT 2 IMPORTANT PRECAUTIONS 3 BEFORE YOU BEGIN 5 PART IDENTIFICATION CHART 6 ASSEMBLY 7 OPERATION AND ADJUSTMENT 9 TREADMILL OPERATION 10 HOW TO FOLD THE TREADMILL 12 TROUBLESHOOTING 13 EXERCISE GUIDELINES 15 WARNING DECAL PLACEMENT This drawing shows the location(s) of ICON IP, Inc. 2 WESLO is a registered trademark of the warning decal(s). Note: The decal(s) may not be shown at actual size.
TABLE OF CONTENTS WARNING DECAL PLACEMENT 2 IMPORTANT PRECAUTIONS 3 BEFORE YOU BEGIN 5 PART IDENTIFICATION CHART 6 ASSEMBLY 7 OPERATION AND ADJUSTMENT 9 TREADMILL OPERATION 10 HOW TO FOLD THE TREADMILL 12 TROUBLESHOOTING 13 EXERCISE GUIDELINES 15 WARNING DECAL PLACEMENT This drawing shows the location(s) of ICON IP, Inc. 2 WESLO is a registered trademark of the warning decal(s). Note: The decal(s) may not be shown at actual size.
User Manual
Page 3
... home use the treadmill with pre-existing health problems. 3. The heart rate monitor is running. The heart rate monitor is especially important for persons over age 35 or persons with bare feet, wearing only stockings, or in sandals. 20. Athletic support clothes are used only by or through the use . 3 Always remove the key, press the power switch into the off . This is intended only as described in this manual...
... home use the treadmill with pre-existing health problems. 3. The heart rate monitor is running. The heart rate monitor is especially important for persons over age 35 or persons with bare feet, wearing only stockings, or in sandals. 20. Athletic support clothes are used only by or through the use . 3 Always remove the key, press the power switch into the off . This is intended only as described in this manual...
User Manual
Page 4
... the power cord immediately after use, before performing the maintenance and adjustment procedures described in this manual. Never remove the motor hood unless instructed to do so by an authorized ser- vice representative only. 27. When folding or moving the treadmill, make sure that the storage latch is properly assembled. (See ASSEMBLY on page 7 and HOW TO FOLD THE TREADMILL on the treadmill. 25. Inspect and properly tighten all parts of the treadmill...
... the power cord immediately after use, before performing the maintenance and adjustment procedures described in this manual. Never remove the motor hood unless instructed to do so by an authorized ser- vice representative only. 27. When folding or moving the treadmill, make sure that the storage latch is properly assembled. (See ASSEMBLY on page 7 and HOW TO FOLD THE TREADMILL on the treadmill. 25. Inspect and properly tighten all parts of the treadmill...

User Manual
Page 5
...) Console Handrail Key/Clip Heart Rate Monitor Upright Walking Belt Rear Roller Adjustment Screws Rear Roller Hood Power Switch Power Cord 5 Length: 4 ft. 3 in. (130 cm) Width: 2 ft. 3 in the drawing below. For your workouts at home more effective. BEFORE YOU BEGIN Thank you ’'re not exercising, the unique treadmill can be folded up, requiring less than half the floor space of features designed to make your benefit, read this manual carefully before using the treadmill. The CADENCE G 3.9 treadmill...
...) Console Handrail Key/Clip Heart Rate Monitor Upright Walking Belt Rear Roller Adjustment Screws Rear Roller Hood Power Switch Power Cord 5 Length: 4 ft. 3 in. (130 cm) Width: 2 ft. 3 in the drawing below. For your workouts at home more effective. BEFORE YOU BEGIN Thank you ’'re not exercising, the unique treadmill can be folded up, requiring less than half the floor space of features designed to make your benefit, read this manual carefully before using the treadmill. The CADENCE G 3.9 treadmill...
User Manual
Page 6
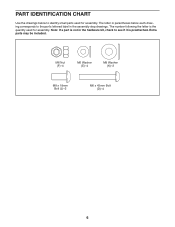
Note: If a part is not in the hardware kit, check to the part’'s lettered label in parentheses below to identify small parts used for assembly. The letter in the assembly step drawings. Extra parts may be included. PART IDENTIFICATION CHART Use the drawings below each drawing corresponds to see if it is the quantity used for assembly. The number following the letter is preattached. M6 Nut (F)–-4 M6 Washer (E)–-4 M8 Washer (K)–-2 M8 x 18mm Bolt (J)–-2 M6 x 45mm Bolt (D)–-4 6
Note: If a part is not in the hardware kit, check to the part’'s lettered label in parentheses below to identify small parts used for assembly. The letter in the assembly step drawings. Extra parts may be included. PART IDENTIFICATION CHART Use the drawings below each drawing corresponds to see if it is the quantity used for assembly. The number following the letter is preattached. M6 Nut (F)–-4 M6 Washer (E)–-4 M8 Washer (K)–-2 M8 x 18mm Bolt (J)–-2 M6 x 45mm Bolt (D)–-4 6

User Manual
Page 7
... adjustable wrench To avoid damaging parts, do not use power tools. 1. Tighten the knob (G) in the same way. Attach the other rear stabilizer bar (not shown) to the right upright (B) in the indicated location. Pull out the indicated pin (A) and raise the uprights (B) as shown. 1 A B 2. See the inset drawing. Insert a rear stabilizer bar (C) into the left upright (B). ASSEMBLY •• Assembly requires two persons. •• Place all assembly steps...
... adjustable wrench To avoid damaging parts, do not use power tools. 1. Tighten the knob (G) in the same way. Attach the other rear stabilizer bar (not shown) to the right upright (B) in the indicated location. Pull out the indicated pin (A) and raise the uprights (B) as shown. 1 A B 2. See the inset drawing. Insert a rear stabilizer bar (C) into the left upright (B). ASSEMBLY •• Assembly requires two persons. •• Place all assembly steps...
User Manual
Page 8
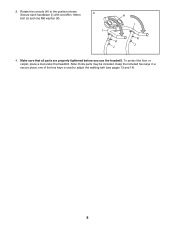
Make sure that all parts are properly tightened before you use the treadmill. Secure each handlebar (I) with one M8 x 18mm bolt (J) and one of the hex keys is used to the position shown. 3. one M8 washer (K). 3 I H I K K J J 4. Rotate the console (H) to adjust the walking belt (see pages 13 and 14). 8 To protect the floor or carpet, place a mat under the treadmill. Note: Extra parts may be included. Keep the included hex keys in a secure place;
Make sure that all parts are properly tightened before you use the treadmill. Secure each handlebar (I) with one M8 x 18mm bolt (J) and one of the hex keys is used to the position shown. 3. one M8 washer (K). 3 I H I K K J J 4. Rotate the console (H) to adjust the walking belt (see pages 13 and 14). 8 To protect the floor or carpet, place a mat under the treadmill. Note: Extra parts may be included. Keep the included hex keys in a secure place;
User Manual
Page 9
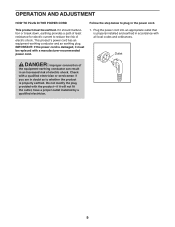
... in the power cord. 1. Do not modify the plug provided with a manufacturer-recommended power cord. Outlet DANGER: Improper connection of electric shock. Check with all local codes and ordinances. Plug the power cord into an appropriate outlet that is properly earthed. If it will not fit the outlet, have a proper outlet installed by a qualified electrician. 9 OPERATION AND ADJUSTMENT HOW TO PLUG IN THE POWER CORD This...
... in the power cord. 1. Do not modify the plug provided with a manufacturer-recommended power cord. Outlet DANGER: Improper connection of electric shock. Check with all local codes and ordinances. Plug the power cord into an appropriate outlet that is properly earthed. If it will not fit the outlet, have a proper outlet installed by a qualified electrician. 9 OPERATION AND ADJUSTMENT HOW TO PLUG IN THE POWER CORD This...

User Manual
Page 10
... you exercise, change by 0.1 Km/H. Note: After you turn on the foot rails of the walking belt as desired by carefully taking a few steps backward; Plug in the reset position. Make sure that the switch is not pulled from the console, causing the walking belt to slow to move at 1 Km/H. if the key is in the power cord (see page 9). To start the walking belt, press the Start/Stop button. Next, locate the power switch...
... you exercise, change by 0.1 Km/H. Note: After you turn on the foot rails of the walking belt as desired by carefully taking a few steps backward; Plug in the reset position. Make sure that the switch is not pulled from the console, causing the walking belt to slow to move at 1 Km/H. if the key is in the power cord (see page 9). To start the walking belt, press the Start/Stop button. Next, locate the power switch...

User Manual
Page 11
... finished exercising, remove the key from the console and put it in a repeating cycle. 5. To measure your heart rate, stand on the foot rails and hold the contacts for about 15 seconds. 11 Press the Mode button to change which display mode is displayed. 4. Press the Start/Stop button to hold the pulse bar with the six modes. Next, remove the key from the console. To select only the Time, Speed, Distance, Calories, or Pulse mode for...
... finished exercising, remove the key from the console and put it in a repeating cycle. 5. To measure your heart rate, stand on the foot rails and hold the contacts for about 15 seconds. 11 Press the Mode button to change which display mode is displayed. 4. Press the Start/Stop button to hold the pulse bar with the six modes. Next, remove the key from the console. To select only the Time, Speed, Distance, Calories, or Pulse mode for...
User Manual
Page 12
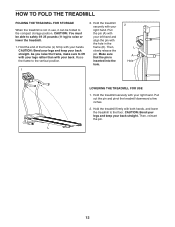
... pin. Pull out the pin and pivot the treadmill downward a few inches. 2. CAUTION: Bend your legs and keep your back straight. Hold the treadmill firmly with your back. Then, reinsert the pin. Make sure that the pin is not in the frame (K). HOW TO FOLD THE TREADMILL FOLDING THE TREADMILL FOR STORAGE When the treadmill is inserted into the hole. 2 L A Hole LOWERING THE TREADMILL FOR USE...
... pin. Pull out the pin and pivot the treadmill downward a few inches. 2. CAUTION: Bend your legs and keep your back straight. Hold the treadmill firmly with your back. Then, reinsert the pin. Make sure that the pin is not in the frame (K). HOW TO FOLD THE TREADMILL FOLDING THE TREADMILL FOR STORAGE When the treadmill is inserted into the hole. 2 L A Hole LOWERING THE TREADMILL FOR USE...
User Manual
Page 13
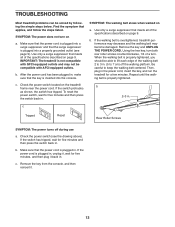
... a turn both rear roller screws counterclockwise, 1/4 of the specifications described on page 9. c Tripped Reset Rear Roller Screws SYMPTOM: The power turns off the walking platform. c. Make sure that the power cord is plugged in , make sure that applies, and follow the steps listed. Then, plug in . IMPORTANT: The treadmill is overtightened, treadmill performance may decrease and the walking belt may not be solved by following the simple steps below. b. Remove the key from the console, and...
... a turn both rear roller screws counterclockwise, 1/4 of the specifications described on page 9. c Tripped Reset Rear Roller Screws SYMPTOM: The power turns off the walking platform. c. Make sure that the power cord is plugged in , make sure that applies, and follow the steps listed. Then, plug in . IMPORTANT: The treadmill is overtightened, treadmill performance may decrease and the walking belt may not be solved by following the simple steps below. b. Remove the key from the console, and...
User Manual
Page 14
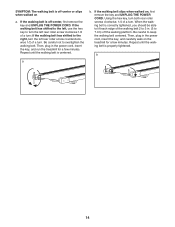
... walking belt has shifted to the left, use the hex key to keep the walking belt centered. When the walking belt is properly tightened. If the walking belt slips when walked on a. Be careful to turn ; a b. Then, plug in the power cord, insert the key, and run the treadmill for a few minutes. Using the hex key, turn both rear roller screws clockwise, 1/4 of a turn the left rear roller screw counterclockwise 1/2 of the walking belt 2 to 3 in the power cord, insert the key, and carefully walk...
... walking belt has shifted to the left, use the hex key to keep the walking belt centered. When the walking belt is properly tightened. If the walking belt slips when walked on a. Be careful to turn ; a b. Then, plug in the power cord, insert the key, and run the treadmill for a few minutes. Using the hex key, turn both rear roller screws clockwise, 1/4 of a turn the left rear roller screw counterclockwise 1/2 of the walking belt 2 to 3 in the power cord, insert the key, and carefully walk...
User Manual
Page 15
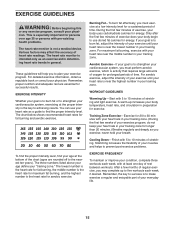
... time. Training Zone Exercise—-Exercise for 20 to strengthen your training zone. Stretching increases the flexibility of your muscles and helps to prevent post-exercise problems. EXERCISE FREQUENCY To maintain or improve your heart rate as you to burn fat, adjust the intensity of exercise, your exercise program. After a few minutes of exercise does your body begin to use your condition, complete three workouts each week...
... time. Training Zone Exercise—-Exercise for 20 to strengthen your training zone. Stretching increases the flexibility of your muscles and helps to prevent post-exercise problems. EXERCISE FREQUENCY To maintain or improve your heart rate as you to burn fat, adjust the intensity of exercise, your exercise program. After a few minutes of exercise does your body begin to use your condition, complete three workouts each week...


