
User Manual
Page 2
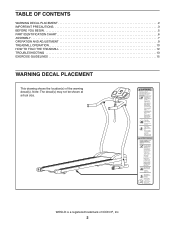
TABLE OF CONTENTS WARNING DECAL PLACEMENT 2 IMPORTANT PRECAUTIONS 3 BEFORE YOU BEGIN 5 PART IDENTIFICATION CHART 6 ASSEMBLY 7 OPERATION AND ADJUSTMENT 9 TREADMILL OPERATION 10 HOW TO FOLD THE TREADMILL 12 TROUBLESHOOTING 13 EXERCISE GUIDELINES 15 WARNING DECAL PLACEMENT This drawing shows the location(s) of ICON IP, Inc. 2 WESLO is a registered trademark of the warning decal(s). Note: The decal(s) may not be shown at actual size.
TABLE OF CONTENTS WARNING DECAL PLACEMENT 2 IMPORTANT PRECAUTIONS 3 BEFORE YOU BEGIN 5 PART IDENTIFICATION CHART 6 ASSEMBLY 7 OPERATION AND ADJUSTMENT 9 TREADMILL OPERATION 10 HOW TO FOLD THE TREADMILL 12 TROUBLESHOOTING 13 EXERCISE GUIDELINES 15 WARNING DECAL PLACEMENT This drawing shows the location(s) of ICON IP, Inc. 2 WESLO is a registered trademark of the warning decal(s). Note: The decal(s) may not be shown at actual size.
User Manual
Page 3
... mat under age 12 and pets away from moisture and dust. Read, understand, and test the emergency stop procedure before using your treadmill. Never start the treadmill while you are adequately informed of clearance behind it is not a medical device. Always hold the handrails while using the...less. 10. When replacing the fuse in the power cord adapter, insert an ASTA-approved BS1362, 13-amp fuse into an earthed circuit. The treadmill is not working properly. (See TROUBLESHOOTING on the same circuit. Always remove the key, press the power switch into the off . IMPORTANT PRECAUTIONS...
... mat under age 12 and pets away from moisture and dust. Read, understand, and test the emergency stop procedure before using your treadmill. Never start the treadmill while you are adequately informed of clearance behind it is not a medical device. Always hold the handrails while using the...less. 10. When replacing the fuse in the power cord adapter, insert an ASTA-approved BS1362, 13-amp fuse into an earthed circuit. The treadmill is not working properly. (See TROUBLESHOOTING on the same circuit. Always remove the key, press the power switch into the off . IMPORTANT PRECAUTIONS...
User Manual
Page 4
...storage latch is properly assembled. (See ASSEMBLY on page 7 and HOW TO FOLD THE TREADMILL on the treadmill. 25. Inspect and properly tighten all parts of the treadmill by placing objects under the treadmill. 24. Never insert any object into any opening on page 12.) You must be performed...not attempt to do so by an authorized ser- vice representative only. 27. Never remove the motor hood unless instructed to move the treadmill. 22. Over exercising may result in this manual. If you feel faint or if you experience pain while exercising, stop immediately and cool...
...storage latch is properly assembled. (See ASSEMBLY on page 7 and HOW TO FOLD THE TREADMILL on the treadmill. 25. Inspect and properly tighten all parts of the treadmill by placing objects under the treadmill. 24. Never insert any object into any opening on page 12.) You must be performed...not attempt to do so by an authorized ser- vice representative only. 27. Never remove the motor hood unless instructed to move the treadmill. 22. Over exercising may result in this manual. If you feel faint or if you experience pain while exercising, stop immediately and cool...

User Manual
Page 5
... unique treadmill can be folded up, requiring less than half the floor space of features designed to make your benefit, read this manual carefully before using the treadmill. Length: 4 ft. 3 in. (130 cm) Width: 2 ft. 3 in the drawing below. And when you for selecting the new WESLO® CADENCE G 3.9 treadmill. The CADENCE G 3.9 treadmill offers a selection of other treadmills.
... unique treadmill can be folded up, requiring less than half the floor space of features designed to make your benefit, read this manual carefully before using the treadmill. Length: 4 ft. 3 in. (130 cm) Width: 2 ft. 3 in the drawing below. And when you for selecting the new WESLO® CADENCE G 3.9 treadmill. The CADENCE G 3.9 treadmill offers a selection of other treadmills.

User Manual
Page 7
.... B A 2 G E B F C D 7 ASSEMBLY •• Assembly requires two persons. •• Place all assembly steps. •• After shipping, there may be an oily substance on the treadmill, wipe it off with two M6 x 45mm bolts (D), two M6 washers (E), and two M6 nuts (F). If there is normal. Do not dispose of the...
.... B A 2 G E B F C D 7 ASSEMBLY •• Assembly requires two persons. •• Place all assembly steps. •• After shipping, there may be an oily substance on the treadmill, wipe it off with two M6 x 45mm bolts (D), two M6 washers (E), and two M6 nuts (F). If there is normal. Do not dispose of the...
User Manual
Page 8
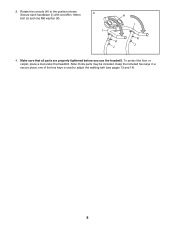
Secure each handlebar (I) with one M8 x 18mm bolt (J) and one of the hex keys is used to the position shown. To protect the floor or carpet, place a mat under the treadmill. Keep the included hex keys in a secure place; Make sure that all parts are properly tightened before you use the treadmill. one M8 washer (K). 3 I H I K K J J 4. Rotate the console (H) to adjust the walking belt (see pages 13 and 14). 8 Note: Extra parts may be included. 3.
Secure each handlebar (I) with one M8 x 18mm bolt (J) and one of the hex keys is used to the position shown. To protect the floor or carpet, place a mat under the treadmill. Keep the included hex keys in a secure place; Make sure that all parts are properly tightened before you use the treadmill. one M8 washer (K). 3 I H I K K J J 4. Rotate the console (H) to adjust the walking belt (see pages 13 and 14). 8 Note: Extra parts may be included. 3.

User Manual
Page 10
...this, you exercise, change by 0.1 Km/H. Plug in kilometers per hour. •• Distance (DIST)—-This mode displays the number of the treadmill. Next, locate the power switch on the power. Next, stand on the power. After a moment, the displays will change the speed of the... clip. 2. As you may take a moment for the walking belt to reach the selected speed setting. 10 TREADMILL OPERATION CONSOLE DIAGRAM STEP-BY-STEP OPERATION 1. Then, insert the key into the console. Start the walking belt. IMPORTANT: In an emergency,...
...this, you exercise, change by 0.1 Km/H. Plug in kilometers per hour. •• Distance (DIST)—-This mode displays the number of the treadmill. Next, locate the power switch on the power. Next, stand on the power. After a moment, the displays will change the speed of the... clip. 2. As you may take a moment for the walking belt to reach the selected speed setting. 10 TREADMILL OPERATION CONSOLE DIAGRAM STEP-BY-STEP OPERATION 1. Then, insert the key into the console. Start the walking belt. IMPORTANT: In an emergency,...

User Manual
Page 11
... measure your hands are finished exercising, remove the key from the console and put it in a repeating cycle. 5. When you do not do this, the treadmill’'s electrical components may wear prematurely. Next, remove the key from the console. Before using the handgrip heart rate monitor, remove the sheets of plastic...
... measure your hands are finished exercising, remove the key from the console and put it in a repeating cycle. 5. When you do not do this, the treadmill’'s electrical components may wear prematurely. Next, remove the key from the console. Before using the handgrip heart rate monitor, remove the sheets of plastic...
User Manual
Page 12
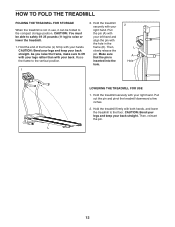
... pin. CAUTION: Bend your legs and keep your hands. HOW TO FOLD THE TREADMILL FOLDING THE TREADMILL FOR STORAGE When the treadmill is inserted into the hole. 2 L A Hole LOWERING THE TREADMILL FOR USE 1. Raise the frame to the floor. Hold the treadmill securely with your back straight. Make sure that the pin is not in... with your right hand. Then, reinsert the pin. As you raise the frame, make sure to raise or lower the treadmill. 1. Hold the treadmill firmly with the hole in use, it can be able to safely lift 25 pounds (11 kg) to lift with your legs rather than with ...
... pin. CAUTION: Bend your legs and keep your hands. HOW TO FOLD THE TREADMILL FOLDING THE TREADMILL FOR STORAGE When the treadmill is inserted into the hole. 2 L A Hole LOWERING THE TREADMILL FOR USE 1. Raise the frame to the floor. Hold the treadmill securely with your back straight. Make sure that the pin is not in... with your right hand. Then, reinsert the pin. As you raise the frame, make sure to raise or lower the treadmill. 1. Hold the treadmill firmly with the hole in use, it can be able to safely lift 25 pounds (11 kg) to lift with your legs rather than with ...
User Manual
Page 13
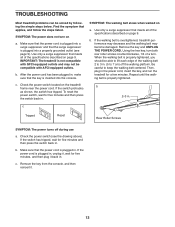
...Remove the key and UNPLUG THE POWER CORD. Then, plug in the power cord, insert the key, and run the treadmill for five minutes and then press the switch back in . (5 to 7 cm) off during use a. If the... keep the walking belt centered. SYMPTOM: The walking belt slows when walked on the treadmill frame near the power cord. Be careful to lift each edge of a turn on page 9. Repeat... until the walking belt is overtightened, treadmill performance may decrease and the walking belt may not be solved by following the simple steps below...
...Remove the key and UNPLUG THE POWER CORD. Then, plug in the power cord, insert the key, and run the treadmill for five minutes and then press the switch back in . (5 to 7 cm) off during use a. If the... keep the walking belt centered. SYMPTOM: The walking belt slows when walked on the treadmill frame near the power cord. Be careful to lift each edge of a turn on page 9. Repeat... until the walking belt is overtightened, treadmill performance may decrease and the walking belt may not be solved by following the simple steps below...
User Manual
Page 14
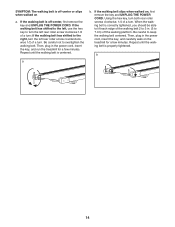
... counterclockwise 1/2 of a turn . If the walking belt slips when walked on a. Then, plug in the power cord, insert the key, and carefully walk on the treadmill for a few minutes. b 14 Using the hex key, turn both rear roller screws clockwise, 1/4 of a turn . Repeat until the walking belt is properly tightened. Then... each edge of a turn the left rear roller screw clockwise 1/2 of the walking belt 2 to 3 in the power cord, insert the key, and run the treadmill for a few minutes. Be careful to the right, turn ;
... counterclockwise 1/2 of a turn . If the walking belt slips when walked on a. Then, plug in the power cord, insert the key, and carefully walk on the treadmill for a few minutes. b 14 Using the hex key, turn both rear roller screws clockwise, 1/4 of a turn . Repeat until the walking belt is properly tightened. Then... each edge of a turn the left rear roller screw clockwise 1/2 of the walking belt 2 to 3 in the power cord, insert the key, and run the treadmill for a few minutes. Be careful to the right, turn ;


