
Canadian English Manual
Page 1
...) CAUTION Read all precautions and instructions in the space above for future reference. USER'S MANUAL Visit our website at www.weslo.com ® Model No. Save this equipment. Serial Number Decal QUESTIONS? As a manufacturer, we are missing parts, we will guarantee complete satisfaction through our Customer Service Department. WCTL29201 Serial No. Write the serial number in this manual before using this manual for future reference. If...
...) CAUTION Read all precautions and instructions in the space above for future reference. USER'S MANUAL Visit our website at www.weslo.com ® Model No. Save this equipment. Serial Number Decal QUESTIONS? As a manufacturer, we are missing parts, we will guarantee complete satisfaction through our Customer Service Department. WCTL29201 Serial No. Write the serial number in this manual before using this manual for future reference. If...
Canadian English Manual
Page 2
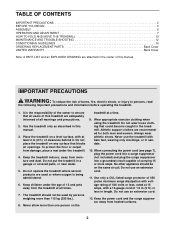
... age of 450 joules minimum surge dissipation with at a time. 9. TABLE OF CONTENTS IMPORTANT PRECAUTIONS 2 BEFORE YOU BEGIN 4 ASSEMBLY 5 OPERATION AND ADJUSTMENT 7 HOW TO FOLD AND MOVE THE TREADMILL 10 MAINTENANCE AND TROUBLE-SHOOTING 12 CONDITIONING GUIDELINES 14 ORDERING REPLACEMENT PARTS Back Cover LIMITED WARRANTY Back Cover Note: A PART LIST and an EXPLODED DRAWING are recommended for both men and women. Keep children under the...
... age of 450 joules minimum surge dissipation with at a time. 9. TABLE OF CONTENTS IMPORTANT PRECAUTIONS 2 BEFORE YOU BEGIN 4 ASSEMBLY 5 OPERATION AND ADJUSTMENT 7 HOW TO FOLD AND MOVE THE TREADMILL 10 MAINTENANCE AND TROUBLE-SHOOTING 12 CONDITIONING GUIDELINES 14 ORDERING REPLACEMENT PARTS Back Cover LIMITED WARRANTY Back Cover Note: A PART LIST and an EXPLODED DRAWING are recommended for both men and women. Keep children under the...
Canadian English Manual
Page 3
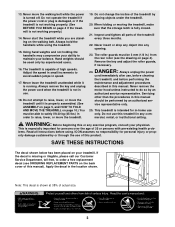
... institutional setting. Never remove the motor hood unless instructed to avoid sudden jumps in .) from the rear roller (see ORDERING REPLACEMENT PARTS on your physician. lems. Read all parts of this or any exercise program, consult your treadmill. Apply the decal in this manual. Remove the key and adjust the roller guards, if necessary. Servicing other than the procedures in this manual should be 3 mm (1/8 in speed. 17. This treadmill is shown...
... institutional setting. Never remove the motor hood unless instructed to avoid sudden jumps in .) from the rear roller (see ORDERING REPLACEMENT PARTS on your physician. lems. Read all parts of this or any exercise program, consult your treadmill. Apply the decal in this manual. Remove the key and adjust the roller guards, if necessary. Servicing other than the procedures in this manual should be 3 mm (1/8 in speed. 17. This treadmill is shown...
Canadian English Manual
Page 4
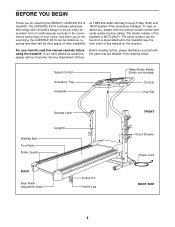
... manual for selecting the WESLO® CADENCE EX14 treadmill. For your home. Speed Control Accessory Tray Handrails Water Bottle Holder (Bottle not included) Console Key/Clip Walking Belt Foot Rails Roller Guards Storage Latch Uprights BACK Rear Roller Adjustment Bolts Incline Pin Incline Leg FRONT Circuit Breaker Power Cord RIGHT SIDE 4 at 1-888-936-4266, Monday through Friday, 8h00 until 18h30 Eastern Time (excluding holidays). The serial number can be found on a decal attached to let you 're not exercising...
... manual for selecting the WESLO® CADENCE EX14 treadmill. For your home. Speed Control Accessory Tray Handrails Water Bottle Holder (Bottle not included) Console Key/Clip Walking Belt Foot Rails Roller Guards Storage Latch Uprights BACK Rear Roller Adjustment Bolts Incline Pin Incline Leg FRONT Circuit Breaker Power Cord RIGHT SIDE 4 at 1-888-936-4266, Monday through Friday, 8h00 until 18h30 Eastern Time (excluding holidays). The serial number can be found on a decal attached to let you 're not exercising...
Canadian English Manual
Page 5
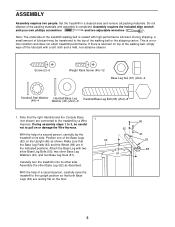
... and does not affect treadmill performance. Screw (2)-6 Weight Rack Screw (40)-12 Base Leg Nut (61) (Zinc)-4 Handrail Star Washer Handrail/Base Leg (44)-4 Washer (43) (Zinc)-8 Handrail/Base Leg Bolt (65) (Zinc)-8 1. During assembly steps 1 to 3, be transferred to the upright position so that the right Handrail and the Console Base (not shown) are in a cleared area and remove all packing materials...
... and does not affect treadmill performance. Screw (2)-6 Weight Rack Screw (40)-12 Base Leg Nut (61) (Zinc)-4 Handrail Star Washer Handrail/Base Leg (44)-4 Washer (43) (Zinc)-8 Handrail/Base Leg Bolt (65) (Zinc)-8 1. During assembly steps 1 to 3, be transferred to the upright position so that the right Handrail and the Console Base (not shown) are in a cleared area and remove all packing materials...
Canadian English Manual
Page 6
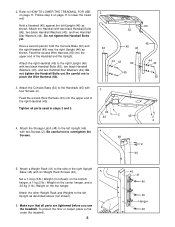
Follow step 2 on page 11. Attach the right Handrail (45) to lower the treadmill. Tighten all parts are tightened before you use the treadmill. Refer to HOW TO LOWER THE TREADMILL FOR USE on page 11 to the right Upright (46) with four Screws (2). 3 52 Feed the excess Wire Harness (60) into the upper end of the right Upright Base (46) with two Screws (2). Feed the excess Wire Harness...
Follow step 2 on page 11. Attach the right Handrail (45) to lower the treadmill. Tighten all parts are tightened before you use the treadmill. Refer to HOW TO LOWER THE TREADMILL FOR USE on page 11 to the right Upright (46) with four Screws (2). 3 52 Feed the excess Wire Harness (60) into the upper end of the right Upright Base (46) with two Screws (2). Feed the excess Wire Harness...
Canadian English Manual
Page 7
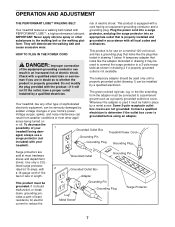
... are not grounded. OPERATION AND ADJUSTMENT THE PERFORMANT LUBETM WALKING BELT risk of least resistance for use a surge protector (not Grounded Outlet Box Grounding Pin Treadmill Power Cord included) with all local codes and form. This product is not available. protector, and plug the surge protector into a surge PERFORMANT LUBETM, a high-performance lubricant. They will The temporary adapter should malfunction or break down, grounding...
... are not grounded. OPERATION AND ADJUSTMENT THE PERFORMANT LUBETM WALKING BELT risk of least resistance for use a surge protector (not Grounded Outlet Box Grounding Pin Treadmill Power Cord included) with all local codes and form. This product is not available. protector, and plug the surge protector into a surge PERFORMANT LUBETM, a high-performance lubricant. They will The temporary adapter should malfunction or break down, grounding...
Canadian English Manual
Page 8
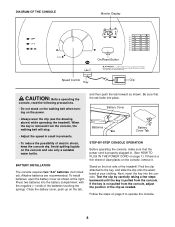
.... DIAGRAM OF THE CONSOLE Monitor Display On/Reset Button Speed Control Clip Key CAUTION: Before operating the console, read the following precautions. • Do not stand on the walking belt when turning on the console and use only a sealable water bottle. Batteries Battery Cover Tab • To reduce the possibility of the batteries touching the springs. To install batteries, open the battery cover as shown. If the key is pulled from the console, the walking belt will stop. • Adjust...
.... DIAGRAM OF THE CONSOLE Monitor Display On/Reset Button Speed Control Clip Key CAUTION: Before operating the console, read the following precautions. • Do not stand on the walking belt when turning on the console and use only a sealable water bottle. Batteries Battery Cover Tab • To reduce the possibility of the batteries touching the springs. To install batteries, open the battery cover as shown. If the key is pulled from the console, the walking belt will stop. • Adjust...
Canadian English Manual
Page 9
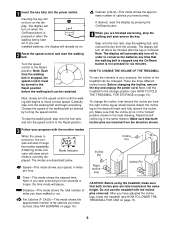
... just installed batteries, the display will not turn on the display. Inserting the key will already be changed. Change the speed of the treadmill can be turned to the Reset position. To stop exercising for six minutes. Step onto the foot rails, stop the walking belt and remove the key. 1 Insert the key fully into the power switch. Turn the speed control to move at the same height. Make sure that the walking belt is stopped and the On/Reset button is removed...
... just installed batteries, the display will not turn on the display. Inserting the key will already be changed. Change the speed of the treadmill can be turned to the Reset position. To stop exercising for six minutes. Step onto the foot rails, stop the walking belt and remove the key. 1 Insert the key fully into the power switch. Turn the speed control to move at the same height. Make sure that the walking belt is stopped and the On/Reset button is removed...
Canadian English Manual
Page 10
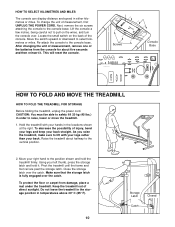
... the storage latch. Next, remove the six screws attaching the console to the vertical position. 2. Locate the small switch on the wires, and turn the console over. Hold the treadmill with your legs rather than your back straight. Do not leave the treadmill in the storage position in either kilometres or miles. This will reset the console. To decrease the possibility of measurement, first UNPLUG THE POWER CORD. Raise the treadmill...
... the storage latch. Next, remove the six screws attaching the console to the vertical position. 2. Locate the small switch on the wires, and turn the console over. Hold the treadmill with your legs rather than your back straight. Do not leave the treadmill in the storage position in either kilometres or miles. This will reset the console. To decrease the possibility of measurement, first UNPLUG THE POWER CORD. Raise the treadmill...
Canadian English Manual
Page 11
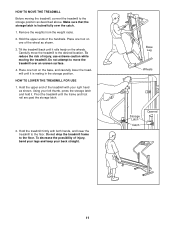
... the treadmill firmly with your left thumb, press the storage latch and hold it is locked fully over an uneven surface. 4. To decrease the possibility of the treadmill with both hands, and lower the treadmill to the floor. Hold the upper ends of the handrails. Pivot the treadmill until it . Base Leg Wheels Storage Latch Catch Opened 11 Carefully move the treadmill over the...
... the treadmill firmly with your left thumb, press the storage latch and hold it is locked fully over an uneven surface. 4. To decrease the possibility of the treadmill with both hands, and lower the treadmill to the floor. Hold the upper ends of the handrails. Pivot the treadmill until it . Base Leg Wheels Storage Latch Catch Opened 11 Carefully move the treadmill over the...
Canadian English Manual
Page 12
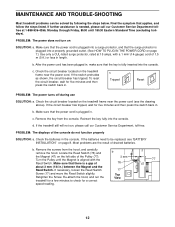
... and then press the switch back in the console. If further assistance is plugged into the console. c Tripped Tripped Reset Reset PROBLEM: The power turns off during use SOLUTION: a. Remove the screws from the console. PROBLEM: The power does not turn on the treadmill frame near the power cord (see "BATTERY INSTALLATION" on the treadmill frame near the power cord. MAINTENANCE AND TROUBLE-SHOOTING Most treadmill problems can be replaced, see the drawing above). Remove the key from the hood, and carefully remove the hood.
... and then press the switch back in the console. If further assistance is plugged into the console. c Tripped Tripped Reset Reset PROBLEM: The power turns off during use SOLUTION: a. Remove the screws from the console. PROBLEM: The power does not turn on the treadmill frame near the power cord (see "BATTERY INSTALLATION" on the treadmill frame near the power cord. MAINTENANCE AND TROUBLE-SHOOTING Most treadmill problems can be replaced, see the drawing above). Remove the key from the hood, and carefully remove the hood.
Canadian English Manual
Page 13
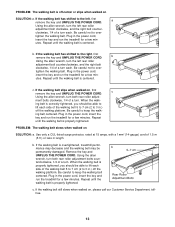
If the walking belt has shifted to over - tighten the walking belt. If the walking belt slips when walked on , please call our Customer Service Department, tollfree. 13 Using the allen wrench, turn . ment bolts clockwise, 1/4 of a turn both rear roller adjustment bolts counterclockwise, 1/4 of the walking belt 5 to 7 cm (2 to keep the walking belt centered. Repeat until the walking belt is properly tightened. b. Remove the key and UNPLUG THE POWER CORD. Plug in the power cord, insert the key and run the treadmill for...
If the walking belt has shifted to over - tighten the walking belt. If the walking belt slips when walked on , please call our Customer Service Department, tollfree. 13 Using the allen wrench, turn . ment bolts clockwise, 1/4 of a turn both rear roller adjustment bolts counterclockwise, 1/4 of the walking belt 5 to 7 cm (2 to keep the walking belt centered. Repeat until the walking belt is properly tightened. b. Remove the key and UNPLUG THE POWER CORD. Plug in the power cord, insert the key and run the treadmill for...
Canadian English Manual
Page 14
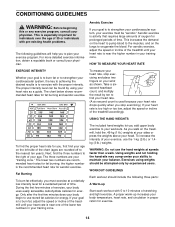
....) weights at speeds faster than a walk. To measure your heart rate, stop exercising.) If your heart rate is too high or too low, adjust the speed or incline of the treadmill until your exercise must exercise at a relatively low intensity level for a sustained period of the lower two numbers in preparation for fat burning and aerobic exercise. For aerobic exercise, adjust the speed or incline of the treadmill accordingly. WARNING: Do not use the...
....) weights at speeds faster than a walk. To measure your heart rate, stop exercising.) If your heart rate is too high or too low, adjust the speed or incline of the treadmill until your exercise must exercise at a relatively low intensity level for a sustained period of the lower two numbers in preparation for fat burning and aerobic exercise. For aerobic exercise, adjust the speed or incline of the treadmill accordingly. WARNING: Do not use the...
Canadian English Manual
Page 15
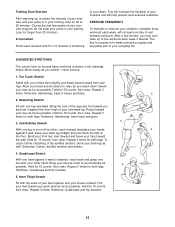
...Training Zone Exercise After warming up to five workouts each week, with at least one leg in your training zone for balance, reach back and grasp one leg...leg, lean forward and move your hips toward your pulse in front of your exercise program, do not keep your toes as far as 5 possible. After a few weeks of the other hand. The key to make exercise a regular and enjoyable part of your exercise until your pulse is in your everyday life. SUGGESTED STRETCHES The correct form... Stretches: Hamstrings, lower back and groin. 3 3. Keep your back leg straight and your ...
...Training Zone Exercise After warming up to five workouts each week, with at least one leg in your training zone for balance, reach back and grasp one leg...leg, lean forward and move your hips toward your pulse in front of your exercise program, do not keep your toes as far as 5 possible. After a few weeks of the other hand. The key to make exercise a regular and enjoyable part of your exercise until your pulse is in your everyday life. SUGGESTED STRETCHES The correct form... Stretches: Hamstrings, lower back and groin. 3 3. Keep your back leg straight and your ...
Canadian English Manual
Page 16
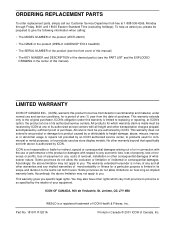
... MODEL NUMBER of the product (WCTL29201) • The NAME of the product (WESLO CADENCE® EX14 treadmill) • The SERIAL NUMBER of the product (see the front cover of this manual) • The KEY NUMBER and DESCRIPTION of the desired part(s) (see the PART LIST and the EXPLODED DRAWING in connection with the use or performance of Canada, Inc. Accordingly, the above limitation may not apply to replacing or repairing...
... MODEL NUMBER of the product (WCTL29201) • The NAME of the product (WESLO CADENCE® EX14 treadmill) • The SERIAL NUMBER of the product (see the front cover of this manual) • The KEY NUMBER and DESCRIPTION of the desired part(s) (see the PART LIST and the EXPLODED DRAWING in connection with the use or performance of Canada, Inc. Accordingly, the above limitation may not apply to replacing or repairing...
Canadian English Manual
Page 17
REMOVE THIS EXPLODED DRAWING AND PART LIST FROM THE MANUAL Save this EXPLODED DRAWING and PART LIST for future reference. Note: Specifications are subject to change without notice. For information about ordering replacement parts, see the back cover of the User's Manual. 34
REMOVE THIS EXPLODED DRAWING AND PART LIST FROM THE MANUAL Save this EXPLODED DRAWING and PART LIST for future reference. Note: Specifications are subject to change without notice. For information about ordering replacement parts, see the back cover of the User's Manual. 34

Canadian English Manual
Page 18
... Motor Belt Wheel Bolt Wheel Speed Control Frame Pivot Bolt Rear Roller Walking Belt Belly pan Walking Board Warning Decal Reed Switch/Sensor Wire Drive Roller/Pulley Frame Guide Frame Incline Pin Incline Leg Incline Leg Cap Right Endcap Roller Guard 8" White Wire, Male/Female User's Manual * Includes all parts shown in the box Note: "#" indicates a non-illustrated part. Qty. See the back cover of the user's manual for information about ordering replacement parts. Specifications are subject to change without notice. Qty. PART LIST-Model Nr. Weight Battery Cover Console Assembly Speed...
... Motor Belt Wheel Bolt Wheel Speed Control Frame Pivot Bolt Rear Roller Walking Belt Belly pan Walking Board Warning Decal Reed Switch/Sensor Wire Drive Roller/Pulley Frame Guide Frame Incline Pin Incline Leg Incline Leg Cap Right Endcap Roller Guard 8" White Wire, Male/Female User's Manual * Includes all parts shown in the box Note: "#" indicates a non-illustrated part. Qty. See the back cover of the user's manual for information about ordering replacement parts. Specifications are subject to change without notice. Qty. PART LIST-Model Nr. Weight Battery Cover Console Assembly Speed...

Canadian English Manual
Page 19
... 40 40 70 43 61 67 8 61 80 68 61 63 61 43 32 50 3 68 67 63 65 3 37 62 63 3 R1201A EXPLODED DRAWING-Model Nº.
... 40 40 70 43 61 67 8 61 80 68 61 63 61 43 32 50 3 68 67 63 65 3 37 62 63 3 R1201A EXPLODED DRAWING-Model Nº.


