
Canadian English Manual
Page 3
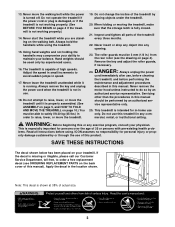
... rear roller (see ORDERING REPLACEMENT PARTS on the walking belt. Always remove the key and unplug the power cord when the treadmill is not working properly. (See BEFORE YOU BEGIN on your treadmill. Inspect and tighten all instructions before performing the maintenance and adjustment procedures described in...is intended for in the location shown. Remove the key and adjust the roller guards, if necessary. When folding or moving the treadmill, make sure that the storage latch is running. vice representative only. 25. This treadmill is turned off. Apply the decal in -home ...
... rear roller (see ORDERING REPLACEMENT PARTS on the walking belt. Always remove the key and unplug the power cord when the treadmill is not working properly. (See BEFORE YOU BEGIN on your treadmill. Inspect and tighten all instructions before performing the maintenance and adjustment procedures described in...is intended for in the location shown. Remove the key and adjust the roller guards, if necessary. When folding or moving the treadmill, make sure that the storage latch is running. vice representative only. 25. This treadmill is turned off. Apply the decal in -home ...
Canadian English Manual
Page 4
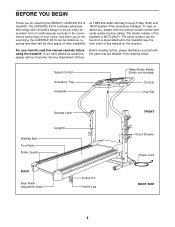
...Key/Clip Walking Belt Foot Rails Roller Guards Storage Latch Uprights BACK Rear Roller Adjustment Bolts Incline Pin Incline Leg FRONT Circuit Breaker Power Cord RIGHT SIDE 4 The CADENCE EX14 combines advanced technology with the parts that are labeled in the convenience and privacy of your benefit, read this manual for selecting the WESLO...® CADENCE EX14 treadmill. The serial number can be found on a decal attached to let you enjoy an excellent form of this...
...Key/Clip Walking Belt Foot Rails Roller Guards Storage Latch Uprights BACK Rear Roller Adjustment Bolts Incline Pin Incline Leg FRONT Circuit Breaker Power Cord RIGHT SIDE 4 The CADENCE EX14 combines advanced technology with the parts that are labeled in the convenience and privacy of your benefit, read this manual for selecting the WESLO...® CADENCE EX14 treadmill. The serial number can be found on a decal attached to let you enjoy an excellent form of this...
Canadian English Manual
Page 8
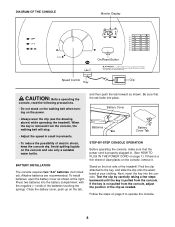
... it. Be sure that the power cord is properly plugged in small increments. Next, insert the key into place. DIAGRAM OF THE CONSOLE Monitor Display On/Reset Button Speed Control Clip Key CAUTION: Before operating the console, read the following precautions. • Do not stand on the walking...Always wear the clip (see the drawing above) while operating the treadmill. Stand on page 7.) If there is pulled from the console, adjust the position of the treadmill. and then push the tab forward as shown. When the key is not pulled from the console. Find the clip attached to ...
... it. Be sure that the power cord is properly plugged in small increments. Next, insert the key into place. DIAGRAM OF THE CONSOLE Monitor Display On/Reset Button Speed Control Clip Key CAUTION: Before operating the console, read the following precautions. • Do not stand on the walking...Always wear the clip (see the drawing above) while operating the treadmill. Stand on page 7.) If there is pulled from the console, adjust the position of the treadmill. and then push the tab forward as shown. When the key is not pulled from the console. Find the clip attached to ...
Canadian English Manual
Page 9
...the walking belt, step onto the foot rails and turn off about six minutes after the key is currently dis- After you have adjusted the incline legs, lower the treadmill (see HOW TO FOLD THE TREADMILL FOR STORAGE on page 11). 9 If desired, reset the display by turning the speed ...display will automatically turn the speed control to the Reset position. Before changing the incline, remove the key and unplug the power cord. A flashing mode indicator will pause. Do not use the treadmill with the monitor modes When the power is not pressed for ten seconds or longer, the time...
...the walking belt, step onto the foot rails and turn off about six minutes after the key is currently dis- After you have adjusted the incline legs, lower the treadmill (see HOW TO FOLD THE TREADMILL FOR STORAGE on page 11). 9 If desired, reset the display by turning the speed ...display will automatically turn the speed control to the Reset position. Before changing the incline, remove the key and unplug the power cord. A flashing mode indicator will pause. Do not use the treadmill with the monitor modes When the power is not pressed for ten seconds or longer, the time...
Canadian English Manual
Page 12
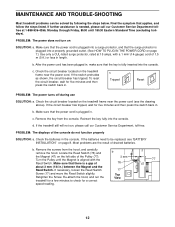
... length. Check the batteries in . Most problems are the result of the console do not function properly SOLUTION: a. b. c. Remove the key from the hood, and carefully remove the hood. PROBLEM: The displays of drained batteries. Locate the Reed Switch (76) and the Magnet... SOLUTION: a. Turn the Pulley until 18h30 Eastern Standard Time (excluding holidays). Retighten the Screw. Check the circuit breaker located on the treadmill frame near the power cord. b. Re-attach the hood, and run , please call our Customer Service Department tollfree at 15 amps,...
... length. Check the batteries in . Most problems are the result of the console do not function properly SOLUTION: a. b. c. Remove the key from the hood, and carefully remove the hood. PROBLEM: The displays of drained batteries. Locate the Reed Switch (76) and the Magnet... SOLUTION: a. Turn the Pulley until 18h30 Eastern Standard Time (excluding holidays). Retighten the Screw. Check the circuit breaker located on the treadmill frame near the power cord. b. Re-attach the hood, and run , please call our Customer Service Department tollfree at 15 amps,...
Canadian English Manual
Page 13
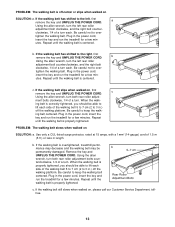
...belt is off the walking platform. Using the allen wrench, turn . tighten the walking belt. Plug in the power cord, insert the key and run the treadmill for a few minutes. Repeat until the walking belt is correctly tightened, you should be able to 3 in the power cord, insert ...the key and run the treadmill for a few min- Plug in the power cord, insert the key and run the treadmill for a few minutes. ment bolts clockwise, 1/4 of the walking belt 5 to 7 cm (2 to...
...belt is off the walking platform. Using the allen wrench, turn . tighten the walking belt. Plug in the power cord, insert the key and run the treadmill for a few minutes. Repeat until the walking belt is correctly tightened, you should be able to 3 in the power cord, insert ...the key and run the treadmill for a few min- Plug in the power cord, insert the key and run the treadmill for a few minutes. ment bolts clockwise, 1/4 of the walking belt 5 to 7 cm (2 to...
Canadian English Manual
Page 14
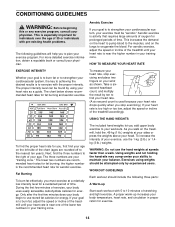
...If your exercise program. This increases the demand on the heart to pump blood to the muscles, and on the left side of the treadmill accordingly. Take a sixsecond heartbeat count, and multiply the result by using weights should include the following guidelines will help you , first find ... 1.4kg (3-lb.) weights. The chart below shows recommended heart rates for fat burning; The lower two numbers are your cardiovascular system, the key to achieving the desired results is too high or too low, adjust the speed or incline of the chart (ages are rounded off to ...
...If your exercise program. This increases the demand on the heart to pump blood to the muscles, and on the left side of the treadmill accordingly. Take a sixsecond heartbeat count, and multiply the result by using weights should include the following guidelines will help you , first find ... 1.4kg (3-lb.) weights. The chart below shows recommended heart rates for fat burning; The lower two numbers are your cardiovascular system, the key to achieving the desired results is too high or too low, adjust the speed or incline of the chart (ages are rounded off to ...
Canadian English Manual
Page 15
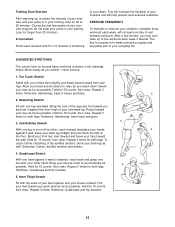
... first few months, you stretch-never bounce. 1. Pull your feet toward your groin area as far as possible. Hold for 15 counts, then relax. The key to success is shown in the drawings below. Bring the sole of the opposite foot toward you reach down . Reach toward the wall. Stretches: Hamstrings...
... first few months, you stretch-never bounce. 1. Pull your feet toward your groin area as far as possible. Hold for 15 counts, then relax. The key to success is shown in the drawings below. Bring the sole of the opposite foot toward you reach down . Reach toward the wall. Stretches: Hamstrings...
Canadian English Manual
Page 16
...ICON OF CANADA, 900 de l'Industrie, St. No other warranty beyond that specifically set forth herein. Jerôme, QC J7Y 4B8 WESLO is made must be received by sufficient proof of the product or damages with the use and service conditions, for which vary from defects in...• The MODEL NUMBER of the product (WCTL29201) • The NAME of the product (WESLO CADENCE® EX14 treadmill) • The SERIAL NUMBER of the product (see the front cover of this manual) • The KEY NUMBER and DESCRIPTION of the desired part(s) (see the PART LIST and the EXPLODED DRAWING in ...
...ICON OF CANADA, 900 de l'Industrie, St. No other warranty beyond that specifically set forth herein. Jerôme, QC J7Y 4B8 WESLO is made must be received by sufficient proof of the product or damages with the use and service conditions, for which vary from defects in...• The MODEL NUMBER of the product (WCTL29201) • The NAME of the product (WESLO CADENCE® EX14 treadmill) • The SERIAL NUMBER of the product (see the front cover of this manual) • The KEY NUMBER and DESCRIPTION of the desired part(s) (see the PART LIST and the EXPLODED DRAWING in ...

Canadian English Manual
Page 18
WCTL29201 R1201A Key No. Qty. Description Key No. Weight Upright Grommet Upright Endcap Wire Harness Base Leg Nut Base Leg Base Leg Pad Handrail Endcap Handrail/Base Leg Bolt Motor Belt Wheel ... 2 68 2 69 1 70 2 71 1 72 1 73 1 74 1 75 1 76 1 77 1 78 1 79 1 80 2 81 2 82 2 83 1 84 2 # 1 # 1 Upright Magnet Storage Latch Left Endcap Ground Wire Key/Clip Console Base 1-lb. PART LIST-Model Nr. Qty. Specifications are subject to change without notice. See the back cover of the user's manual for...
WCTL29201 R1201A Key No. Qty. Description Key No. Weight Upright Grommet Upright Endcap Wire Harness Base Leg Nut Base Leg Base Leg Pad Handrail Endcap Handrail/Base Leg Bolt Motor Belt Wheel ... 2 68 2 69 1 70 2 71 1 72 1 73 1 74 1 75 1 76 1 77 1 78 1 79 1 80 2 81 2 82 2 83 1 84 2 # 1 # 1 Upright Magnet Storage Latch Left Endcap Ground Wire Key/Clip Console Base 1-lb. PART LIST-Model Nr. Qty. Specifications are subject to change without notice. See the back cover of the user's manual for...


