
English Manual
Page 3
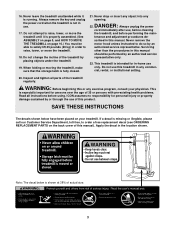
...sustained by an authorized service representative only. 23. Do not change the incline of actual size. 3 16. Apply the decal in this treadmill in use. 17. tenance and adjustment procedures de- Servicing other than the procedures in this manual should be able to raise, lower,... or move the treadmill. 18. This treadmill is shown at 38% of the treadmill by an authorized service representative. Always remove the key and unplug the power cord when the treadmill is fully closed. 21. Never drop or insert any object ...
...sustained by an authorized service representative only. 23. Do not change the incline of actual size. 3 16. Apply the decal in this treadmill in use. 17. tenance and adjustment procedures de- Servicing other than the procedures in this manual should be able to raise, lower,... or move the treadmill. 18. This treadmill is shown at 38% of the treadmill by an authorized service representative. Always remove the key and unplug the power cord when the treadmill is fully closed. 21. Never drop or insert any object ...
English Manual
Page 4
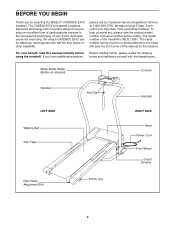
...number of this manual carefully before calling. Water Bottle Holder (Bottle not included) Console Handrail LEFT SIDE Walking Belt Grip Tape Key/Clip Handrail RIGHT SIDE Hood Power Cord Front Wheel Circuit Breaker Rear Roller Adjustment Bolt Incline Leg 4 Mountain Time (excluding ... space of your benefit, read this manual for selecting the WESLO® CADENCE EX12 treadmill. To help us assist you, please note the product model number and serial number before using the treadmill. The CADENCE EX12 treadmill combines advanced technology with the labeled parts. If you have ...
...number of this manual carefully before calling. Water Bottle Holder (Bottle not included) Console Handrail LEFT SIDE Walking Belt Grip Tape Key/Clip Handrail RIGHT SIDE Hood Power Cord Front Wheel Circuit Breaker Rear Roller Adjustment Bolt Incline Leg 4 Mountain Time (excluding ... space of your benefit, read this manual for selecting the WESLO® CADENCE EX12 treadmill. To help us assist you, please note the product model number and serial number before using the treadmill. The CADENCE EX12 treadmill combines advanced technology with the labeled parts. If you have ...
English Manual
Page 8
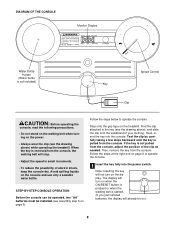
... two "AA" batteries must be on the treadmill. Then, remove the key from the console, adjust the position of the clip as needed. When the key is removed from the console. If the key is not pulled from the console. Note: Inserting the key will not turn on when the ON/RESET ...be installed (see assembly step 6 on the display. DIAGRAM OF THE CONSOLE Monitor Display Water Bottle Holder (Water bottle is not included) Speed Control Key Clip CAUTION: Before operating the console, read the following precautions. • Do not stand on the walking belt when turning on the power. •...
... two "AA" batteries must be on the treadmill. Then, remove the key from the console, adjust the position of the clip as needed. When the key is removed from the console. If the key is not pulled from the console. Note: Inserting the key will not turn on when the ON/RESET ...be installed (see assembly step 6 on the display. DIAGRAM OF THE CONSOLE Monitor Display Water Bottle Holder (Water bottle is not included) Speed Control Key Clip CAUTION: Before operating the console, read the following precautions. • Do not stand on the walking belt when turning on the power. •...

English Manual
Page 9
... your exercise, the incline of miles you are finished exercising, stop the walking belt and remove the key. HOW TO CHANGE THE INCLINE OF THE TREADMILL Next, slowly turn off about six minutes after the key is not pressed for ten seconds or longer, the time mode will pause. • Distance-This... mode shows the total number of the treadmill can be changed. Carefully step onto the walking belt and begin...
... your exercise, the incline of miles you are finished exercising, stop the walking belt and remove the key. HOW TO CHANGE THE INCLINE OF THE TREADMILL Next, slowly turn off about six minutes after the key is not pressed for ten seconds or longer, the time mode will pause. • Distance-This... mode shows the total number of the treadmill can be changed. Carefully step onto the walking belt and begin...
English Manual
Page 12
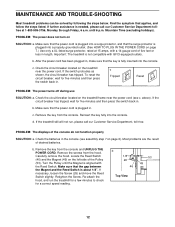
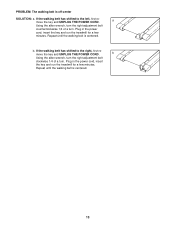
... the Magnet (49) on SOLUTION: a. Find the symptom that the power cord is about 1/8". Make sure that the key is aligned with the Reed Switch. c. Check the circuit breaker located on the treadmill near the power cord (see assembly step 7 on page 7.) Use only a UL-listed surge protector, rated at 1-800...: The power does not turn on the left side of five feet or less in . Remove the key from the console and UNPLUG THE POWER CORD. If the treadmill still will not run the treadmill for a few minutes to check for five minutes and then press the switch back in , make sure...
... the Magnet (49) on SOLUTION: a. Find the symptom that the power cord is about 1/8". Make sure that the key is aligned with the Reed Switch. c. Check the circuit breaker located on the treadmill near the power cord (see assembly step 7 on page 7.) Use only a UL-listed surge protector, rated at 1-800...: The power does not turn on the left side of five feet or less in . Remove the key from the console and UNPLUG THE POWER CORD. If the treadmill still will not run the treadmill for a few minutes to check for five minutes and then press the switch back in , make sure...
English Manual
Page 13
... has shifted to the left, first re- Plug in the power cord, insert the key and run the treadmill for a few minutes. If the walking belt has shifted to the right, first remove the key and UNPLUG THE POWER CORD. b. Repeat until the walking belt is centered. 13 Repeat... until the walking belt is centered. Plug in the power cord, insert the key and run the treadmill for a few minutes. a move the key and UNPLUG THE POWER CORD. b Using the allen wrench, turn the right adjustment bolt clockwise 1/4 of a turn . ...
... has shifted to the left, first re- Plug in the power cord, insert the key and run the treadmill for a few minutes. If the walking belt has shifted to the right, first remove the key and UNPLUG THE POWER CORD. b. Repeat until the walking belt is centered. 13 Repeat... until the walking belt is centered. Plug in the power cord, insert the key and run the treadmill for a few minutes. a move the key and UNPLUG THE POWER CORD. b Using the allen wrench, turn the right adjustment bolt clockwise 1/4 of a turn . ...
English Manual
Page 16
... MODEL NUMBER of the product (WLTL10091) • The NAME of the product (WESLO® CADENCE EX12 treadmill) • The SERIAL NUMBER of the product (see the front cover of this manual) If possible, place the treadmill near your telephone for indirect, special or consequential damages arising out of or in...(90) days from defects in workmanship and material, under this warranty is limited in the center of this manual) • The KEY NUMBER and DESCRIPTION of its authorized service centers. Accordingly, the above is not responsible or liable for easy reference when calling. ING in...
... MODEL NUMBER of the product (WLTL10091) • The NAME of the product (WESLO® CADENCE EX12 treadmill) • The SERIAL NUMBER of the product (see the front cover of this manual) If possible, place the treadmill near your telephone for indirect, special or consequential damages arising out of or in...(90) days from defects in workmanship and material, under this warranty is limited in the center of this manual) • The KEY NUMBER and DESCRIPTION of its authorized service centers. Accordingly, the above is not responsible or liable for easy reference when calling. ING in...


