

Canadian English Manual
Page 2
Remove the PART LIST and EXPLODED DRAWING before beginning assembly. 2 TABLE OF CONTENTS IMPORTANT PRECAUTIONS 3 BEFORE YOU BEGIN 5 ASSEMBLY 6 OPERATION AND ADJUSTMENT 8 HOW TO FOLD AND MOVE THE TREADMILL 11 MAINTENANCE AND TROUBLE-SHOOTING 13 CONDITIONING GUIDELINES 15 CUSTOMER RECORD 18 ORDERING REPLACEMENT PARTS 19 LIMITED WARRANTY Back Cover Note: A PART LIST and an EXPLODED DRAWING are attached in the center of this manual.
Remove the PART LIST and EXPLODED DRAWING before beginning assembly. 2 TABLE OF CONTENTS IMPORTANT PRECAUTIONS 3 BEFORE YOU BEGIN 5 ASSEMBLY 6 OPERATION AND ADJUSTMENT 8 HOW TO FOLD AND MOVE THE TREADMILL 11 MAINTENANCE AND TROUBLE-SHOOTING 13 CONDITIONING GUIDELINES 15 CUSTOMER RECORD 18 ORDERING REPLACEMENT PARTS 19 LIMITED WARRANTY Back Cover Note: A PART LIST and an EXPLODED DRAWING are attached in the center of this manual.
Canadian English Manual
Page 3
... working properly. (See BEFORE YOU BEGIN on a level surface, with bare feet, wearing only stockings, or in speed. 18. Do not put the treadmill in use. 9. Adjust the speed in small increments to raise, lower, or move the walking belt while the power is properly assembled. (See ASSEMBLY ...able to safely lift 45 pounds to ensure that blocks any opening. 23. Do not attempt to avoid sudden jumps in sandals. 11. Keep the treadmill indoors, away from heated surfaces. 14. Never allow more than one person on the walking belt. 16. Athletic support clothes are adequately informed of...
... working properly. (See BEFORE YOU BEGIN on a level surface, with bare feet, wearing only stockings, or in speed. 18. Do not put the treadmill in use. 9. Adjust the speed in small increments to raise, lower, or move the walking belt while the power is properly assembled. (See ASSEMBLY ...able to safely lift 45 pounds to ensure that blocks any opening. 23. Do not attempt to avoid sudden jumps in sandals. 11. Keep the treadmill indoors, away from heated surfaces. 14. Never allow more than one person on the walking belt. 16. Athletic support clothes are adequately informed of...
Canadian English Manual
Page 4
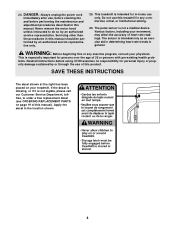
...before performing the maintenance and adjustment procedures described in this manual. ICON assumes no responsibility for in any exercise program, consult your treadmill. 24. erty damage sustained by or through the use only. Various factors, including your movement, may affect the accuracy of ...our Customer Service Department, tollfree, to do so by an authorized service representative only. 25. This treadmill is especially important for persons over the age of this treadmill in -home use of heart rate readings. Apply the decal in general. DANGER: Always unplug the...
...before performing the maintenance and adjustment procedures described in this manual. ICON assumes no responsibility for in any exercise program, consult your treadmill. 24. erty damage sustained by or through the use only. Various factors, including your movement, may affect the accuracy of ...our Customer Service Department, tollfree, to do so by an authorized service representative only. 25. This treadmill is especially important for persons over the age of this treadmill in -home use of heart rate readings. Apply the decal in general. DANGER: Always unplug the...
Canadian English Manual
Page 5
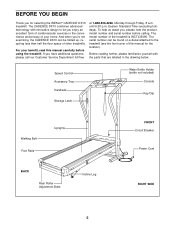
...labeled in the convenience and privacy of the treadmill is WCTL35090. For your home. If you for the location). Eastern Standard Time (excluding holidays). The model number of your benefit, read this manual for selecting the WESLO® CADENCE DX10 treadmill. until 6:30 p.m. To help us ...assist you enjoy an excellent form of other treadmills. And when you're not exercising, the CADENCE DX10 can be folded up, requiring less than half the floor ...
...labeled in the convenience and privacy of the treadmill is WCTL35090. For your home. If you for the location). Eastern Standard Time (excluding holidays). The model number of your benefit, read this manual for selecting the WESLO® CADENCE DX10 treadmill. until 6:30 p.m. To help us ...assist you enjoy an excellent form of other treadmills. And when you're not exercising, the CADENCE DX10 can be folded up, requiring less than half the floor ...

Canadian English Manual
Page 6
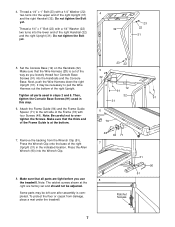
...nuts in a cleared area and remove all packing materials. Assembly requires your own phillips screw- With the help of a second person, carefully raise the treadmill to lower the treadmill. Follow the instructions in the indicated positions. Thread a 1/4" x 1" Bolt (23) with two 3/8" x 2" Bolts (43), two 3/8" Washers...Assembly requires two people. driver , two adjustable wrenches , and scissors . 1. With the help of a second person, carefully lay the treadmill on its other Base Leg (38) as shown. Position one of the left Handrail (32) and the left Upright (31). Make sure...
...nuts in a cleared area and remove all packing materials. Assembly requires your own phillips screw- With the help of a second person, carefully raise the treadmill to lower the treadmill. Follow the instructions in the indicated positions. Thread a 1/4" x 1" Bolt (23) with two 3/8" x 2" Bolts (43), two 3/8" Washers...Assembly requires two people. driver , two adjustable wrenches , and scissors . 1. With the help of a second person, carefully lay the treadmill on its other Base Leg (38) as shown. Position one of the left Handrail (32) and the left Upright (31). Make sure...
Canadian English Manual
Page 7
... Screws (91) used in steps 2 and 5. Note: Be careful not to pull the Wire Harness out the bottom of the way as you use the treadmill. Make sure that the thick end of the Frame Guide is at the right are tight before you loosely thread four Console Base Screws (91... Bolt yet. 4 32 23 22 31 5. Make sure that all parts used in the indicated location. Remove the backing from damage, place a mat under the treadmill. 5 28 32 23 22 12 91 32 91 31 6 76 48 7 94 71 31 90 51 8 Ratchet Screws 7 Press the Allen Wrench (90) into the...
... Screws (91) used in steps 2 and 5. Note: Be careful not to pull the Wire Harness out the bottom of the way as you use the treadmill. Make sure that the thick end of the Frame Guide is at the right are tight before you loosely thread four Console Base Screws (91... Bolt yet. 4 32 23 22 31 5. Make sure that all parts used in the indicated location. Remove the backing from damage, place a mat under the treadmill. 5 28 32 23 22 12 91 32 91 31 6 76 48 7 94 71 31 90 51 8 Ratchet Screws 7 Press the Allen Wrench (90) into the...

Canadian English Manual
Page 8
... Surge protectors are not grounded. Check with a qualified electrician or serviceman if you are in accordance with a 14-gauge cord of your treadmill. To decrease the possibility of five feet or less in drawing 2 may be held in drawing 2 if a properly grounded outlet is...is for electric current to determine if the outlet box cover is equipped with a cord having an equipment-grounding conductor and a Your treadmill features a walking belt coated with the product-if it must be used it will deteriorate the walking belt and ordinances. Whenever the...
... Surge protectors are not grounded. Check with a qualified electrician or serviceman if you are in accordance with a 14-gauge cord of your treadmill. To decrease the possibility of five feet or less in drawing 2 may be held in drawing 2 if a properly grounded outlet is...is for electric current to determine if the outlet box cover is equipped with a cord having an equipment-grounding conductor and a Your treadmill features a walking belt coated with the product-if it must be used it will deteriorate the walking belt and ordinances. Whenever the...
Canadian English Manual
Page 9
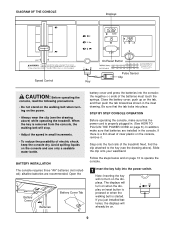
...belt will turn on the displays. The displays will stop. • Adjust the speed in small increments. • To reduce the possibility of the treadmill. Avoid spilling liquids on . 9 Slide the clip onto your waistband. When the key is a thin sheet of the batteries must touch the springs...not stand on the walking belt when turning on the power. • Always wear the clip (see the drawing above ) while operating the treadmill. alkaline batteries are installed in the inset drawing. Be sure that batteries are recommended. Follow the steps below and on page 10 to the ...
...belt will turn on the displays. The displays will stop. • Adjust the speed in small increments. • To reduce the possibility of the treadmill. Avoid spilling liquids on . 9 Slide the clip onto your waistband. When the key is a thin sheet of the batteries must touch the springs...not stand on the walking belt when turning on the power. • Always wear the clip (see the drawing above ) while operating the treadmill. alkaline batteries are installed in the inset drawing. Be sure that batteries are recommended. Follow the steps below and on page 10 to the ...
Canadian English Manual
Page 11
... position. 11 After changing the unit of measurement, remove one of the batteries from the console for about halfway to raise, lower or move the treadmill. 1. Caution: You must be about 5%. Before changing the incline, remove the key and unplug the power cord. Raise the back end again until it... legs are locked in the lowest position, the incline is in position. change the unit of measurement, first UNPLUG THE POWER CORD. Hold the treadmill with your hands in either kilometres or miles. Raise the back end until it clicks into position. (Note: It may be changed by raising ...
... position. 11 After changing the unit of measurement, remove one of the batteries from the console for about halfway to raise, lower or move the treadmill. 1. Caution: You must be about 5%. Before changing the incline, remove the key and unplug the power cord. Raise the back end again until it... legs are locked in the lowest position, the incline is in position. change the unit of measurement, first UNPLUG THE POWER CORD. Hold the treadmill with your hands in either kilometres or miles. Raise the back end until it clicks into position. (Note: It may be changed by raising ...
Canadian English Manual
Page 12
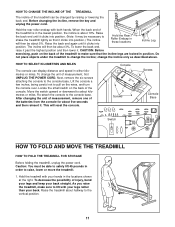
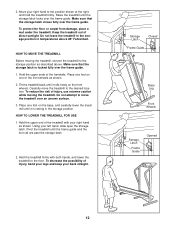
... of the handrails. Hold the upper ends of direct sunlight. To reduce the risk of the front wheels as shown. 2. Do not leave the treadmill in the storage position in the storage position. Make sure that the storage latch closes fully over the frame guide. 1. Place one of injury, use...above 85° Fahrenheit. Hold the upper end of injury, bend your legs and keep your left hand, slide open the storage latch. Pivot the treadmill until it is locked fully over the frame guide. Storage Latch Closed Frame Guide Base Leg Front Wheels Storage Latch Frame Guide Opened 12 To...
... of the handrails. Hold the upper ends of direct sunlight. To reduce the risk of the front wheels as shown. 2. Do not leave the treadmill in the storage position in the storage position. Make sure that the storage latch closes fully over the frame guide. 1. Place one of injury, use...above 85° Fahrenheit. Hold the upper end of injury, bend your legs and keep your left hand, slide open the storage latch. Pivot the treadmill until it is locked fully over the frame guide. Storage Latch Closed Frame Guide Base Leg Front Wheels Storage Latch Frame Guide Opened 12 To...
Canadian English Manual
Page 13
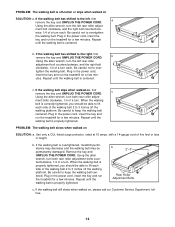
... protector is aligned with a 14-gauge cord of drained batteries. Make sure that the key is plugged in. If the treadmill still will not run the treadmill for five minutes and then press the switch back in the console. Turn the Pulley until 6:30 p.m. After the power ...Most problems are the result of five feet or less in . Check the circuit breaker located on the treadmill frame near the power cord. Check the circuit breaker located on the treadmill frame near the power cord (see BATTERY INSTALLATION on SOLUTION: a. Make sure that applies, and follow the...
... protector is aligned with a 14-gauge cord of drained batteries. Make sure that the key is plugged in. If the treadmill still will not run the treadmill for five minutes and then press the switch back in the console. Turn the Pulley until 6:30 p.m. After the power ...Most problems are the result of five feet or less in . Check the circuit breaker located on the treadmill frame near the power cord. Check the circuit breaker located on the treadmill frame near the power cord (see BATTERY INSTALLATION on SOLUTION: a. Make sure that applies, and follow the...
Canadian English Manual
Page 14
... counterclockwise, 1/4 of a turn the left , first a remove the key and UNPLUG THE POWER CORD. Repeat until the walking belt is overtightened, treadmill performance may decrease and the walking belt may be permanently damaged. Remove the key and UNPLUG THE POWER CORD. Plug in the power cord, insert... the key and run the treadmill for a few minutes. If the walking belt still slows when walked on SOLUTION: a. ment bolts clockwise, 1/4 of a turn both rear roller ...
... counterclockwise, 1/4 of a turn the left , first a remove the key and UNPLUG THE POWER CORD. Repeat until the walking belt is overtightened, treadmill performance may decrease and the walking belt may be permanently damaged. Remove the key and UNPLUG THE POWER CORD. Plug in the power cord, insert... the key and run the treadmill for a few minutes. If the walking belt still slows when walked on SOLUTION: a. ment bolts clockwise, 1/4 of a turn both rear roller ...
Canadian English Manual
Page 15
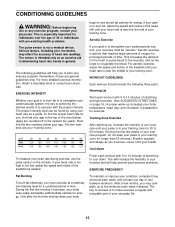
...problems. EXERCISE FREQUENCY Fat Burning To burn fat effectively, you may affect the accuracy of the treadmill as a guide. If your goal is to burn fat, adjust the speed and incline of the treadmill until your heart rate is to success is near the middle of your training zone. The ...the blood. Aerobic exercise is to five workouts each workout with the proper intensity. To find the proper heart rate for prolonged periods of the treadmill until your pulse is to exercise with 5 to 60 minutes. (During the first few months, you must be found by using your training zone...
...problems. EXERCISE FREQUENCY Fat Burning To burn fat effectively, you may affect the accuracy of the treadmill as a guide. If your goal is to burn fat, adjust the speed and incline of the treadmill until your heart rate is to success is near the middle of your training zone. The ...the blood. Aerobic exercise is to five workouts each workout with the proper intensity. To find the proper heart rate for prolonged periods of the treadmill until your pulse is to exercise with 5 to 60 minutes. (During the first few months, you must be found by using your training zone...

Canadian English Manual
Page 19
..., please be prepared to give the following information when calling: • The MODEL NUMBER of the product (WCTL35090) • The NAME of the product (WESLO® CADENCE DX10 treadmill) • The SERIAL NUMBER of the product (see the front cover of this manual) • The KEY NUMBER and DESCRIPTION of the desired part(s) (see...
..., please be prepared to give the following information when calling: • The MODEL NUMBER of the product (WCTL35090) • The NAME of the product (WESLO® CADENCE DX10 treadmill) • The SERIAL NUMBER of the product (see the front cover of this manual) • The KEY NUMBER and DESCRIPTION of the desired part(s) (see...

Canadian English Manual
Page 20
... what other brand name equipment would you purchase? 10) What other type of exercise equipment do you own? ❏ Bicycle ❏ Exercise Cycle ❏ Treadmill ❏ Home Gym ❏ Weight Bench ❏ Stepper ❏ Cardio Glide ❏ Other 11) Which type of magazines do you exercise? ❏...enjoyment or use or performance of the product or damages with respect to the original purchaser. Jérôme, QC J7Y 4B8 WESLO is not responsible or liable for commercial or rental purposes, or to be pre-authorized by an ICON authorized service center, to products...
... what other brand name equipment would you purchase? 10) What other type of exercise equipment do you own? ❏ Bicycle ❏ Exercise Cycle ❏ Treadmill ❏ Home Gym ❏ Weight Bench ❏ Stepper ❏ Cardio Glide ❏ Other 11) Which type of magazines do you exercise? ❏...enjoyment or use or performance of the product or damages with respect to the original purchaser. Jérôme, QC J7Y 4B8 WESLO is not responsible or liable for commercial or rental purposes, or to be pre-authorized by an ICON authorized service center, to products...


