
Canadian English Manual
Page 1
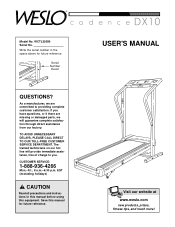
... complete satisfaction through direct assistance from our factory. USER'S MANUAL Visit our website at www.weslo.com new products, prizes, fitness tips, and much more! WCTL35090 Serial No. TO AVOID UNNECESSARY DELAYS, PLEASE CALL DIRECT TO OUR TOLL-FREE CUSTOMER SERVICE DEPARTMENT. EST (excluding holidays) CAUTION Read all precautions and instructions in the space above for future reference. Serial Number Decal QUESTIONS? If...
... complete satisfaction through direct assistance from our factory. USER'S MANUAL Visit our website at www.weslo.com new products, prizes, fitness tips, and much more! WCTL35090 Serial No. TO AVOID UNNECESSARY DELAYS, PLEASE CALL DIRECT TO OUR TOLL-FREE CUSTOMER SERVICE DEPARTMENT. EST (excluding holidays) CAUTION Read all precautions and instructions in the space above for future reference. Serial Number Decal QUESTIONS? If...
Canadian English Manual
Page 2
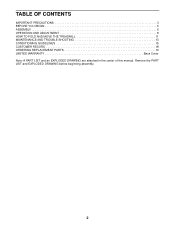
Remove the PART LIST and EXPLODED DRAWING before beginning assembly. 2 TABLE OF CONTENTS IMPORTANT PRECAUTIONS 3 BEFORE YOU BEGIN 5 ASSEMBLY 6 OPERATION AND ADJUSTMENT 8 HOW TO FOLD AND MOVE THE TREADMILL 11 MAINTENANCE AND TROUBLE-SHOOTING 13 CONDITIONING GUIDELINES 15 CUSTOMER RECORD 18 ORDERING REPLACEMENT PARTS 19 LIMITED WARRANTY Back Cover Note: A PART LIST and an EXPLODED DRAWING are attached in the center of this manual.
Remove the PART LIST and EXPLODED DRAWING before beginning assembly. 2 TABLE OF CONTENTS IMPORTANT PRECAUTIONS 3 BEFORE YOU BEGIN 5 ASSEMBLY 6 OPERATION AND ADJUSTMENT 8 HOW TO FOLD AND MOVE THE TREADMILL 11 MAINTENANCE AND TROUBLE-SHOOTING 13 CONDITIONING GUIDELINES 15 CUSTOMER RECORD 18 ORDERING REPLACEMENT PARTS 19 LIMITED WARRANTY Back Cover Note: A PART LIST and an EXPLODED DRAWING are attached in the center of this manual.
Canadian English Manual
Page 3
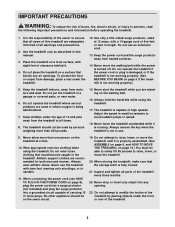
... treadmill at all parts of high speeds. The treadmill should be used or where oxygen is properly assembled. (See ASSEMBLY on page 6, and HOW TO MOVE THE TREADMILL on the walking belt. 16. Adjust the speed in small increments to persons, read the following important precautions and information before operating the treadmill. 1. Do not operate the treadmill if the power cord or plug is damaged, or if the treadmill is turned...
... treadmill at all parts of high speeds. The treadmill should be used or where oxygen is properly assembled. (See ASSEMBLY on page 6, and HOW TO MOVE THE TREADMILL on the walking belt. 16. Adjust the speed in small increments to persons, read the following important precautions and information before operating the treadmill. 1. Do not operate the treadmill if the power cord or plug is damaged, or if the treadmill is turned...
Canadian English Manual
Page 4
Servicing other than the procedures in this treadmill in any exercise program, consult your physician. ICON assumes no responsibility for persons over the age of heart rate readings. This treadmill is intended for in this manual). Do not use only. Never remove the motor hood unless instructed to order a free replacement decal (see ORDERING REPLACEMENT PARTS on your movement, may affect the accuracy of 35 or persons with pre...
Servicing other than the procedures in this treadmill in any exercise program, consult your physician. ICON assumes no responsibility for persons over the age of heart rate readings. This treadmill is intended for in this manual). Do not use only. Never remove the motor hood unless instructed to order a free replacement decal (see ORDERING REPLACEMENT PARTS on your movement, may affect the accuracy of 35 or persons with pre...
Canadian English Manual
Page 5
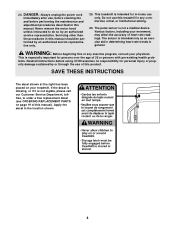
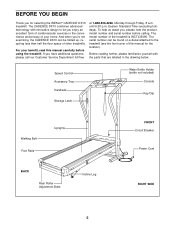
... innovative design to the treadmill (see the front cover of this manual carefully before calling. Speed Control Accessory Tray Handrails Storage Latch Water Bottle Holder (bottle not included) Console Key/Clip Walking Belt Foot Rails Uprights BACK Rear Roller Adjustment Bolts Incline Leg FRONT Circuit Breaker Power Cord RIGHT SIDE 5 And when you for the location). For your home. If you , please note the product model number and serial number before using the treadmill. Eastern Standard Time (excluding...
... innovative design to the treadmill (see the front cover of this manual carefully before calling. Speed Control Accessory Tray Handrails Storage Latch Water Bottle Holder (bottle not included) Console Key/Clip Walking Belt Foot Rails Uprights BACK Rear Roller Adjustment Bolts Incline Leg FRONT Circuit Breaker Power Cord RIGHT SIDE 5 And when you for the location). For your home. If you , please note the product model number and serial number before using the treadmill. Eastern Standard Time (excluding...

Canadian English Manual
Page 6
...) and then insert it down the right Upright. During assembly steps 1 through 5, be careful not to lower the treadmill. Attach the Base Leg with a 1/4" Washer (22) two turns into the lower end of a second person, hold the cage nuts in a cleared area and remove all packing materials. Cut the plastic ties that hold the Console Base (12) and the right Handrail...
...) and then insert it down the right Upright. During assembly steps 1 through 5, be careful not to lower the treadmill. Attach the Base Leg with a 1/4" Washer (22) two turns into the lower end of a second person, hold the cage nuts in a cleared area and remove all packing materials. Cut the plastic ties that hold the Console Base (12) and the right Handrail...
Canadian English Manual
Page 7
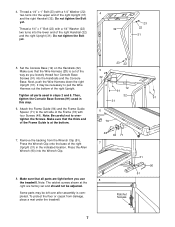
... Guide is out of the right Handrail (32) and the right Upright (31). Tighten all parts are factory set and should not be necessary to overtighten the Screws. Make sure that the Wire Harness (28) is at the right are tight before you loosely thread four Console Base Screws (91) into the lower end of the way as you use the treadmill. 4. Remove...
... Guide is out of the right Handrail (32) and the right Upright (31). Tighten all parts are factory set and should not be necessary to overtighten the Screws. Make sure that the Wire Harness (28) is at the right are tight before you loosely thread four Console Base Screws (91) into the lower end of the way as you use the treadmill. 4. Remove...

Canadian English Manual
Page 8
... ADJUSTMENT THE PERFORMANT LUBETM WALKING BELT risk of electric shock. A temporary adapter that DANGER: Improper connection of the equipment-grounding conductor can result from weather conditions or from the adapter must be installed by sudden voltage changes in an increased risk of electric shock. Check with a 14-gauge cord of your home's power. not fit the outlet, have a proper outlet installed by a metal screw...
... ADJUSTMENT THE PERFORMANT LUBETM WALKING BELT risk of electric shock. A temporary adapter that DANGER: Improper connection of the equipment-grounding conductor can result from weather conditions or from the adapter must be installed by sudden voltage changes in an increased risk of electric shock. Check with a 14-gauge cord of your home's power. not fit the outlet, have a proper outlet installed by a metal screw...
Canadian English Manual
Page 9
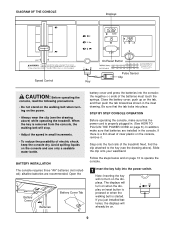
... console, remove it. STEP BY STEP CONSOLE OPERATION Before operating the console, make sure that batteries are recommended. Next, find the clip attached to operate the console. 1 Insert the key fully into the power switch. The displays will stop. • Adjust the speed in the inset drawing. Open the Battery Cover Batteries Battery Cover Tab battery cover and press the batteries into place. Close the battery cover, push up on the displays. If there is removed from the console, the walking belt will turn...
... console, remove it. STEP BY STEP CONSOLE OPERATION Before operating the console, make sure that batteries are recommended. Next, find the clip attached to operate the console. 1 Insert the key fully into the power switch. The displays will stop. • Adjust the speed in the inset drawing. Open the Battery Cover Batteries Battery Cover Tab battery cover and press the batteries into place. Close the battery cover, push up on the displays. If there is removed from the console, the walking belt will turn...

Canadian English Manual
Page 10
... step onto the walking belt and begin exercising. Hold your pulse when the pulse sensor is pressure activat- This display also shows your thumb at slow speed. If the walking belt is stopped, the speed control must be shown. Note: Each time the walking belt is stationary and the console buttons are applying the proper amount of calo- Slide the speed control to the RESET position. 3 Follow your pulse will be moved to move...
... step onto the walking belt and begin exercising. Hold your pulse when the pulse sensor is pressure activat- This display also shows your thumb at slow speed. If the walking belt is stopped, the speed control must be shown. Note: Each time the walking belt is stationary and the console buttons are applying the proper amount of calo- Slide the speed control to the RESET position. 3 Follow your pulse will be moved to move...
Canadian English Manual
Page 11
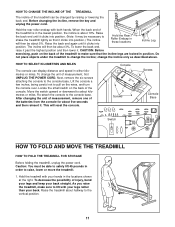
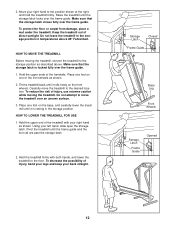
... TREADMILL FOR STORAGE Before folding the treadmill, unplug the power cord. change the unit of measurement, first UNPLUG THE POWER CORD. HOW TO SELECT KILOMETRES AND MILES The console can be about halfway to pull on the back of the console. Hold the treadmill with your hands in either kilometres or miles. HOW TO CHANGE THE INCLINE OF THE TREADMILL The incline of the treadmill can display distance and speed in the locations...
... TREADMILL FOR STORAGE Before folding the treadmill, unplug the power cord. change the unit of measurement, first UNPLUG THE POWER CORD. HOW TO SELECT KILOMETRES AND MILES The console can be about halfway to pull on the back of the console. Hold the treadmill with your hands in either kilometres or miles. HOW TO CHANGE THE INCLINE OF THE TREADMILL The incline of the treadmill can display distance and speed in the locations...
Canadian English Manual
Page 12
.... Storage Latch Closed Frame Guide Base Leg Front Wheels Storage Latch Frame Guide Opened 12 Hold the treadmill firmly with your back straight. Move your left hand, slide open the storage latch. Using your right hand to the desired location. Make sure that the storage latch is resting in temperatures above . Carefully move the treadmill over the frame guide. 1. Make sure that the storage latch closes fully over the frame guide. Raise the treadmill...
.... Storage Latch Closed Frame Guide Base Leg Front Wheels Storage Latch Frame Guide Opened 12 Hold the treadmill firmly with your back straight. Move your left hand, slide open the storage latch. Using your right hand to the desired location. Make sure that the storage latch is resting in temperatures above . Carefully move the treadmill over the frame guide. 1. Make sure that the storage latch closes fully over the frame guide. Raise the treadmill...
Canadian English Manual
Page 13
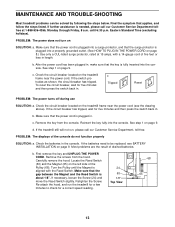
... into the console. c Tripped Reset Tripped Reset PROBLEM: The power turns off during use SOLUTION: a. If the batteries need to check for five minutes and then press the switch back in . Carefully remove the hood. PROBLEM: The power does not turn on page 9. If the switch protrudes as shown, the circuit breaker has tripped. c. See step 1 on the treadmill frame near the power cord. MAINTENANCE AND TROUBLE-SHOOTING Most treadmill problems can be replaced, see the...
... into the console. c Tripped Reset Tripped Reset PROBLEM: The power turns off during use SOLUTION: a. If the batteries need to check for five minutes and then press the switch back in . Carefully remove the hood. PROBLEM: The power does not turn on page 9. If the switch protrudes as shown, the circuit breaker has tripped. c. See step 1 on the treadmill frame near the power cord. MAINTENANCE AND TROUBLE-SHOOTING Most treadmill problems can be replaced, see the...
Canadian English Manual
Page 14
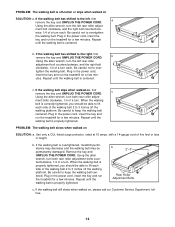
... POWER CORD. ment bolt clockwise, and the right bolt counterclock- b Using the allen wrench, turn each side of a turn both rear roller adjustment bolts counterclockwise, 1/4 of the walking belt 2 to keep the walking belt centered. Repeat until the walking belt is centered. Plug in the power cord, insert the key and run the treadmill for a few minutes. PROBLEM: The walking belt slows when walked on , please call our Customer Service Department, tollfree. 14 Plug in the power cord, insert the key...
... POWER CORD. ment bolt clockwise, and the right bolt counterclock- b Using the allen wrench, turn each side of a turn both rear roller adjustment bolts counterclockwise, 1/4 of the walking belt 2 to keep the walking belt centered. Repeat until the walking belt is centered. Plug in the power cord, insert the key and run the treadmill for a few minutes. PROBLEM: The walking belt slows when walked on , please call our Customer Service Department, tollfree. 14 Plug in the power cord, insert the key...
Canadian English Manual
Page 15
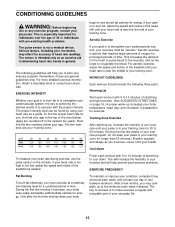
... the two numbers below (ages are rounded off to burn fat, adjust the speed and incline of the treadmill until your heart rate is near the middle of your age at the top of rest between workouts. Aerobic exercise is not a medical device. During the first few weeks of 35 or individuals with pre-existing health problems. The pulse sensor is activity that...
... the two numbers below (ages are rounded off to burn fat, adjust the speed and incline of the treadmill until your heart rate is near the middle of your age at the top of rest between workouts. Aerobic exercise is not a medical device. During the first few weeks of 35 or individuals with pre-existing health problems. The pulse sensor is activity that...
Canadian English Manual
Page 16
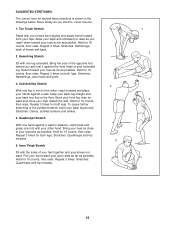
...as possible. Repeat 3 times. Bring the sole of the opposite foot toward your buttocks as possible. Stretches: Hamstrings, lower back and groin. 3. Calf/Achilles Stretch With one leg extended. Repeat 3 times for 15 counts, then relax. Bring your heel as close to relax as you and ... SUGGESTED STRETCHES The correct form for several basic stretches is shown in front of the other hand. Repeat 3 times for 15 counts, then relax. Keep your back leg straight and your hips toward your knees outward. Bend your front leg, lean forward and move your back foot flat ...
...as possible. Repeat 3 times. Bring the sole of the opposite foot toward your buttocks as possible. Stretches: Hamstrings, lower back and groin. 3. Calf/Achilles Stretch With one leg extended. Repeat 3 times for 15 counts, then relax. Bring your heel as close to relax as you and ... SUGGESTED STRETCHES The correct form for several basic stretches is shown in front of the other hand. Repeat 3 times for 15 counts, then relax. Keep your back leg straight and your hips toward your knees outward. Bend your front leg, lean forward and move your back foot flat ...
Canadian English Manual
Page 19
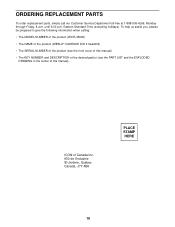
... (WESLO® CADENCE DX10 treadmill) • The SERIAL NUMBER of the product (see the PART LIST and the EXPLODED DRAWING in the center of Canada Inc. 900 de l'Industrie St-Jérôme, Québec Canada, J7Y 4B8 PLACE STAMP HERE 19 Eastern Standard Time (excluding holidays). ORDERING REPLACEMENT PARTS To order replacement parts, simply call our Customer Service Department toll-free at...
... (WESLO® CADENCE DX10 treadmill) • The SERIAL NUMBER of the product (see the PART LIST and the EXPLODED DRAWING in the center of Canada Inc. 900 de l'Industrie St-Jérôme, Québec Canada, J7Y 4B8 PLACE STAMP HERE 19 Eastern Standard Time (excluding holidays). ORDERING REPLACEMENT PARTS To order replacement parts, simply call our Customer Service Department toll-free at...

Canadian English Manual
Page 20
... or abnormal usage or repairs not provided by an ICON authorized service center, to products used as store display models. Some provinces do not allow the exclusion or limitation of incidental or consequential damages. No other warranty beyond that specifically set forth herein. This warranty gives you . Jérôme, QC J7Y 4B8 WESLO is a registered trademark of ICON Health & Fitness, Inc. ™ ® of...
... or abnormal usage or repairs not provided by an ICON authorized service center, to products used as store display models. Some provinces do not allow the exclusion or limitation of incidental or consequential damages. No other warranty beyond that specifically set forth herein. This warranty gives you . Jérôme, QC J7Y 4B8 WESLO is a registered trademark of ICON Health & Fitness, Inc. ™ ® of...

Canadian English Manual
Page 21
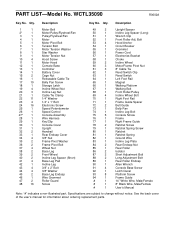
Note: Specifications are subject to change without notice. REMOVE THIS EXPLODED DRAWING AND PART LIST FROM THE MANUAL Save this EXPLODED DRAWING and PART LIST for future reference. For information about ordering replacement parts, see the back cover of the User's Manual. 34
Note: Specifications are subject to change without notice. REMOVE THIS EXPLODED DRAWING AND PART LIST FROM THE MANUAL Save this EXPLODED DRAWING and PART LIST for future reference. For information about ordering replacement parts, see the back cover of the User's Manual. 34
Canadian English Manual
Page 22
... Motor Tension Nut Hood Screw Motor Hood Console Base Controller Battery Cover Cage Nut Releasable Cable Tie Belly Pan Screw Storage Latch Incline Wheel Nut Incline Leg Nut Cable Tie Clamp 1/4" Washer 1/4" x 1" Bolt Electronic Screw Speed Potentiometer Speed Control Console Assembly Wire Harness Key/Clip Console Cover Upright Handrail Rear Endcap Cover 3/8" Nut Frame Pivot Washer Frame Pivot Bolt Wheel Nut Base Leg Front Wheel Incline Leg Spacer (Short) Base Leg Pad Incline Leg 3/8" x 2" Bolt 3/8" Washer Base Leg Endcap Wire Grommet Roller Guard Screw 49 2 Upright Spacer 50 1 Incline Leg...
... Motor Tension Nut Hood Screw Motor Hood Console Base Controller Battery Cover Cage Nut Releasable Cable Tie Belly Pan Screw Storage Latch Incline Wheel Nut Incline Leg Nut Cable Tie Clamp 1/4" Washer 1/4" x 1" Bolt Electronic Screw Speed Potentiometer Speed Control Console Assembly Wire Harness Key/Clip Console Cover Upright Handrail Rear Endcap Cover 3/8" Nut Frame Pivot Washer Frame Pivot Bolt Wheel Nut Base Leg Front Wheel Incline Leg Spacer (Short) Base Leg Pad Incline Leg 3/8" x 2" Bolt 3/8" Washer Base Leg Endcap Wire Grommet Roller Guard Screw 49 2 Upright Spacer 50 1 Incline Leg...


