
Canadian English Manual
Page 5
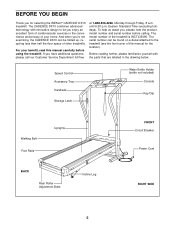
... for the location). until 6:30 p.m. Eastern Standard Time (excluding holidays). To help us assist you 're not exercising, the CADENCE DX10 can be folded up, requiring less than half the floor space of the treadmill is WCTL35090. For your home. Before reading further...WESLO® CADENCE DX10 treadmill. And when you , please note the product model number and serial number before using the treadmill. The model number of other treadmills. Speed Control Accessory Tray Handrails Storage Latch Water Bottle Holder (bottle not included) Console Key/Clip Walking Belt Foot Rails...
... for the location). until 6:30 p.m. Eastern Standard Time (excluding holidays). To help us assist you 're not exercising, the CADENCE DX10 can be folded up, requiring less than half the floor space of the treadmill is WCTL35090. For your home. Before reading further...WESLO® CADENCE DX10 treadmill. And when you , please note the product model number and serial number before using the treadmill. The model number of other treadmills. Speed Control Accessory Tray Handrails Storage Latch Water Bottle Holder (bottle not included) Console Key/Clip Walking Belt Foot Rails...
Canadian English Manual
Page 9
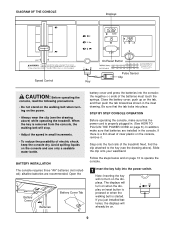
... button is pressed or when the walking belt is properly plugged in small increments. • To reduce the possibility of the treadmill. Step onto the foot rails of electric shock, keep the console dry. Note: Inserting the key will already be on the console and use only a sealable water bottle. When the...
... button is pressed or when the walking belt is properly plugged in small increments. • To reduce the possibility of the treadmill. Step onto the foot rails of electric shock, keep the console dry. Note: Inserting the key will already be on the console and use only a sealable water bottle. When the...

Canadian English Manual
Page 10
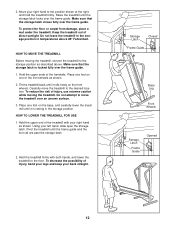
...-This display shows the elapsed time and the distance that you become familiar with the three displays. To measure your pulse, stand on the foot rails and place your thumb Pulse Sensor on the sensor as shown, and that your thumb is stopped, the speed control must be too high ... pulse, if desired. Make sure that you have walked or run, in the pulse display flashes steadily. To stop the walking belt, step onto the foot rails and slide the speed control to the RESET position. 3 Follow your pulse. 5 Turn off the sensor and allow the display to the other, as...
...-This display shows the elapsed time and the distance that you become familiar with the three displays. To measure your pulse, stand on the foot rails and place your thumb Pulse Sensor on the sensor as shown, and that your thumb is stopped, the speed control must be too high ... pulse, if desired. Make sure that you have walked or run, in the pulse display flashes steadily. To stop the walking belt, step onto the foot rails and slide the speed control to the RESET position. 3 Follow your pulse. 5 Turn off the sensor and allow the display to the other, as...
Canadian English Manual
Page 12
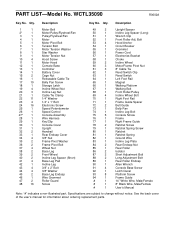
... freely on the front wheels. HOW TO MOVE THE TREADMILL Before moving the treadmill. Tilt the treadmill back until the frame guide and the foot rail are past the storage latch. 2. Hold the treadmill firmly with your right hand to the desired location. Carefully move the treadmill over the .... 2. To protect the floor or carpet from damage, place a mat under the treadmill. Keep the treadmill out of the handrails. Place one foot on one foot on the base, and carefully lower the treadmill until the storage latch locks over the frame guide. HOW TO LOWER THE TREADMILL FOR USE...
... freely on the front wheels. HOW TO MOVE THE TREADMILL Before moving the treadmill. Tilt the treadmill back until the frame guide and the foot rail are past the storage latch. 2. Hold the treadmill firmly with your right hand to the desired location. Carefully move the treadmill over the .... 2. To protect the floor or carpet from damage, place a mat under the treadmill. Keep the treadmill out of the handrails. Place one foot on one foot on the base, and carefully lower the treadmill until the storage latch locks over the frame guide. HOW TO LOWER THE TREADMILL FOR USE...
Canadian English Manual
Page 22
... 3 Motor/Frame Pivot Nut 61 3 8" Cable Tie 62 1 Reed Switch Clip 63 1 Reed Switch 64 1 Left Foot Rail 65 1 Magnet 66 1 Walking Platform 67 1 Walking Belt 68 1 Front Roller/Pulley 69 4 Incline Wheel Bolt 70 1 Right Foot Rail 71 1 Frame Guide Spacer 72 2 Belt Guide 73 1 Belly Pan 74 1 Incline Leg Bolt 75 6 Console...
... 3 Motor/Frame Pivot Nut 61 3 8" Cable Tie 62 1 Reed Switch Clip 63 1 Reed Switch 64 1 Left Foot Rail 65 1 Magnet 66 1 Walking Platform 67 1 Walking Belt 68 1 Front Roller/Pulley 69 4 Incline Wheel Bolt 70 1 Right Foot Rail 71 1 Frame Guide Spacer 72 2 Belt Guide 73 1 Belly Pan 74 1 Incline Leg Bolt 75 6 Console...
