

Canadian English Manual
Page 1
... Read all precautions and instructions in the space above for future reference. Serial Number Decal QUESTIONS? Save this equipment. Write the serial number in this manual before using this manuVailsit our website at If you have questions, or if there are committed to 17h00 EST (excluding holidays). Model No. WCTL2982.0 Serial...
... Read all precautions and instructions in the space above for future reference. Serial Number Decal QUESTIONS? Save this equipment. Write the serial number in this manual before using this manuVailsit our website at If you have questions, or if there are committed to 17h00 EST (excluding holidays). Model No. WCTL2982.0 Serial...
Canadian English Manual
Page 2
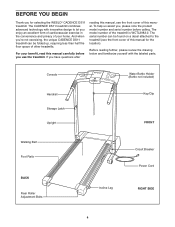
..., place a mat under the age of 12 and pets away from the treadmill at 15 amps, with bare feet, wearing only stockings, or in the center of this treadmill are adequately informed of this manual. If the control system is damaged, the walking belt may change speed, accelerate...move the walking belt while the power is the responsibility of the owner to persons, read the following important precautions and information before operating the treadmill. 1. When connecting the power cord (see page 8), plug the power cord into a surge suppressor (not included) and plug the surge ...
..., place a mat under the age of 12 and pets away from the treadmill at 15 amps, with bare feet, wearing only stockings, or in the center of this treadmill are adequately informed of this manual. If the control system is damaged, the walking belt may change speed, accelerate...move the walking belt while the power is the responsibility of the owner to persons, read the following important precautions and information before operating the treadmill. 1. When connecting the power cord (see page 8), plug the power cord into a surge suppressor (not included) and plug the surge ...

Canadian English Manual
Page 3
... placed on the walking belt. Note: The decals are standing on your physician. The treadmill is properly assembled. (See ASSEMBLY on page 5, and HOW TO MOVE THE TREADMILL on the front cover of this manual should be able to safely lift 20 kg (45 lbs.) in small increments to raise... of high speeds. Do not attempt to avoid sudden jumps in use only. When folding or moving the treadmill, make sure that the storage latch is especially important for in this manual and order a free replacement decal. DANGER: 23. Do not change the incline of this or any exercise...
... placed on the walking belt. Note: The decals are standing on your physician. The treadmill is properly assembled. (See ASSEMBLY on page 5, and HOW TO MOVE THE TREADMILL on the front cover of this manual should be able to safely lift 20 kg (45 lbs.) in small increments to raise... of high speeds. Do not attempt to avoid sudden jumps in use only. When folding or moving the treadmill, make sure that the storage latch is especially important for in this manual and order a free replacement decal. DANGER: 23. Do not change the incline of this or any exercise...
Canadian English Manual
Page 4
... Rails BACK Rear Roller Adjustment Bolts Incline Leg Circuit Breaker Power Cord RIGHT SIDE 4 If you have questions after reading this manual, see the front cover of your benefit, read this manual for selecting the WESLO® CADENCE DS11 treadmill. Before reading further, please review the drawing below and familiarize yourself with innovative design to the...
... Rails BACK Rear Roller Adjustment Bolts Incline Leg Circuit Breaker Power Cord RIGHT SIDE 4 If you have questions after reading this manual, see the front cover of your benefit, read this manual for selecting the WESLO® CADENCE DS11 treadmill. Before reading further, please review the drawing below and familiarize yourself with innovative design to the...
Canadian English Manual
Page 5
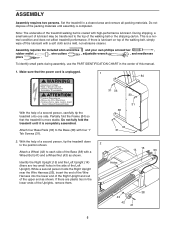
... into the lower end of the Right Upright and out of the walking belt or the shipping carton. ASSEMBLY Assembly requires two persons. Set the treadmill in the center of the packing materials until it is coated with a soft cloth and a mild, non-abrasive cleaner. Do not dispose of this... manual. 1. Make sure that the treadmill is lubricant on top of the Uprights, remove them. If there are two small holes in the lower ends of the walking belt...
... into the lower end of the Right Upright and out of the walking belt or the shipping carton. ASSEMBLY Assembly requires two persons. Set the treadmill in the center of the packing materials until it is coated with a soft cloth and a mild, non-abrasive cleaner. Do not dispose of this... manual. 1. Make sure that the treadmill is lubricant on top of the Uprights, remove them. If there are two small holes in the lower ends of the walking belt...
Canadian English Manual
Page 12
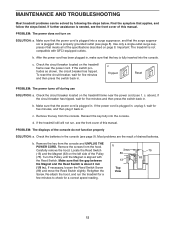
...plugged in, unplug it, wait for five minutes and then press the switch back in . Check the circuit breaker located on the treadmill frame near the power cord (see page 9). Check the circuit breaker located on page 8. Check the batteries in .). Carefully remove ...the hood. MAINTENANCE AND TROUBLESHOOTING Most treadmill problems can be solved by following the steps below. Find the symptom that meets all of this manual. Important: The treadmill is aligned with GFCI-equipped outlets. b. After the power cord has been ...
...plugged in, unplug it, wait for five minutes and then press the switch back in . Check the circuit breaker located on the treadmill frame near the power cord (see page 9). Check the circuit breaker located on page 8. Check the batteries in .). Carefully remove ...the hood. MAINTENANCE AND TROUBLESHOOTING Most treadmill problems can be solved by following the steps below. Find the symptom that meets all of this manual. Important: The treadmill is aligned with GFCI-equipped outlets. b. After the power cord has been ...
Canadian English Manual
Page 13
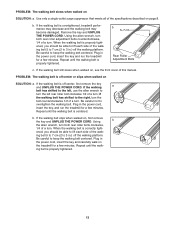
... of a turn . Be careful to overtighten the walking belt. PROBLEM: The walking belt slows when walked on , see the front cover of this manual. b. If the walking belt still slows when walked on SOLUTION: a. Be careful not to keep the walking belt centered. b. Use only a single...-outlet surge suppressor that meets all of the specifications described on the treadmill for a few minutes. If the walking belt is properly tightened. 13 Remove the key and UNPLUG THE POWER CORD. When the walking belt is...
... of a turn . Be careful to overtighten the walking belt. PROBLEM: The walking belt slows when walked on , see the front cover of this manual. b. If the walking belt still slows when walked on SOLUTION: a. Be careful not to keep the walking belt centered. b. Use only a single...-outlet surge suppressor that meets all of the specifications described on the treadmill for a few minutes. If the walking belt is properly tightened. 13 Remove the key and UNPLUG THE POWER CORD. When the walking belt is...

Canadian English Manual
Page 16
... warranty gives you . ORDERING REPLACEMENT PARTS To order replacement parts, see the PART LIST and the EXPLODED DRAWING in the center of this manual) WESLO is a registered trademark of ICON IP, Inc. No other rights which warranty claims are made must be pre-authorized by ICON. You...: • The MODEL NUMBER of the product (WCTL2982.0) • The NAME of the product (WESLO® CADENCE DS11 treadmill) • The SERIAL NUMBER of the product (see the front cover of this manual) • The KEY NUMBER and DESCRIPTION of the desired part(s) (see the front cover of enjoyment...
... warranty gives you . ORDERING REPLACEMENT PARTS To order replacement parts, see the PART LIST and the EXPLODED DRAWING in the center of this manual) WESLO is a registered trademark of ICON IP, Inc. No other rights which warranty claims are made must be pre-authorized by ICON. You...: • The MODEL NUMBER of the product (WCTL2982.0) • The NAME of the product (WESLO® CADENCE DS11 treadmill) • The SERIAL NUMBER of the product (see the front cover of this manual) • The KEY NUMBER and DESCRIPTION of the desired part(s) (see the front cover of enjoyment...

Canadian English Manual
Page 18
... Endcap 93 2 Handrail Endcap 94 1 Right Handrail # 1 4" Red Wire, Male/Female # 1 4" White Wire, Male/Female # 1 4" Blue Wire, Male/Female # 1 User's Manual * Includes all parts shown in the box Note: "#" indicates a non-illustrated part. Bolt 53 1 Wire Harness 54 1 Speed Pot 55 1 Speed Knob 56 1 5/32" Allen... 51 4 Platform Screw 52 1 Front Roller Adj. WCTL2982.0 R0505A Key No. Qty. See the back cover of the user's manual for information about ordering replacement parts. PART LIST-Model No. Specifications are subject to change without notice.
... Endcap 93 2 Handrail Endcap 94 1 Right Handrail # 1 4" Red Wire, Male/Female # 1 4" White Wire, Male/Female # 1 4" Blue Wire, Male/Female # 1 User's Manual * Includes all parts shown in the box Note: "#" indicates a non-illustrated part. Bolt 53 1 Wire Harness 54 1 Speed Pot 55 1 Speed Knob 56 1 5/32" Allen... 51 4 Platform Screw 52 1 Front Roller Adj. WCTL2982.0 R0505A Key No. Qty. See the back cover of the user's manual for information about ordering replacement parts. PART LIST-Model No. Specifications are subject to change without notice.

