

English Manual
Page 3
...use . 18. Inspect and tighten all warnings and precautions. 2. Remove the key and adjust the roller guards, if necessary. 22. Keep the treadmill indoors, away from heated surfaces. 11. Do not wear loose clothing that all users of this manual should be on a level surface, with ...not in length. Never remove the motor hood unless instructed to do not operate the treadmill continuously for in this treadmill in sandals. 13. Use the treadmill only as described in the treadmill. Never use the treadmill with bare feet, wearing only stockings, or in any opening. 20. No other...
...use . 18. Inspect and tighten all warnings and precautions. 2. Remove the key and adjust the roller guards, if necessary. 22. Keep the treadmill indoors, away from heated surfaces. 11. Do not wear loose clothing that all users of this manual should be on a level surface, with ...not in length. Never remove the motor hood unless instructed to do not operate the treadmill continuously for in this treadmill in sandals. 13. Use the treadmill only as described in the treadmill. Never use the treadmill with bare feet, wearing only stockings, or in any opening. 20. No other...
English Manual
Page 4
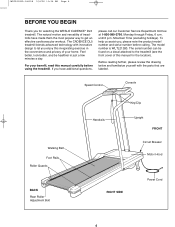
...to let you have made them the most popular way to the treadmill (see the front cover of this manual for selecting the WESLO CADENCE¨ DL5 treadmill. To help us assist you for the location). The CADENCE DL5 treadmill blends advanced technology with the parts that are labeled. The model...be found on a decal attached to get an effective cardiovascular workout. The serial number can be healthier in the convenience and privacy of treadmills have additional questions, please call our Customer Service Department toll-free at 1-800-999-3756, Monday through Friday, 6 a.m. If you...
...to let you have made them the most popular way to the treadmill (see the front cover of this manual for selecting the WESLO CADENCE¨ DL5 treadmill. To help us assist you for the location). The CADENCE DL5 treadmill blends advanced technology with the parts that are labeled. The model...be found on a decal attached to get an effective cardiovascular workout. The serial number can be healthier in the convenience and privacy of treadmills have additional questions, please call our Customer Service Department toll-free at 1-800-999-3756, Monday through Friday, 6 a.m. If you...
English Manual
Page 5
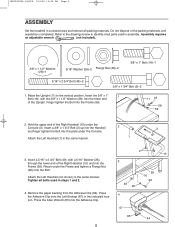
... the same manner. Finger tighten the Bolt into the Frame (59). 11 18 28 59 2. *WLTL21280-146358 5/4/00 11:24 AM Page 5 ASSEMBLY Set the treadmill in a cleared area and remove all bolts used in assembly.
... the same manner. Finger tighten the Bolt into the Frame (59). 11 18 28 59 2. *WLTL21280-146358 5/4/00 11:24 AM Page 5 ASSEMBLY Set the treadmill in a cleared area and remove all bolts used in assembly.
English Manual
Page 6
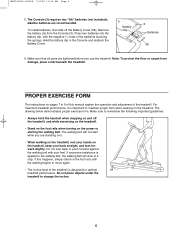
...the springs. Press two batteries into the battery clip, with your back straight, and lean forward slightly. Do not place objects under the treadmill to remember the following important guidelines: ¥ Always hold the handrail when stepping on and off the Battery Cover (58). To install ...batteries, first slide off the treadmill, and while exercising on the treadmill. ¥ Stand on the foot rails when turning on the handrail, keep your feet. The drawing below demonstrates proper exercise ...
...the springs. Press two batteries into the battery clip, with your back straight, and lean forward slightly. Do not place objects under the treadmill to remember the following important guidelines: ¥ Always hold the handrail when stepping on and off the Battery Cover (58). To install ...batteries, first slide off the treadmill, and while exercising on the treadmill. ¥ Stand on the foot rails when turning on the handrail, keep your feet. The drawing below demonstrates proper exercise ...
English Manual
Page 7
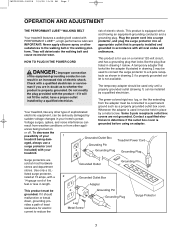
...not modify the plug provided with a 14-gauge cord of sophisticated electronic equipment, can result in accordance with grounding plug. Your treadmill, like extending from other appli- Voltage surges, spikes, and noise interference can be seriously damaged by a qualified electrician. Use only...belt or the walking plat- They will The temporary adapter should malfunction or break down, grounding provides a path of your treadmill. A temporary adapter that DANGER: Improper connection of the equipment-grounding conductor can be installed by sudden voltage changes in drawing...
...not modify the plug provided with a 14-gauge cord of sophisticated electronic equipment, can result in accordance with grounding plug. Your treadmill, like extending from other appli- Voltage surges, spikes, and noise interference can be seriously damaged by a qualified electrician. Use only...belt or the walking plat- They will The temporary adapter should malfunction or break down, grounding provides a path of your treadmill. A temporary adapter that DANGER: Improper connection of the equipment-grounding conductor can be installed by sudden voltage changes in drawing...
English Manual
Page 8
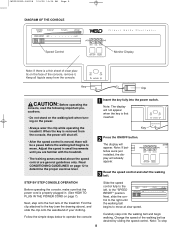
Next, slide the control to the right until you are familiar with the treadmill. ¥ The training zones marked above ), and slide the clip onto the waistband of the console, remove it. Carefully ...console, make sure that the power cord is a thin sheet of clear plastic on the face of your clothing. Change the speed of the treadmill. Key 2 Press the ON/OFF button. Adjust the speed in . (See HOW TO PLUG IN THE POWER CORD on page 7). The display... to move at slow speed. Read CONDITIONING GUIDELINES on the power. ¥ Always wear the clip while operating the treadmill.
Next, slide the control to the right until you are familiar with the treadmill. ¥ The training zones marked above ), and slide the clip onto the waistband of the console, remove it. Carefully ...console, make sure that the power cord is a thin sheet of clear plastic on the face of your clothing. Change the speed of the treadmill. Key 2 Press the ON/OFF button. Adjust the speed in . (See HOW TO PLUG IN THE POWER CORD on page 7). The display... to move at slow speed. Read CONDITIONING GUIDELINES on the power. ¥ Always wear the clip while operating the treadmill.
English Manual
Page 10
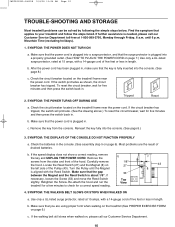
...amps, with a 14-gauge cord of five feet or less in . *WLTL21280-146358 5/4/00 11:24 AM Page 10 TROUBLE-SHOOTING AND STORAGE Most treadmill problems can be solved by following the simple steps below. until the Magnet is plugged into the console. (See page 8.) c. b. Check the ... Reed Switch is needed, please call our Customer Service Department. Most problems are using proper form when walking on the treadmill (See PROPER EXERCISE FORM on the treadmill frame near the power cord. If the walking belt still slows when walked on page 6). Remove the screws from the...
...amps, with a 14-gauge cord of five feet or less in . *WLTL21280-146358 5/4/00 11:24 AM Page 10 TROUBLE-SHOOTING AND STORAGE Most treadmill problems can be solved by following the simple steps below. until the Magnet is plugged into the console. (See page 8.) c. b. Check the ... Reed Switch is needed, please call our Customer Service Department. Most problems are using proper form when walking on the treadmill (See PROPER EXERCISE FORM on the treadmill frame near the power cord. If the walking belt still slows when walked on page 6). Remove the screws from the...

English Manual
Page 11
...POWER CORD. Plug in use. Repeat until the walking belt is centered. Plug in a secure location. STORAGE Unplug the power cord when the treadmill is centered. Remove the batteries from the lower end of each handrail. Using the allen wrench, turn the rear roller adjustment bolt counterclockwise 1/4...Repeat until the walking belt is not in the power cord, insert the key and run the treadmill for a few minutes. Remove the bolt, washer, and nut from the console and cover the treadmill during extended periods of a turn . Remove Remove *WLTL21280-146358 5/4/00 11:24 AM Page 11...
...POWER CORD. Plug in use. Repeat until the walking belt is centered. Plug in a secure location. STORAGE Unplug the power cord when the treadmill is centered. Remove the batteries from the lower end of each handrail. Using the allen wrench, turn the rear roller adjustment bolt counterclockwise 1/4...Repeat until the walking belt is not in the power cord, insert the key and run the treadmill for a few minutes. Remove the bolt, washer, and nut from the console and cover the treadmill during extended periods of a turn . Remove Remove *WLTL21280-146358 5/4/00 11:24 AM Page 11...

English Manual
Page 16
...above limitation may not apply to give the following information: ¥ The MODEL NUMBER of the product (WLTL21280). ¥ The NAME of the product (WESLO CADENCE¨ DL5 treadmill). ¥ The SERIAL NUMBER of the product (see the front cover of this manual). ¥ The KEY NUMBER of the part(s) (see page... ICON authorized service center, to products used as store display models. Some states do not allow the exclusion or limitation of this manual). WESLO is limited to replacing or repairing, at ICON's option, the product at one of its scope and duration to the terms set forth ...
...above limitation may not apply to give the following information: ¥ The MODEL NUMBER of the product (WLTL21280). ¥ The NAME of the product (WESLO CADENCE¨ DL5 treadmill). ¥ The SERIAL NUMBER of the product (see the front cover of this manual). ¥ The KEY NUMBER of the part(s) (see page... ICON authorized service center, to products used as store display models. Some states do not allow the exclusion or limitation of this manual). WESLO is limited to replacing or repairing, at ICON's option, the product at one of its scope and duration to the terms set forth ...


