
English Manual
Page 1
Serial ¨ Number Decal QUESTIONS? MST CAUTION Read all precautions and instructions in the space above for future reference. Save this equipment. *WLTL21280-146358 5/4/00 11:24 AM Page 1 Model No. WLTL21280 Serial No. TO AVOID UNNECESSARY DELAYS, PLEASE CALL DIRECT TO OUR TOLL-FREE CUSTOMER HOT LINE. As a manufacturer, we are missing or damaged parts... direct assistance from our factory. Write the serial number in this manual before using this manual for future reference. The trained technicians on our Customer Hot Line will guarantee you . USER'S MANUAL
Serial ¨ Number Decal QUESTIONS? MST CAUTION Read all precautions and instructions in the space above for future reference. Save this equipment. *WLTL21280-146358 5/4/00 11:24 AM Page 1 Model No. WLTL21280 Serial No. TO AVOID UNNECESSARY DELAYS, PLEASE CALL DIRECT TO OUR TOLL-FREE CUSTOMER HOT LINE. As a manufacturer, we are missing or damaged parts... direct assistance from our factory. Write the serial number in this manual before using this manual for future reference. The trained technicians on our Customer Hot Line will guarantee you . USER'S MANUAL
English Manual
Page 2
... by or through the use of 35 or persons with pre-existing health problems. Read all instructions before using. *WLTL21280-146358 5/4/00 11:24 AM Page 2 ¨ TABLE OF CONTENTS IMPORTANT PRECAUTIONS 3 BEFORE YOU BEGIN 4 ASSEMBLY 5 PROPER EXERCISE FORM 6 OPERATION AND ADJUSTMENT 7 TROUBLE-SHOOTING AND STORAGE 10 CONDITIONING GUIDELINES 12 PART LIST 14 EXPLODED DRAWING 15 ORDERING REPLACEMENT PARTS Back Cover LIMITED WARRANTY Back Cover WARNING: Before beginning this...
... by or through the use of 35 or persons with pre-existing health problems. Read all instructions before using. *WLTL21280-146358 5/4/00 11:24 AM Page 2 ¨ TABLE OF CONTENTS IMPORTANT PRECAUTIONS 3 BEFORE YOU BEGIN 4 ASSEMBLY 5 PROPER EXERCISE FORM 6 OPERATION AND ADJUSTMENT 7 TROUBLE-SHOOTING AND STORAGE 10 CONDITIONING GUIDELINES 12 PART LIST 14 EXPLODED DRAWING 15 ORDERING REPLACEMENT PARTS Back Cover LIMITED WARRANTY Back Cover WARNING: Before beginning this...

English Manual
Page 3
.... Adjust the speed in this manual. 3. Use only a UL-listed surge protector, rated at all warnings and precautions. 2. Never move the walking belt while the power is intended for in-home use an extension cord. 10. BEFORE YOU BEGIN on the same circuit. 9. Keep children under age 12 and pets away from the rear roller. When connecting the power cord (see page 4) must be on page 4 if the treadmill...
.... Adjust the speed in this manual. 3. Use only a UL-listed surge protector, rated at all warnings and precautions. 2. Never move the walking belt while the power is intended for in-home use an extension cord. 10. BEFORE YOU BEGIN on the same circuit. 9. Keep children under age 12 and pets away from the rear roller. When connecting the power cord (see page 4) must be on page 4 if the treadmill...
English Manual
Page 4
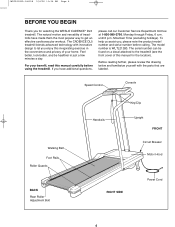
..., Monday through Friday, 6 a.m. Speed Control Console Walking Belt Foot Rails Roller Guards BACK Rear Roller Adjustment Bolt Handrails Key/Clip Upright FRONT Circuit Breaker Motor Hood RIGHT SIDE Power Cord The natural motion and versatility of your benefit, read this manual carefully before calling. For your home. Feel better, look better, and be found on a decal attached to the treadmill (see the front cover of this invigorating exercise in just a few minutes...
..., Monday through Friday, 6 a.m. Speed Control Console Walking Belt Foot Rails Roller Guards BACK Rear Roller Adjustment Bolt Handrails Key/Clip Upright FRONT Circuit Breaker Motor Hood RIGHT SIDE Power Cord The natural motion and versatility of your benefit, read this manual carefully before calling. For your home. Feel better, look better, and be found on a decal attached to the treadmill (see the front cover of this invigorating exercise in just a few minutes...
English Manual
Page 5
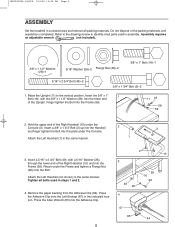
... identify small parts used in assembly. Press 4 the Adhesive Clip onto the Left Endcap (67) in the same manner. Attach the Left Handrail (not shown) in the indicated loca- tion. Attach the Left Handrail (1) in a cleared area and remove all bolts used in steps 1 and 2. 2 10 3 48 26 59 10 49 4. *WLTL21280-146358 5/4/00 11:24 AM Page 5 ASSEMBLY Set the treadmill in...
... identify small parts used in assembly. Press 4 the Adhesive Clip onto the Left Endcap (67) in the same manner. Attach the Left Handrail (not shown) in the indicated loca- tion. Attach the Left Handrail (1) in a cleared area and remove all bolts used in steps 1 and 2. 2 10 3 48 26 59 10 49 4. *WLTL21280-146358 5/4/00 11:24 AM Page 5 ASSEMBLY Set the treadmill in...
English Manual
Page 6
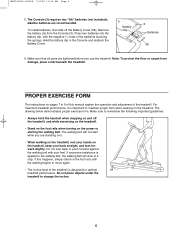
... move again. ¥ The incline level of the batteries touching the springs. PROPER EXERCISE FORM The instructions on the handrail, keep your hands on pages 7 to a stop. To install batteries, first slide off the treadmill, and while exercising on the treadmill. ¥ Stand on the foot rails when turning on and off the Battery Cover (58). Do not lean back or push forward against the walking belt...
... move again. ¥ The incline level of the batteries touching the springs. PROPER EXERCISE FORM The instructions on the handrail, keep your hands on pages 7 to a stop. To install batteries, first slide off the treadmill, and while exercising on the treadmill. ¥ Stand on the foot rails when turning on and off the Battery Cover (58). Do not lean back or push forward against the walking belt...
English Manual
Page 7
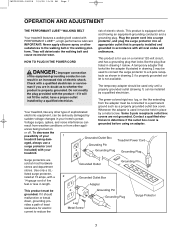
... extending from other type of least resistance for use a surge protector (not Grounded Outlet Box Grounding Pin Treadmill Power Cord included) with a 14-gauge cord of electric shock. Check with all local codes and form. not fit the outlet, have a proper outlet installed by a metal screw. The green-colored rigid ear, lug, or the like the adapter illustrated in drawing 2 may be seriously...
... extending from other type of least resistance for use a surge protector (not Grounded Outlet Box Grounding Pin Treadmill Power Cord included) with a 14-gauge cord of electric shock. Check with all local codes and form. not fit the outlet, have a proper outlet installed by a metal screw. The green-colored rigid ear, lug, or the like the adapter illustrated in drawing 2 may be seriously...
English Manual
Page 8
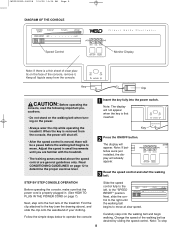
... stop Follow the simple steps below to the "SPEED RESET" position. The display will be a pause before the walking belt begins to move . Slide the speed control fully to the left, to operate the console: 1 Insert the key fully into the power switch. Keep all liquids away from the console, the power will shut off. ¥ After the speed control is moved, there will appear. Key 2 Press the ON/OFF button. Carefully step...
... stop Follow the simple steps below to the "SPEED RESET" position. The display will be a pause before the walking belt begins to move . Slide the speed control fully to the left, to operate the console: 1 Insert the key fully into the power switch. Keep all liquids away from the console, the power will shut off. ¥ After the speed control is moved, there will appear. Key 2 Press the ON/OFF button. Carefully step...
English Manual
Page 9
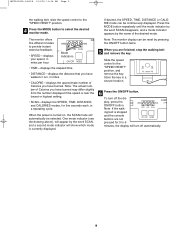
... modes to 6 minutes, the display will turn off automatically. Note: The monitor display can be selected. Slide the speed control to select the desired monitor mode. When the power is turned on, the SCAN mode will show which mode is stopped and the console buttons are finished, stop the walking belt and remove the key. One mode indicator (see the drawing above), will appear by the name of Calories you are not pressed...
... modes to 6 minutes, the display will turn off automatically. Note: The monitor display can be selected. Slide the speed control to select the desired monitor mode. When the power is turned on, the SCAN mode will show which mode is stopped and the console buttons are finished, stop the walking belt and remove the key. One mode indicator (see the drawing above), will appear by the name of Calories you are not pressed...
English Manual
Page 10
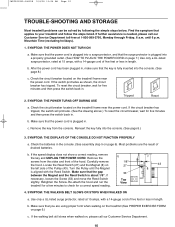
... Screw. If the walking belt still slows when walked on page 6). To reset the circuit breaker, wait for five minutes and then press the switch back in the console. (See assembly step 5 on , please call our Customer Service Department toll-free at 1-800-999-3756, Monday through Friday, 6 a.m. b. c. Most problems are using proper form when walking on the treadmill (See PROPER EXERCISE FORM on the treadmill frame near the power cord. Carefully remove...
... Screw. If the walking belt still slows when walked on page 6). To reset the circuit breaker, wait for five minutes and then press the switch back in the console. (See assembly step 5 on , please call our Customer Service Department toll-free at 1-800-999-3756, Monday through Friday, 6 a.m. b. c. Most problems are using proper form when walking on the treadmill (See PROPER EXERCISE FORM on the treadmill frame near the power cord. Carefully remove...

English Manual
Page 11
... the lower end of a turn the rear roller adjustment bolt counterclockwise 1/4 of each handrail. Remove Remove Using the allen wrench, turn . utes. Plug in the power cord, insert the key and run the treadmill for a few minutes. Lay the upright on the treadmill. b. *WLTL21280-146358 5/4/00 11:24 AM Page 11 5. Repeat until the walking belt is centered. Remove the batteries from the upper end of storage. Remove the bolt from the console and cover the treadmill...
... the lower end of a turn the rear roller adjustment bolt counterclockwise 1/4 of each handrail. Remove Remove Using the allen wrench, turn . utes. Plug in the power cord, insert the key and run the treadmill for a few minutes. Lay the upright on the treadmill. b. *WLTL21280-146358 5/4/00 11:24 AM Page 11 5. Repeat until the walking belt is centered. Remove the batteries from the upper end of storage. Remove the bolt from the console and cover the treadmill...
English Manual
Page 12
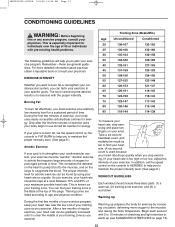
...-existing health problems. The following guidelines will help you stop exercising and place two fingers on the console to AEROBIC to maintain the proper intensity level. (See page 8.) WORKOUT GUIDELINES Each workout should be found by increasing circulation, delivering more detailed information about exercise, obtain a reputable book or consult your exercise. In addition, set the speed control on the lungs to your exercise program. This...
...-existing health problems. The following guidelines will help you stop exercising and place two fingers on the console to AEROBIC to maintain the proper intensity level. (See page 8.) WORKOUT GUIDELINES Each workout should be found by increasing circulation, delivering more detailed information about exercise, obtain a reputable book or consult your exercise. In addition, set the speed control on the lungs to your exercise program. This...
English Manual
Page 13
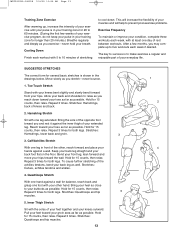
...form for several basic stretches is in your training zone for both legs. Repeat 3 times for longer than 20 minutes.) Breathe regularly and deeply as possible. Hold for 15 counts, then relax. *WLTL21280-146358 5/4/00 11:24 AM Page 13 Training Zone Exercise After warming up to five workouts each week if desired. The key...both legs. Stretches: Hamstrings, lower back and groin. 3 3. Calf/Achilles Stretch With one leg extended. Bend your front leg, lean forward and move your hands against the inner thigh of your exercise program, do not keep your pulse in your training ...
...form for several basic stretches is in your training zone for both legs. Repeat 3 times for longer than 20 minutes.) Breathe regularly and deeply as possible. Hold for 15 counts, then relax. *WLTL21280-146358 5/4/00 11:24 AM Page 13 Training Zone Exercise After warming up to five workouts each week if desired. The key...both legs. Stretches: Hamstrings, lower back and groin. 3 3. Calf/Achilles Stretch With one leg extended. Bend your front leg, lean forward and move your hands against the inner thigh of your exercise program, do not keep your pulse in your training ...
English Manual
Page 14
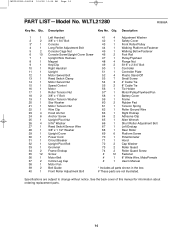
... Roller Adjustment Bolt 27 1 Reed Switch/Sensor Wire 67 1 Left Endcap 28 1 3/8Ó x 1 1/2Ó Washer 68 1 Rear Roller 29 1 Upright Cover 69 6 Platform Screw 30 1 Power Cord 70 1 Potentiometer 31 1 Circuit Breaker 71 1 Hood 32 1 Upright Pivot Bolt 72 2 Cap Washer 33 1 Grommet 73 2 Roller Guard 34 2 Frame Endcap 74 2 Roller Guard Screw 35 12 Screw # 12 Fastener 36 1 Motor Belt # 1 8Ó White Wire, Male/Female 37 2 Incline Leg Cap # 1 UserÕs Manual 38 1 Motor Fan 39 2 Belt Guide * Includes all parts...
... Roller Adjustment Bolt 27 1 Reed Switch/Sensor Wire 67 1 Left Endcap 28 1 3/8Ó x 1 1/2Ó Washer 68 1 Rear Roller 29 1 Upright Cover 69 6 Platform Screw 30 1 Power Cord 70 1 Potentiometer 31 1 Circuit Breaker 71 1 Hood 32 1 Upright Pivot Bolt 72 2 Cap Washer 33 1 Grommet 73 2 Roller Guard 34 2 Frame Endcap 74 2 Roller Guard Screw 35 12 Screw # 12 Fastener 36 1 Motor Belt # 1 8Ó White Wire, Male/Female 37 2 Incline Leg Cap # 1 UserÕs Manual 38 1 Motor Fan 39 2 Belt Guide * Includes all parts...

English Manual
Page 16
... duration to replacing or repairing, at ICON's option, the product at 1-800-999-3756, Monday through Friday, 6 a.m. This warranty extends only to give the following information: ¥ The MODEL NUMBER of the product (WLTL21280). ¥ The NAME of the product (WESLO CADENCE¨ DL5 treadmill). ¥ The SERIAL NUMBER of the product (see the front cover of this manual). ¥ The KEY NUMBER of the part(s) (see page...
... duration to replacing or repairing, at ICON's option, the product at 1-800-999-3756, Monday through Friday, 6 a.m. This warranty extends only to give the following information: ¥ The MODEL NUMBER of the product (WLTL21280). ¥ The NAME of the product (WESLO CADENCE¨ DL5 treadmill). ¥ The SERIAL NUMBER of the product (see the front cover of this manual). ¥ The KEY NUMBER of the part(s) (see page...


