

Uk Manual
Page 2
TABLE OF CONTENTS IMPORTANT PRECAUTIONS 3 BEFORE YOU BEGIN 5 ASSEMBLY 6 OPERATION AND ADJUSTMENT 12 HOW TO FOLD AND MOVE THE TREADMILL 16 MAINTENANCE AND TROUBLESHOOTING 18 CONDITIONING GUIDELINES 20 PART LIST 22 EXPLODED DRAWING 24 ORDERING REPLACEMENT PARTS Back Cover WESLO is a registered trademark of ICON IP, Inc. 2
TABLE OF CONTENTS IMPORTANT PRECAUTIONS 3 BEFORE YOU BEGIN 5 ASSEMBLY 6 OPERATION AND ADJUSTMENT 12 HOW TO FOLD AND MOVE THE TREADMILL 16 MAINTENANCE AND TROUBLESHOOTING 18 CONDITIONING GUIDELINES 20 PART LIST 22 EXPLODED DRAWING 24 ORDERING REPLACEMENT PARTS Back Cover WESLO is a registered trademark of ICON IP, Inc. 2
Uk Manual
Page 3
... PRECAUTIONS WARNING: To reduce the risk of burns, fire, electric shock, or injury to persons, read the following important precautions and information before using the treadmill (see page 12), plug the power cord into any air openings. It is properly assembled. (See ASSEMBLY on page 6 and HOW TO FOLD AND ... able to safely lift 45 pounds (20 kg) to the fuse carrier. Never allow more than one person on each side. Do not place the treadmill on a surface that all users of all times. 7. When replacing the fuse, an ASTA approved BS1362 type should be used or where oxygen is...
... PRECAUTIONS WARNING: To reduce the risk of burns, fire, electric shock, or injury to persons, read the following important precautions and information before using the treadmill (see page 12), plug the power cord into any air openings. It is properly assembled. (See ASSEMBLY on page 6 and HOW TO FOLD AND ... able to safely lift 45 pounds (20 kg) to the fuse carrier. Never allow more than one person on each side. Do not place the treadmill on a surface that all users of all times. 7. When replacing the fuse, an ASTA approved BS1362 type should be used or where oxygen is...
Uk Manual
Page 4
... is missing, or if it is especially important for in this or any commercial, rental, or institutional setting. Do not use of this treadmill in any exercise program, consult your physician. WARNING: Before beginning this manual should be performed by an authorized service representative. DANGER: 23.... manual and order a free replacement decal. Always unplug the power cord immediately after use only. tenance and adjustment procedures de- This treadmill is not shown at the right has been placed on the front cover of 35 or persons with pre-existing health problems. Read ...
... is missing, or if it is especially important for in this or any commercial, rental, or institutional setting. Do not use of this treadmill in any exercise program, consult your physician. WARNING: Before beginning this manual should be performed by an authorized service representative. DANGER: 23.... manual and order a free replacement decal. Always unplug the power cord immediately after use only. tenance and adjustment procedures de- This treadmill is not shown at the right has been placed on the front cover of 35 or persons with pre-existing health problems. Read ...
Uk Manual
Page 5
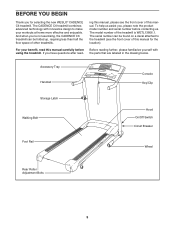
... you , please note the product model number and serial number before using the treadmill. If you 're not exercising, the CADENCE C6 treadmill can be folded up, requiring less than half the floor space of this manual for selecting the new WESLO® CADENCE C6 treadmill. The serial number can be found on a decal attached to make your...
... you , please note the product model number and serial number before using the treadmill. If you 're not exercising, the CADENCE C6 treadmill can be folded up, requiring less than half the floor space of this manual for selecting the new WESLO® CADENCE C6 treadmill. The serial number can be found on a decal attached to make your...
Uk Manual
Page 6
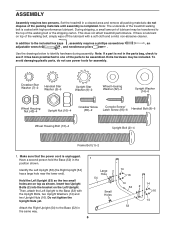
...the parts bag, check to see if it has been preattached to one of the parts to be transferred to the top of the treadmill walking belt is unplugged. Insert two Upright Bolts (2) into the bracket on top as shown. Base Pad AttaScchretwhe(2R6ig)-h6t Upright (54... keys , assembly requires a phillips screwdriver , an adjustable wrench , and needlenose pliers . do not use power tools for assembly. This does not affect treadmill performance. Do not tighten the Upright Nuts yet. Assembly requires two persons. ASSEMB2 L3/4Y" Bolt (47)-4 Star Washer (81)-4 Washer (29)-4 Handrail...
...the parts bag, check to see if it has been preattached to one of the parts to be transferred to the top of the treadmill walking belt is unplugged. Insert two Upright Bolts (2) into the bracket on top as shown. Base Pad AttaScchretwhe(2R6ig)-h6t Upright (54... keys , assembly requires a phillips screwdriver , an adjustable wrench , and needlenose pliers . do not use power tools for assembly. This does not affect treadmill performance. Do not tighten the Upright Nuts yet. Assembly requires two persons. ASSEMB2 L3/4Y" Bolt (47)-4 Star Washer (81)-4 Washer (29)-4 Handrail...

Uk Manual
Page 7
Position the Base (52) as possible. Next, pull the opposite end of the wire tie out of the upper end of the 3 treadmill as close to the front of the Right Upright (54), until the Wire Harness is routed completely through the Right Upright. Secure the Wire Harness ...
Position the Base (52) as possible. Next, pull the opposite end of the wire tie out of the upper end of the 3 treadmill as close to the front of the Right Upright (54), until the Wire Harness is routed completely through the Right Upright. Secure the Wire Harness ...
Uk Manual
Page 11
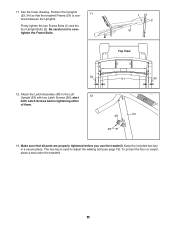
... place. See the lower drawing. The hex key is cen- Firmly tighten the two Frame Bolts (1) and the four Upright Bolts (2). Make sure that the treadmill Frame (51) is used to adjust the walking belt (see page 19). Attach the Latch Assembly (48) to overtighten the Frame Bolts. 1 2 51 ...Top View 54 51 53 12. start 12 both Latch Screws before you use the treadmill. Position the Uprights 11 (53, 54) so that all parts are properly tightened before tightening either of them. 48 53 95 13. tered between the...
... place. See the lower drawing. The hex key is cen- Firmly tighten the two Frame Bolts (1) and the four Upright Bolts (2). Make sure that the treadmill Frame (51) is used to adjust the walking belt (see page 19). Attach the Latch Assembly (48) to overtighten the Frame Bolts. 1 2 51 ...Top View 54 51 53 12. start 12 both Latch Screws before you use the treadmill. Position the Uprights 11 (53, 54) so that all parts are properly tightened before tightening either of them. 48 53 95 13. tered between the...
Uk Manual
Page 12
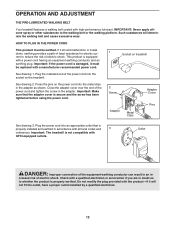
...the power cord and tighten the screw in - HOW TO PLUG IN THE POWER CORD This product must be earthed. Socket on the treadmill. Close the adapter cover over the end of the equipment-earthing conductor can result in an in the adapter. Check with all local ...a power cord having an equipment-earthing conductor and an earthing plug. If it must be replaced with a manufacturer-recommended power cord. Important: The treadmill is properly earthed. IMPORTANT: Never apply silicone spray or other substances to reduce the risk of least resistance for electric cur- 1 rent to the...
...the power cord and tighten the screw in - HOW TO PLUG IN THE POWER CORD This product must be earthed. Socket on the treadmill. Close the adapter cover over the end of the equipment-earthing conductor can result in an in the adapter. Check with all local ...a power cord having an equipment-earthing conductor and an earthing plug. If it must be replaced with a manufacturer-recommended power cord. Important: The treadmill is properly earthed. IMPORTANT: Never apply silicone spray or other substances to reduce the risk of least resistance for electric cur- 1 rent to the...
Uk Manual
Page 13
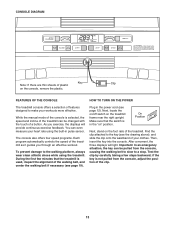
... your clothes. After a moment, the three displays will provide continuous exercise feedback. if the key is selected, the speed and incline of the treadmill can be changed with the touch of the walking belt, and center the walking belt if necessary (see page 12). Next, locate the on.../off switch on " position. The console also offers four speed programs. Each program automatically controls the speed of your heart rate using the treadmill. Then, insert the key into the console. Important: In an emergency situation, the key can be pulled from the console, adjust the position...
... your clothes. After a moment, the three displays will provide continuous exercise feedback. if the key is selected, the speed and incline of the treadmill can be changed with the touch of the walking belt, and center the walking belt if necessary (see page 12). Next, locate the on.../off switch on " position. The console also offers four speed programs. Each program automatically controls the speed of your heart rate using the treadmill. Then, insert the key into the console. Important: In an emergency situation, the key can be pulled from the console, adjust the position...
Uk Manual
Page 14
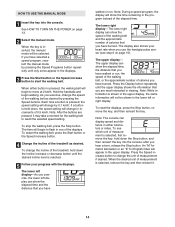
... to move at 2 km/h. When the desired unit of measurement is shown in the upper display, the same information will change the speed of the treadmill as desired by 0.1 km/h; When the key is selected, first remove the key, hold down , the speed setting will not be selected. As you have... is pressed, the walking belt will appear in viewing. An "M" for metric kilometers or an "E" for the walking belt to change the unit of the treadmill, hold down the Stop button, and then reinsert the key into the console. if a button is held down the Incline increase or decrease button until...
... to move at 2 km/h. When the desired unit of measurement is shown in the upper display, the same information will change the speed of the treadmill as desired by 0.1 km/h; When the key is selected, first remove the key, hold down , the speed setting will not be selected. As you have... is pressed, the walking belt will appear in viewing. An "M" for metric kilometers or an "E" for the walking belt to change the unit of the treadmill, hold down the Stop button, and then reinsert the key into the console. if a button is held down the Incline increase or decrease button until...
Uk Manual
Page 15
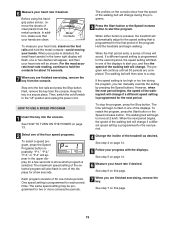
...lower right display will flash, one of the displays to the "off" position and unplug the power cord. When either button is pressed, the treadmill will be programmed for the first period of the walking belt will change if a different speed setting is programmed for a few seconds to show ...the next period. 4 Change the incline of clear plastic from the metal contacts. Before using the handgrip pulse sensor, remove the sheets of the treadmill as desired. In addition, make sure that is programmed for the second period, the speed setting will appear in one of 30 one of ...
...lower right display will flash, one of the displays to the "off" position and unplug the power cord. When either button is pressed, the treadmill will be programmed for the first period of the walking belt will change if a different speed setting is programmed for a few seconds to show ...the next period. 4 Change the incline of clear plastic from the metal contacts. Before using the handgrip pulse sensor, remove the sheets of the treadmill as desired. In addition, make sure that is programmed for the second period, the speed setting will appear in one of 30 one of ...
Uk Manual
Page 16
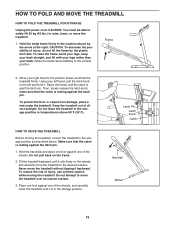
...storage position in the location shown by the plastic foot rails. To reduce the risk of injury, use extreme caution while moving the treadmill, convert the treadmill to the position shown and hold it rolls freely on the frame. 2. Move your right hand to the storage position as described ...above 85°F (30°C). HOW TO MOVE THE TREADMILL Before moving the treadmill. Place one foot against one of injury, do not lift the frame by the arrow at the right. Hold the metal frame firmly...
...storage position in the location shown by the plastic foot rails. To reduce the risk of injury, use extreme caution while moving the treadmill, convert the treadmill to the position shown and hold it rolls freely on the frame. 2. Move your right hand to the storage position as described ...above 85°F (30°C). HOW TO MOVE THE TREADMILL Before moving the treadmill. Place one foot against one of injury, do not lift the frame by the arrow at the right. Hold the metal frame firmly...

Uk Manual
Page 17
Next, lower the frame until it . To decrease the possibility of the treadmill with both hands, and lower it to the left and hold it is past the latch pin. Then, release the latch knob. 2. Latch Pin Latch Knob Frame 17 Using your left hand, pull the latch knob to the floor. Hold the frame firmly with your back straight. Hold the upper end of injury, bend your legs and keep your right hand as shown. HOW TO LOWER THE TREADMILL FOR USE 1.
Next, lower the frame until it . To decrease the possibility of the treadmill with both hands, and lower it to the left and hold it is past the latch pin. Then, release the latch knob. 2. Latch Pin Latch Knob Frame 17 Using your left hand, pull the latch knob to the floor. Hold the frame firmly with your back straight. Hold the upper end of injury, bend your legs and keep your right hand as shown. HOW TO LOWER THE TREADMILL FOR USE 1.
Uk Manual
Page 18
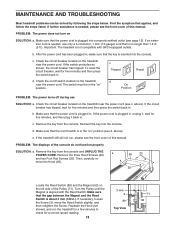
... Hood (65). 65 20 25 Locate the Reed Switch (89) and the Magnet (62) on the left side of this manual. MAINTENANCE AND TROUBLESHOOTING Most treadmill problems can be in the "on" position. Find the symptom that the gap between the Magnet and the Reed Switch is plugged in. If an... SOLUTION: a. b. If the power cord is needed , use SOLUTION: a. Remove the key from the console. Make sure that the on/off switch located on the treadmill near the power cord (see the front cover of the Pulley (71). c. Make sure that the power cord is about 3 mm (1/8 in , unplug it, wait...
... Hood (65). 65 20 25 Locate the Reed Switch (89) and the Magnet (62) on the left side of this manual. MAINTENANCE AND TROUBLESHOOTING Most treadmill problems can be in the "on" position. Find the symptom that the gap between the Magnet and the Reed Switch is plugged in. If an... SOLUTION: a. b. If the power cord is needed , use SOLUTION: a. Remove the key from the console. Make sure that the on/off switch located on the treadmill near the power cord (see the front cover of the Pulley (71). c. Make sure that the power cord is about 3 mm (1/8 in , unplug it, wait...
Uk Manual
Page 19
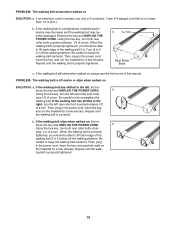
...turn . b. Using the hex key, turn both rear roller bolts clock- Then, plug in the power cord, insert the key, and run the treadmill for a few minutes. Be careful not to the right, turn the left rear roller bolt counterclockwise 1/2 of a turn both rear roller bolts counterclockwise..., 1/4 of a turn . Then, plug in the power cord, insert the key, and run the treadmill for a few minutes. b. If the walking belt slips when walked on SOLUTION: a. Repeat until the walking belt is no longer than 1.5 m (5 ...
...turn . b. Using the hex key, turn both rear roller bolts clock- Then, plug in the power cord, insert the key, and run the treadmill for a few minutes. Be careful not to the right, turn the left rear roller bolt counterclockwise 1/2 of a turn both rear roller bolts counterclockwise..., 1/4 of a turn . Then, plug in the power cord, insert the key, and run the treadmill for a few minutes. b. If the walking belt slips when walked on SOLUTION: a. Repeat until the walking belt is no longer than 1.5 m (5 ...
Uk Manual
Page 20
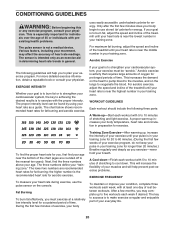
... of your exercise until your pulse is in your training zone for 20 to 60 minutes. (During the first few minutes of the treadmill until your cardiovascular system, the key to exercise with preexisting health problems. uses easily accessible carbohydrate calories for prolonged periods of heart rate ... cool down -Finish each week, with 5 to the nearest ten years). For maximum fat burning, adjust the speed and incline of the treadmill until your heart rate is near the highest number in your goal is to oxygenate the blood. The three numbers define your physician. This...
... of your exercise until your pulse is in your training zone for 20 to 60 minutes. (During the first few minutes of the treadmill until your cardiovascular system, the key to exercise with preexisting health problems. uses easily accessible carbohydrate calories for prolonged periods of heart rate ... cool down -Finish each week, with 5 to the nearest ten years). For maximum fat burning, adjust the speed and incline of the treadmill until your heart rate is near the highest number in your goal is to oxygenate the blood. The three numbers define your physician. This...

Uk Manual
Page 28
... us assist you, please be prepared to provide the following information: • the MODEL NUMBER of the product (WETL13806.1) • the NAME of the product (WESLO CADENCE C6 treadmill) • the SERIAL NUMBER of the product (see the front cover of this manual) • the KEY NUMBER and DESCRIPTION of the needed part(s) (see...
... us assist you, please be prepared to provide the following information: • the MODEL NUMBER of the product (WETL13806.1) • the NAME of the product (WESLO CADENCE C6 treadmill) • the SERIAL NUMBER of the product (see the front cover of this manual) • the KEY NUMBER and DESCRIPTION of the needed part(s) (see...


