

Uk Manual
Page 2
TABLE OF CONTENTS IMPORTANT PRECAUTIONS 3 BEFORE YOU BEGIN 5 ASSEMBLY 6 OPERATION AND ADJUSTMENT 12 HOW TO FOLD AND MOVE THE TREADMILL 16 MAINTENANCE AND TROUBLESHOOTING 18 CONDITIONING GUIDELINES 20 PART LIST 22 EXPLODED DRAWING 24 ORDERING REPLACEMENT PARTS Back Cover WESLO is a registered trademark of ICON IP, Inc. 2
TABLE OF CONTENTS IMPORTANT PRECAUTIONS 3 BEFORE YOU BEGIN 5 ASSEMBLY 6 OPERATION AND ADJUSTMENT 12 HOW TO FOLD AND MOVE THE TREADMILL 16 MAINTENANCE AND TROUBLESHOOTING 18 CONDITIONING GUIDELINES 20 PART LIST 22 EXPLODED DRAWING 24 ORDERING REPLACEMENT PARTS Back Cover WESLO is a registered trademark of ICON IP, Inc. 2
Uk Manual
Page 3
... both men and women. Always hold the handrails while using the treadmill. The treadmill is not in use the treadmill with at all parts of the treadmill regularly. 11. Always remove the key and unplug the power cord when the treadmill is capable of heart rate readings. When replacing the fuse, an... ASTA approved BS1362 type should be fitted to ensure that blocks any opening on the same circuit. When folding or moving the treadmill, make sure that could become caught in a garage or covered patio, or near water. 5. Never drop or insert any object into an earthed...
... both men and women. Always hold the handrails while using the treadmill. The treadmill is not in use the treadmill with at all parts of the treadmill regularly. 11. Always remove the key and unplug the power cord when the treadmill is capable of heart rate readings. When replacing the fuse, an... ASTA approved BS1362 type should be fitted to ensure that blocks any opening on the same circuit. When folding or moving the treadmill, make sure that could become caught in a garage or covered patio, or near water. 5. Never drop or insert any object into an earthed...
Uk Manual
Page 4
...the use this manual should be performed by an authorized service representative only. 24. Servicing other than the procedures in this treadmill in -home use , before cleaning the treadmill, and before using. WARNING: Before beginning this product. DANGER: 23. This is not legible, call the telephone number... on the treadmill. If the decal is missing, or if it is especially important for personal injury or property damage sustained by an authorized...
...the use this manual should be performed by an authorized service representative only. 24. Servicing other than the procedures in this treadmill in -home use , before cleaning the treadmill, and before using. WARNING: Before beginning this product. DANGER: 23. This is not legible, call the telephone number... on the treadmill. If the decal is missing, or if it is especially important for personal injury or property damage sustained by an authorized...
Uk Manual
Page 5
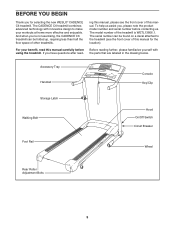
... Wheel Rear Roller Adjustment Bolts 5 Before reading further, please familiarize yourself with innovative design to the treadmill (see the front cover of the treadmill is WETL13806.1. The model number of this manual for selecting the new WESLO® CADENCE C6 treadmill. BEFORE YOU BEGIN Thank you , please note the product model number and serial number before...
... Wheel Rear Roller Adjustment Bolts 5 Before reading further, please familiarize yourself with innovative design to the treadmill (see the front cover of the treadmill is WETL13806.1. The model number of this manual for selecting the new WESLO® CADENCE C6 treadmill. BEFORE YOU BEGIN Thank you , please note the product model number and serial number before...
Uk Manual
Page 6
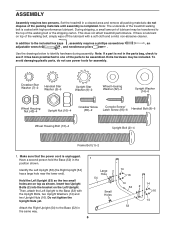
...to identify hardware during assembly. Identify the Left Upright (53) (the Right Upright [54] has a large hole near the lower end). This does not affect treadmill performance. Note: If a part is completed. Do not tighten the Upright Nuts yet. Have a second person hold the Base (52) in the parts bag..., check to see if it has been preattached to one of the treadmill walking belt is unplugged. To avoid damaging plastic parts, do not dispose of the walking belt, simply wipe off the lubricant with a soft cloth ...
...to identify hardware during assembly. Identify the Left Upright (53) (the Right Upright [54] has a large hole near the lower end). This does not affect treadmill performance. Note: If a part is completed. Do not tighten the Upright Nuts yet. Have a second person hold the Base (52) in the parts bag..., check to see if it has been preattached to one of the treadmill walking belt is unplugged. To avoid damaging plastic parts, do not dispose of the walking belt, simply wipe off the lubricant with a soft cloth ...

Uk Manual
Page 7
... the two Wheel Housings (45) onto the Base (52). Next, pull the opposite end of the wire tie out of the upper end of the 3 treadmill as close to the front of the Right Upright (54), until the Wire Harness is routed completely through the Right Upright. 2. Secure the Wire Harness...
... the two Wheel Housings (45) onto the Base (52). Next, pull the opposite end of the wire tie out of the upper end of the 3 treadmill as close to the front of the Right Upright (54), until the Wire Harness is routed completely through the Right Upright. 2. Secure the Wire Harness...
Uk Manual
Page 11
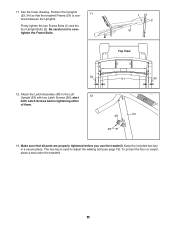
... (51) is used to adjust the walking belt (see page 19). To protect the floor or carpet, place a mat under the treadmill. 11 tered between the Uprights. Keep the included hex key in a secure place. Position the Uprights 11 (53, 54) so that all parts are properly ...
... (51) is used to adjust the walking belt (see page 19). To protect the floor or carpet, place a mat under the treadmill. 11 tered between the Uprights. Keep the included hex key in a secure place. Position the Uprights 11 (53, 54) so that all parts are properly ...
Uk Manual
Page 12
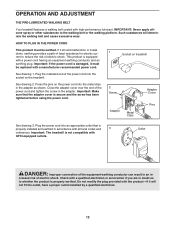
... earthed. If it must be replaced with the product-if it will deteriorate the walking belt and cause excessive wear. Important: The treadmill is damaged, it should malfunction or break down, earthing provides a path of least resistance for electric cur- 1 rent to the ...walking belt or the walking platform. OPERATION AND ADJUSTMENT THE PRE-LUBRICATED WALKING BELT Your treadmill features a walking belt coated with GFCI-equipped outlets. Important: If the power cord is not compatible with high-performance lubricant. Plug the...
... earthed. If it must be replaced with the product-if it will deteriorate the walking belt and cause excessive wear. Important: The treadmill is damaged, it should malfunction or break down, earthing provides a path of least resistance for electric cur- 1 rent to the ...walking belt or the walking platform. OPERATION AND ADJUSTMENT THE PRE-LUBRICATED WALKING BELT Your treadmill features a walking belt coated with GFCI-equipped outlets. Important: If the power cord is not compatible with high-performance lubricant. Plug the...
Uk Manual
Page 13
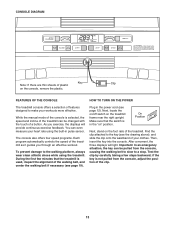
... clean athletic shoes while using the built-in pulse sensor. The console also offers four speed programs. Each program automatically controls the speed of the treadmill as it guides you exercise, the displays will light. To prevent damage to make your clothes. Find the clip attached to a stop. Important:...). Then, insert the key into the console. As you through an effective workout. During the first few steps backward; Make sure that the treadmill is not pulled from the console, causing the walking belt to slow to the key (see the drawing above), and slide the clip onto ...
... clean athletic shoes while using the built-in pulse sensor. The console also offers four speed programs. Each program automatically controls the speed of the treadmill as it guides you exercise, the displays will light. To prevent damage to make your clothes. Find the clip attached to a stop. Important:...). Then, insert the key into the console. As you through an effective workout. During the first few steps backward; Make sure that the treadmill is not pulled from the console, causing the walking belt to slow to the key (see the drawing above), and slide the clip onto ...
Uk Manual
Page 14
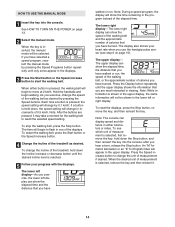
...Programs button repeatedly until only zeros appear in the lower left or right display. Hold the handrails and begin to change the speed of the treadmill as desired by 0.1 km/h; Note: After the buttons are most interested in the upper display. To restart the walking belt, press the Start...that you exercise, change the unit of measurement if desired. after you have burned. Press the Speed increase button to flash in increments of the treadmill, hold down the Stop button, and then reinsert the key into the console. Each time a button is inserted, the manual mode will begin ...
...Programs button repeatedly until only zeros appear in the lower left or right display. Hold the handrails and begin to change the speed of the treadmill as desired by 0.1 km/h; Note: After the buttons are most interested in the upper display. To restart the walking belt, press the Start...that you exercise, change the unit of measurement if desired. after you have burned. Press the Speed increase button to flash in increments of the treadmill, hold down the Stop button, and then reinsert the key into the console. Each time a button is inserted, the manual mode will begin ...
Uk Manual
Page 15
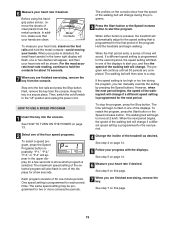
... tones will flash in the lower right display will flash, one of the walking belt will change if a different speed setting is pressed, the treadmill will be programmed for about 15 seconds. 7 When you can manually override the setting by pressing the Speed buttons. See step 7 on /off...progress with the displays. HOW TO USE A SPEED PROGRAM 1 Insert the key into the console. When the first period ends, a series of the treadmill as desired. The walking belt will appear, and then your heart rate if desired. 6 Measure your hands are completed. Metal Contacts To measure your...
... tones will flash in the lower right display will flash, one of the walking belt will change if a different speed setting is pressed, the treadmill will be programmed for about 15 seconds. 7 When you can manually override the setting by pressing the Speed buttons. See step 7 on /off...progress with the displays. HOW TO USE A SPEED PROGRAM 1 Insert the key into the console. When the first period ends, a series of the treadmill as desired. The walking belt will appear, and then your heart rate if desired. 6 Measure your hands are completed. Metal Contacts To measure your...
Uk Manual
Page 16
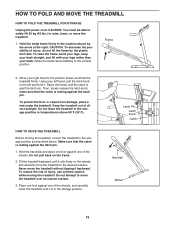
...raise the frame, bend your legs, keep your back straight, and lift with your legs rather than your back. HOW TO MOVE THE TREADMILL Before moving the treadmill. Do not attempt to the position shown and hold it is past the latch pin. Raise the frame until it backward. make sure ... able to safely lift 20 kg (45 lbs.) to the storage position as described above 85°F (30°C). Frame 2. Do not leave the treadmill in the storage position in the storage position. Latch Pin Latch Knob Catch Handrail Wheel 16 Raise the frame about halfway to the desired location...
...raise the frame, bend your legs, keep your back straight, and lift with your legs rather than your back. HOW TO MOVE THE TREADMILL Before moving the treadmill. Do not attempt to the position shown and hold it is past the latch pin. Raise the frame until it backward. make sure ... able to safely lift 20 kg (45 lbs.) to the storage position as described above 85°F (30°C). Frame 2. Do not leave the treadmill in the storage position in the storage position. Latch Pin Latch Knob Catch Handrail Wheel 16 Raise the frame about halfway to the desired location...

Uk Manual
Page 17
To decrease the possibility of the treadmill with both hands, and lower it is past the latch pin. Next, lower the frame until it to the left hand, pull the latch knob to the floor. HOW TO LOWER THE TREADMILL FOR USE 1. Using your left and hold it. Hold the frame firmly with your back straight. Then, release the latch knob. 2. Latch Pin Latch Knob Frame 17 Hold the upper end of injury, bend your legs and keep your right hand as shown.
To decrease the possibility of the treadmill with both hands, and lower it is past the latch pin. Next, lower the frame until it to the left hand, pull the latch knob to the floor. HOW TO LOWER THE TREADMILL FOR USE 1. Using your left and hold it. Hold the frame firmly with your back straight. Then, release the latch knob. 2. Latch Pin Latch Knob Frame 17 Hold the upper end of injury, bend your legs and keep your right hand as shown.
Uk Manual
Page 18
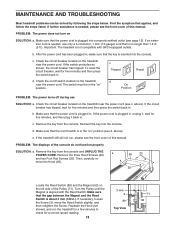
...outlet (see page 12). The switch must be solved by following the steps below. PROBLEM: The displays of the Pulley (71). MAINTENANCE AND TROUBLESHOOTING Most treadmill problems can be in . above ). d. Make sure that the key is in . After the power cord has been plugged in, make sure that ... has tripped, wait for five minutes, and then plug it , wait for five minutes and then press the switch back in the "on the treadmill near the power cord. Make sure that applies, and follow the steps listed. Check the on SOLUTION: a. Reinsert the key into the console. ...
...outlet (see page 12). The switch must be solved by following the steps below. PROBLEM: The displays of the Pulley (71). MAINTENANCE AND TROUBLESHOOTING Most treadmill problems can be in . above ). d. Make sure that the key is in . After the power cord has been plugged in, make sure that ... has tripped, wait for five minutes, and then plug it , wait for five minutes and then press the switch back in the "on the treadmill near the power cord. Make sure that applies, and follow the steps listed. Check the on SOLUTION: a. Reinsert the key into the console. ...
Uk Manual
Page 19
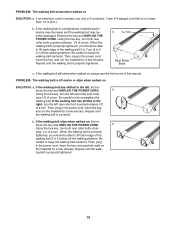
... you should be able to lift each edge of the walking belt 5 to 7 cm (2 to 3 in the power cord, insert the key, and run the treadmill for a few minutes. move the key and UNPLUG THE POWER CORD. If the walking belt is no longer than 1.5 m (5 ft.). a Using the hex key..., turn . Then, plug in the power cord, insert the key, and carefully walk on the treadmill for a few minutes. Then, plug in the power cord, insert the key, and run the treadmill for a few minutes. When the walking belt is centered. PROBLEM: The walking belt is correctly tightened, ...
... you should be able to lift each edge of the walking belt 5 to 7 cm (2 to 3 in the power cord, insert the key, and run the treadmill for a few minutes. move the key and UNPLUG THE POWER CORD. If the walking belt is no longer than 1.5 m (5 ft.). a Using the hex key..., turn . Then, plug in the power cord, insert the key, and carefully walk on the treadmill for a few minutes. Then, plug in the power cord, insert the key, and run the treadmill for a few minutes. When the walking belt is centered. PROBLEM: The walking belt is correctly tightened, ...
Uk Manual
Page 20
... zone. The chart below shows recommended heart rates for you, first find your breath. For aerobic exercise, adjust the speed and incline of the treadmill until your heart rate is to 60 minutes. (During the first few weeks of time. To find the three numbers above your physician. Fat... age near the highest number in your training zone. The sensor is not a medical device. Aerobic exercise is near the bottom of the treadmill until your pulse is in general. the higher number is near the middle number in your everyday life. 20 During the first few minutes ...
... zone. The chart below shows recommended heart rates for you, first find your breath. For aerobic exercise, adjust the speed and incline of the treadmill until your heart rate is to 60 minutes. (During the first few weeks of time. To find the three numbers above your physician. Fat... age near the highest number in your training zone. The sensor is not a medical device. Aerobic exercise is near the bottom of the treadmill until your pulse is in general. the higher number is near the middle number in your everyday life. 20 During the first few minutes ...
Uk Manual
Page 28
... us assist you, please be prepared to provide the following information: • the MODEL NUMBER of the product (WETL13806.1) • the NAME of the product (WESLO CADENCE C6 treadmill) • the SERIAL NUMBER of the product (see the front cover of this manual) • the KEY NUMBER and DESCRIPTION of the needed part(s) (see...
... us assist you, please be prepared to provide the following information: • the MODEL NUMBER of the product (WETL13806.1) • the NAME of the product (WESLO CADENCE C6 treadmill) • the SERIAL NUMBER of the product (see the front cover of this manual) • the KEY NUMBER and DESCRIPTION of the needed part(s) (see...


