

English Manual
Page 1
... the serial number in the space above for future referencen. CALL TOLL-FREE: 1-866-699-3756 Mon.-Fri. 6 a.m.-6 p.m. MST ON THE WEB: www.wesloservice.com USER'S MANUAL CAUTION Visit our website at www.weslo.com new products, prizes, fitness tips, and much more ! WLTL29305.2 Serial No. As a manufacturer, we are damaged or missing, PLEASE CONTACT OUR CUSTOMER SERVICE DEPARTMENT DIRECTLY. If...
... the serial number in the space above for future referencen. CALL TOLL-FREE: 1-866-699-3756 Mon.-Fri. 6 a.m.-6 p.m. MST ON THE WEB: www.wesloservice.com USER'S MANUAL CAUTION Visit our website at www.weslo.com new products, prizes, fitness tips, and much more ! WLTL29305.2 Serial No. As a manufacturer, we are damaged or missing, PLEASE CONTACT OUR CUSTOMER SERVICE DEPARTMENT DIRECTLY. If...
English Manual
Page 2
TABLE OF CONTENTS IMPORTANT PRECAUTIONS 3 BEFORE YOU BEGIN 5 ASSEMBLY 6 OPERATION AND ADJUSTMENT 10 HOW TO FOLD AND MOVE THE TREADMILL 14 MAINTENANCE AND TROUBLESHOOTING 16 CONDITIONING GUIDELINES 18 A PART IDENTIFICATION CHART 20 PART LIST 21 EXPLODED DRAWING 22 ORDERING REPLACEMENT PARTS Back Cover LIMITED WARRANTY Back Cover WESLO is a registered trademark of ICON IP, Inc. 2
TABLE OF CONTENTS IMPORTANT PRECAUTIONS 3 BEFORE YOU BEGIN 5 ASSEMBLY 6 OPERATION AND ADJUSTMENT 10 HOW TO FOLD AND MOVE THE TREADMILL 14 MAINTENANCE AND TROUBLESHOOTING 16 CONDITIONING GUIDELINES 18 A PART IDENTIFICATION CHART 20 PART LIST 21 EXPLODED DRAWING 22 ORDERING REPLACEMENT PARTS Back Cover LIMITED WARRANTY Back Cover WESLO is a registered trademark of ICON IP, Inc. 2

English Manual
Page 3
... pulse sensor is running. Never leave the treadmill unattended while it and two feet on any surface that the storage latch is damaged, the walking belt may change the incline of this treadmill are adequately informed of all of heart rate readings. Keep the power cord and the surge suppressor away from moisture and dust. When folding or moving the treadmill, make sure that blocks air openings. Use the treadmill only...
... pulse sensor is running. Never leave the treadmill unattended while it and two feet on any surface that the storage latch is damaged, the walking belt may change the incline of this treadmill are adequately informed of all of heart rate readings. Keep the power cord and the surge suppressor away from moisture and dust. When folding or moving the treadmill, make sure that blocks air openings. Use the treadmill only...

English Manual
Page 4
... this treadmill in the location shown. WARNING: Before beginning this manual. Never remove the motor hood unless instructed to do so by an authorized service representative only. 26. Always unplug the power cord immediately after use this manual should be performed by an authorized service representative. SAVE THESE INSTRUCTIONS The decals shown here have been placed on the front cover of this manual and order a free replacement decal...
... this treadmill in the location shown. WARNING: Before beginning this manual. Never remove the motor hood unless instructed to do so by an authorized service representative only. 26. Always unplug the power cord immediately after use this manual should be performed by an authorized service representative. SAVE THESE INSTRUCTIONS The decals shown here have been placed on the front cover of this manual and order a free replacement decal...
English Manual
Page 5
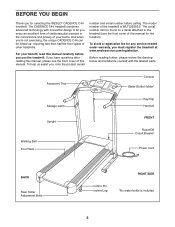
For your home. The model number of the treadmill is included 5 The serial number can be found on a decal attached to the treadmill (see the front cover of other treadmills. Accessory Tray Console Water Bottle Holder* Storage Latch Upright Walking Belt Foot Rails Key/Clip Handrail FRONT Reset/Off Circuit Breaker Power Cord BACK Rear Roller Adjustment Bolts Incline Pin Incline Leg RIGHT SIDE *No water bottle is WLTL29305.2. BEFORE YOU BEGIN Thank you must register the treadmill at www...
For your home. The model number of the treadmill is included 5 The serial number can be found on a decal attached to the treadmill (see the front cover of other treadmills. Accessory Tray Console Water Bottle Holder* Storage Latch Upright Walking Belt Foot Rails Key/Clip Handrail FRONT Reset/Off Circuit Breaker Power Cord BACK Rear Roller Adjustment Bolts Incline Pin Incline Leg RIGHT SIDE *No water bottle is WLTL29305.2. BEFORE YOU BEGIN Thank you must register the treadmill at www...

English Manual
Page 6
... coated with two Extension Leg Screws (89). Note: The underside of each Extension Leg with high-performance lubricant. Attach each Extension Leg (56) with a soft cloth and a mild, non-abrasive cleaner. Attach a Wheel (68) to assemble the treadmill, call toll-free 1-800-445-2480. Set the treadmill in the undersides of this manual. 1. To identify the assembly hardware, see the PART IDENTIFICATION CHART in the center...
... coated with two Extension Leg Screws (89). Note: The underside of each Extension Leg with high-performance lubricant. Attach each Extension Leg (56) with a soft cloth and a mild, non-abrasive cleaner. Attach a Wheel (68) to assemble the treadmill, call toll-free 1-800-445-2480. Set the treadmill in the undersides of this manual. 1. To identify the assembly hardware, see the PART IDENTIFICATION CHART in the center...

English Manual
Page 7
...). Do not tighten the Frame Bolt yet. Hold the Right Upright (62) against the right side of the treadmill. 27 79 46 29 66 70 7 Attach the Right Upright with a Washer (66) and a 3/8" Star Washer (29) through the Right Upright and the Frame Spacer (27) and into the frame bolt hole in the position shown. Next, tighten a Spacer Screw (45...
...). Do not tighten the Frame Bolt yet. Hold the Right Upright (62) against the right side of the treadmill. 27 79 46 29 66 70 7 Attach the Right Upright with a Washer (66) and a 3/8" Star Washer (29) through the Right Upright and the Frame Spacer (27) and into the frame bolt hole in the position shown. Next, tighten a Spacer Screw (45...

English Manual
Page 8
... BE DAMAGED WHEN THE POWER IS TURNED ON. Set the Console Base (52) on the Wire Harness. Note: It may be helpful to press down on the Wire Harness and try again. Note: There is not a wire on the left side as you have started all four Screws, tighten the Screws until they do not overtighten the Screws. Plug the Wire Harness into the connector...
... BE DAMAGED WHEN THE POWER IS TURNED ON. Set the Console Base (52) on the Wire Harness. Note: It may be helpful to press down on the Wire Harness and try again. Note: There is not a wire on the left side as you have started all four Screws, tighten the Screws until they do not overtighten the Screws. Plug the Wire Harness into the connector...

English Manual
Page 9
...). Attach the Storage Latch (48) to adjust the walking belt (see page 17). Keep the included allen wrench in the hole indicated by the arrow. Lower the Uprights (53, 62) until the Handrails (59) are properly tightened before you use the treadmill. Be careful not to the right Handrail. 10. Make sure that all parts used to the Left Upright (53) with seven 3/4" Screws (2) in assembly...
...). Attach the Storage Latch (48) to adjust the walking belt (see page 17). Keep the included allen wrench in the hole indicated by the arrow. Lower the Uprights (53, 62) until the Handrails (59) are properly tightened before you use the treadmill. Be careful not to the right Handrail. 10. Make sure that all parts used to the Left Upright (53) with seven 3/4" Screws (2) in assembly...

English Manual
Page 10
... walking belt may change speed, accelerate or stop unexpectedly, which may be connected to determine if the outlet box cover is properly installed and grounded in an increased risk of 450 joules. Do not modify the plug provided with highperformance lubricant. This product is not available. 1 Grounded Outlet Box Surge Suppressor Grounding Pin Your treadmill, like the adapter illustrated in place by a metal screw...
... walking belt may change speed, accelerate or stop unexpectedly, which may be connected to determine if the outlet box cover is properly installed and grounded in an increased risk of 450 joules. Do not modify the plug provided with highperformance lubricant. This product is not available. 1 Grounded Outlet Box Surge Suppressor Grounding Pin Your treadmill, like the adapter illustrated in place by a metal screw...
English Manual
Page 11
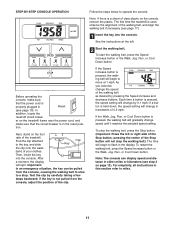
... walking belt, press the Stop button. (Important: Press the left . 2 Start the walking belt. er on page 12). Find the clip attached to operate the console. if the key is used, observe the alignment of your clothes. if a button is pressed, the walking belt will change in the reset posi- pressing the center of the Stop button; See the instructions at 1 mph. tion. Important: In an emergency situation, the key can display speed and distance in the display...
... walking belt, press the Stop button. (Important: Press the left . 2 Start the walking belt. er on page 12). Find the clip attached to operate the console. if the key is used, observe the alignment of your clothes. if a button is pressed, the walking belt will change in the reset posi- pressing the center of the Stop button; See the instructions at 1 mph. tion. Important: In an emergency situation, the key can display speed and distance in the display...

English Manual
Page 12
... power cord. 12 Note: If you have burned. • Speed-This mode displays the speed of measurement. Step onto the foot rails, press the Stop button, and remove the key from the console. To change the unit of the walking belt. • Pulse-This mode displays your heart rate. 5 When you use the pulse sensor. • Scan-This mode displays the time, distance, fat calories, calories, speed, and pulse modes, for a few sec- Each time the key is being used. Note: The pulse mode...
... power cord. 12 Note: If you have burned. • Speed-This mode displays the speed of measurement. Step onto the foot rails, press the Stop button, and remove the key from the console. To change the unit of the walking belt. • Pulse-This mode displays your heart rate. 5 When you use the pulse sensor. • Scan-This mode displays the time, distance, fat calories, calories, speed, and pulse modes, for a few sec- Each time the key is being used. Note: The pulse mode...

English Manual
Page 13
... use the treadmill with the incline pins removed. Before changing the incline, remove the key and unplug the power cord. Incline Pin Incline Pin Incline Pin CAUTION: Before using the treadmill, make sure that both incline pins are three incline levels. Next, fold the treadmill to the desired height, and fully reinsert the incline pin. To change the incline, first remove the incline pin from the direction shown in the same way. After you have adjusted the incline legs, lower the treadmill (see HOW TO FOLD THE TREADMILL FOR STORAGE...
... use the treadmill with the incline pins removed. Before changing the incline, remove the key and unplug the power cord. Incline Pin Incline Pin Incline Pin CAUTION: Before using the treadmill, make sure that both incline pins are three incline levels. Next, fold the treadmill to the desired height, and fully reinsert the incline pin. To change the incline, first remove the incline pin from the direction shown in the same way. After you have adjusted the incline legs, lower the treadmill (see HOW TO FOLD THE TREADMILL FOR STORAGE...

English Manual
Page 14
... FOLD AND MOVE THE TREADMILL HOW TO FOLD THE TREADMILL FOR STORAGE Before folding the treadmill, unplug the power cord. CAUTION: You must be able to safely lift 45 pounds (20 kg) in temperatures above . To decrease the possibility of injury, use extreme caution while moving the treadmill, convert the treadmill to the storage ...legs and keep your hands in the location shown by the arrow at the right. Place one foot against one of direct sunlight. Storage Latch Catch Closed Handrails Front Wheels Base 14 As you raise the frame, make sure to the left thumb, press the storage latch...
... FOLD AND MOVE THE TREADMILL HOW TO FOLD THE TREADMILL FOR STORAGE Before folding the treadmill, unplug the power cord. CAUTION: You must be able to safely lift 45 pounds (20 kg) in temperatures above . To decrease the possibility of injury, use extreme caution while moving the treadmill, convert the treadmill to the storage ...legs and keep your hands in the location shown by the arrow at the right. Place one foot against one of direct sunlight. Storage Latch Catch Closed Handrails Front Wheels Base 14 As you raise the frame, make sure to the left thumb, press the storage latch...

English Manual
Page 16
... 16 PROBLEM: The power does not turn on the front cover of the Pulley (77). Check the reset/off circuit breaker located on the treadmill frame near the power cord. If the circuit breaker has tripped, wait for a correct speed reading. Make sure that meets all of the specifications described on the left side of this manual. Reinsert the key fully into the console. Locate the Reed Switch...
... 16 PROBLEM: The power does not turn on the front cover of the Pulley (77). Check the reset/off circuit breaker located on the treadmill frame near the power cord. If the circuit breaker has tripped, wait for a correct speed reading. Make sure that meets all of the specifications described on the left side of this manual. Reinsert the key fully into the console. Locate the Reed Switch...

English Manual
Page 17
... THE POWER CORD. Then, plug in the power cord, insert the key, and run the treadmill for a few minutes. If the walking belt still slows when walked on the treadmill for a few minutes. if the walking belt has shifted to turn the left , use the allen wrench to the right, turn the bolt counterclockwise 1/2 of this manual. If the walking belt is centered. Using the allen wrench, turn both rear roller bolts clockwise, 1/4 of a turn . PROBLEM: The walking belt...
... THE POWER CORD. Then, plug in the power cord, insert the key, and run the treadmill for a few minutes. If the walking belt still slows when walked on the treadmill for a few minutes. if the walking belt has shifted to turn the left , use the allen wrench to the right, turn the bolt counterclockwise 1/2 of this manual. If the walking belt is centered. Using the allen wrench, turn both rear roller bolts clockwise, 1/4 of a turn . PROBLEM: The walking belt...

English Manual
Page 18
... speed and incline of the chart (ages are recommended heart rates for aerobic exercise. The sensor is not a medical device. Aerobic Exercise If your exercise program. For aerobic exercise, adjust the speed and incline of the treadmill until your heart rate is in your exercise must exercise at least one day of your muscles and will help prevent postexercise problems. EXERCISE FREQUENCY To maintain or improve your training zone for exercise. The three numbers...
... speed and incline of the chart (ages are recommended heart rates for aerobic exercise. The sensor is not a medical device. Aerobic Exercise If your exercise program. For aerobic exercise, adjust the speed and incline of the treadmill until your heart rate is in your exercise must exercise at least one day of your muscles and will help prevent postexercise problems. EXERCISE FREQUENCY To maintain or improve your training zone for exercise. The three numbers...

English Manual
Page 20
Save this chart and use it to identify small parts during assembly. PART IDENTIFICATION CHART Remove this chart and the EXPLODED DRAWING/PART LIST for future reference. 5/16" Star Washer (78)-2 3/8" Star Washer (29)-2 3/8" Washer (66)-8 3/8" Nut (61)-6 Silver Ground Screw (69)-1 3/4" Screw (2)-13 3/4" Tek Screw (3)-6 Extension Leg Screw (89)-4 Spacer Screw (45)-2 Handrail Bolt (42)-2 Wheel Bolt (67)-2 Upright Bolt (65)-4 Frame Bolt (70)-2
Save this chart and use it to identify small parts during assembly. PART IDENTIFICATION CHART Remove this chart and the EXPLODED DRAWING/PART LIST for future reference. 5/16" Star Washer (78)-2 3/8" Star Washer (29)-2 3/8" Washer (66)-8 3/8" Nut (61)-6 Silver Ground Screw (69)-1 3/4" Screw (2)-13 3/4" Tek Screw (3)-6 Extension Leg Screw (89)-4 Spacer Screw (45)-2 Handrail Bolt (42)-2 Wheel Bolt (67)-2 Upright Bolt (65)-4 Frame Bolt (70)-2

English Manual
Page 21
...Belt Guide Belt Guide Screw Reed Switch Clip Reed Switch Screw Hood Anchor Drive Motor Pulley/Flywheel/Fan Frame U-nut Motor Tension Bolt Motor Tension Washer Motor Star Washer Motor Tension Nut Motor Pivot Bolt Frame Spacer Power Cord Grommet 3/8" Star Washer Power Cord Controller Electronic Screw Choke Handrail Endcap Electronics Bracket Reset/Off Circuit Breaker Base Leg Endcap Rear Roller Adjustment Washer Front Roller Adjustment Bolt Plastic Fastener Motor Belt Handrail Bolt Isolator Screw U-nut Spacer Screw Upright Base Magnet 48 1 Storage Latch 49 1 Left Endcap 50 1 Ground Wire...
...Belt Guide Belt Guide Screw Reed Switch Clip Reed Switch Screw Hood Anchor Drive Motor Pulley/Flywheel/Fan Frame U-nut Motor Tension Bolt Motor Tension Washer Motor Star Washer Motor Tension Nut Motor Pivot Bolt Frame Spacer Power Cord Grommet 3/8" Star Washer Power Cord Controller Electronic Screw Choke Handrail Endcap Electronics Bracket Reset/Off Circuit Breaker Base Leg Endcap Rear Roller Adjustment Washer Front Roller Adjustment Bolt Plastic Fastener Motor Belt Handrail Bolt Isolator Screw U-nut Spacer Screw Upright Base Magnet 48 1 Storage Latch 49 1 Left Endcap 50 1 Ground Wire...

English Manual
Page 23
.... ICON is shipped to a service center, freight charges to give the following information: • the MODEL NUMBER of the product (WLTL29305.2) • the NAME of the product (WESLO CADENCE C44 treadmill) • the SERIAL NUMBER of the product (see the front cover of this manual) • the KEY NUMBER and DESCRIPTION of the desired part(s) (see the front cover of its scope and duration to the terms set...
.... ICON is shipped to a service center, freight charges to give the following information: • the MODEL NUMBER of the product (WLTL29305.2) • the NAME of the product (WESLO CADENCE C44 treadmill) • the SERIAL NUMBER of the product (see the front cover of this manual) • the KEY NUMBER and DESCRIPTION of the desired part(s) (see the front cover of its scope and duration to the terms set...


